Getting started with Paidlio
From an empty app to an invoice that is paid, in 37 short steps. Click the highlighted button in each screenshot, or use Next, and the guide moves on the way the app would.
Already installed it? Jump to the chapter you need. Every screen here is the real app, running the trial you can download here.
The guide, step by step
Set up your businessStep 1 of 3
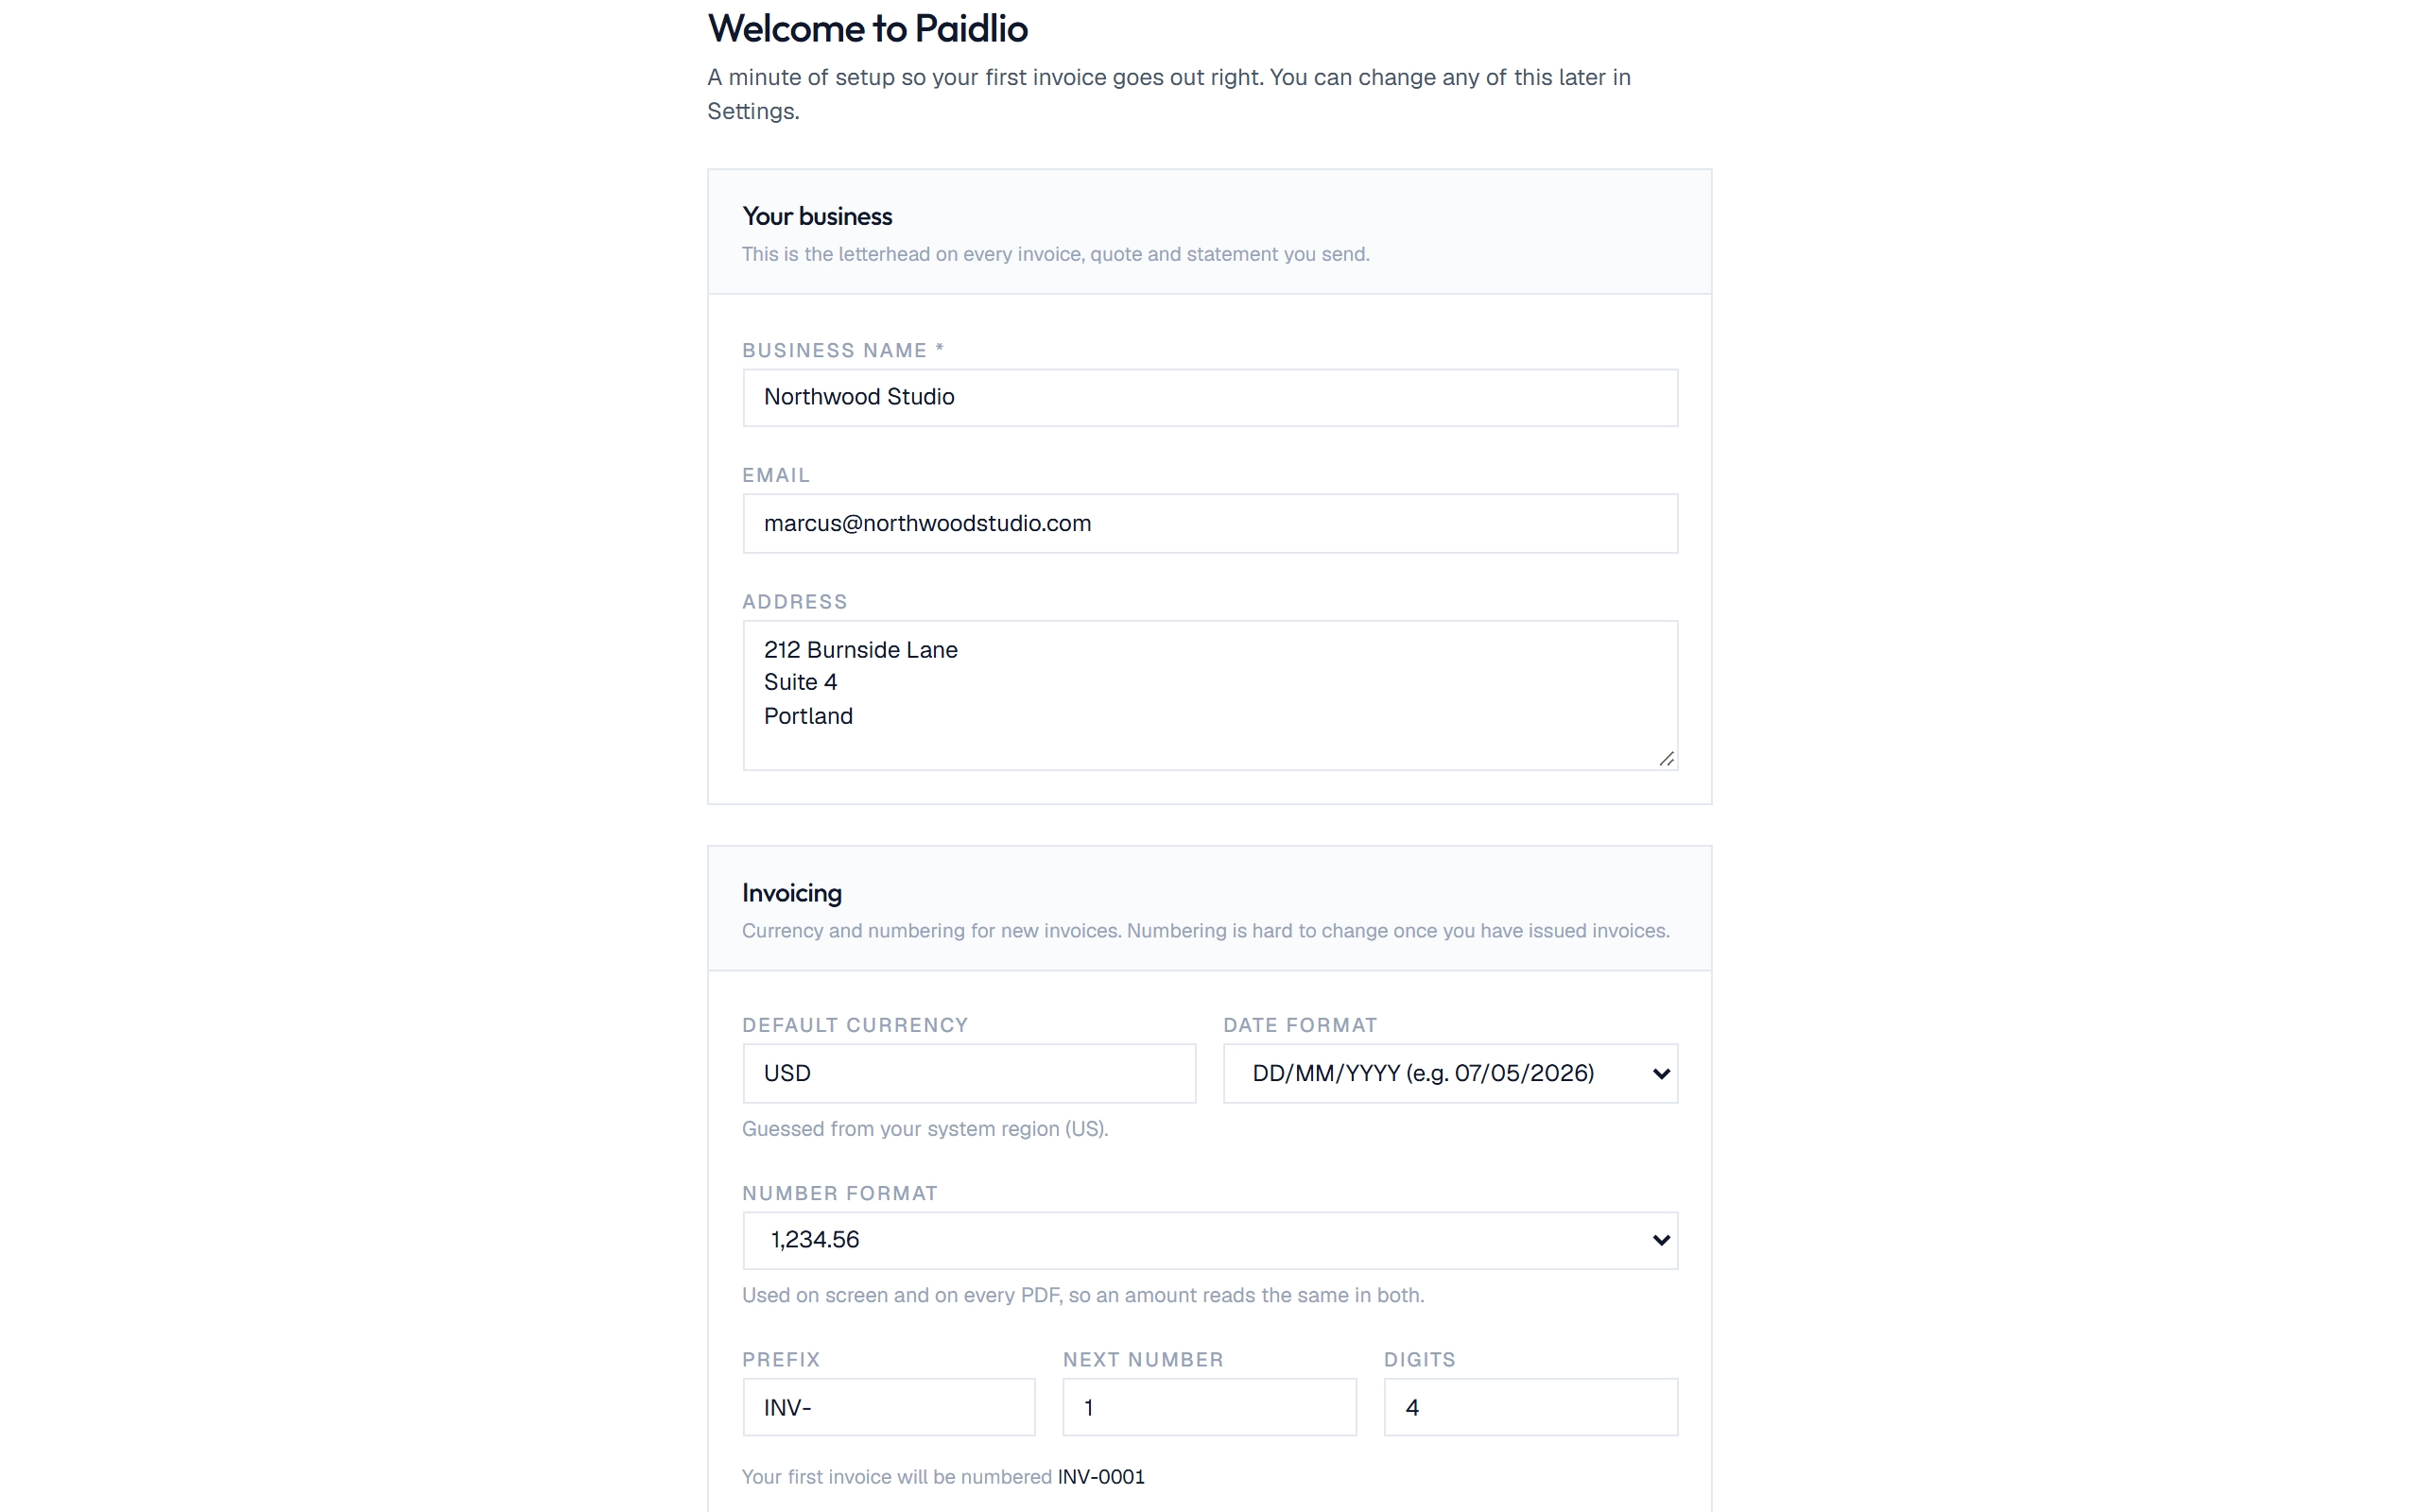
Start with your business name
The first time Paidlio opens it asks who you are. Your business name, email and address become the letterhead on every invoice, quote and statement you send, so this screen is worth the minute it takes.
Set up your businessStep 2 of 3
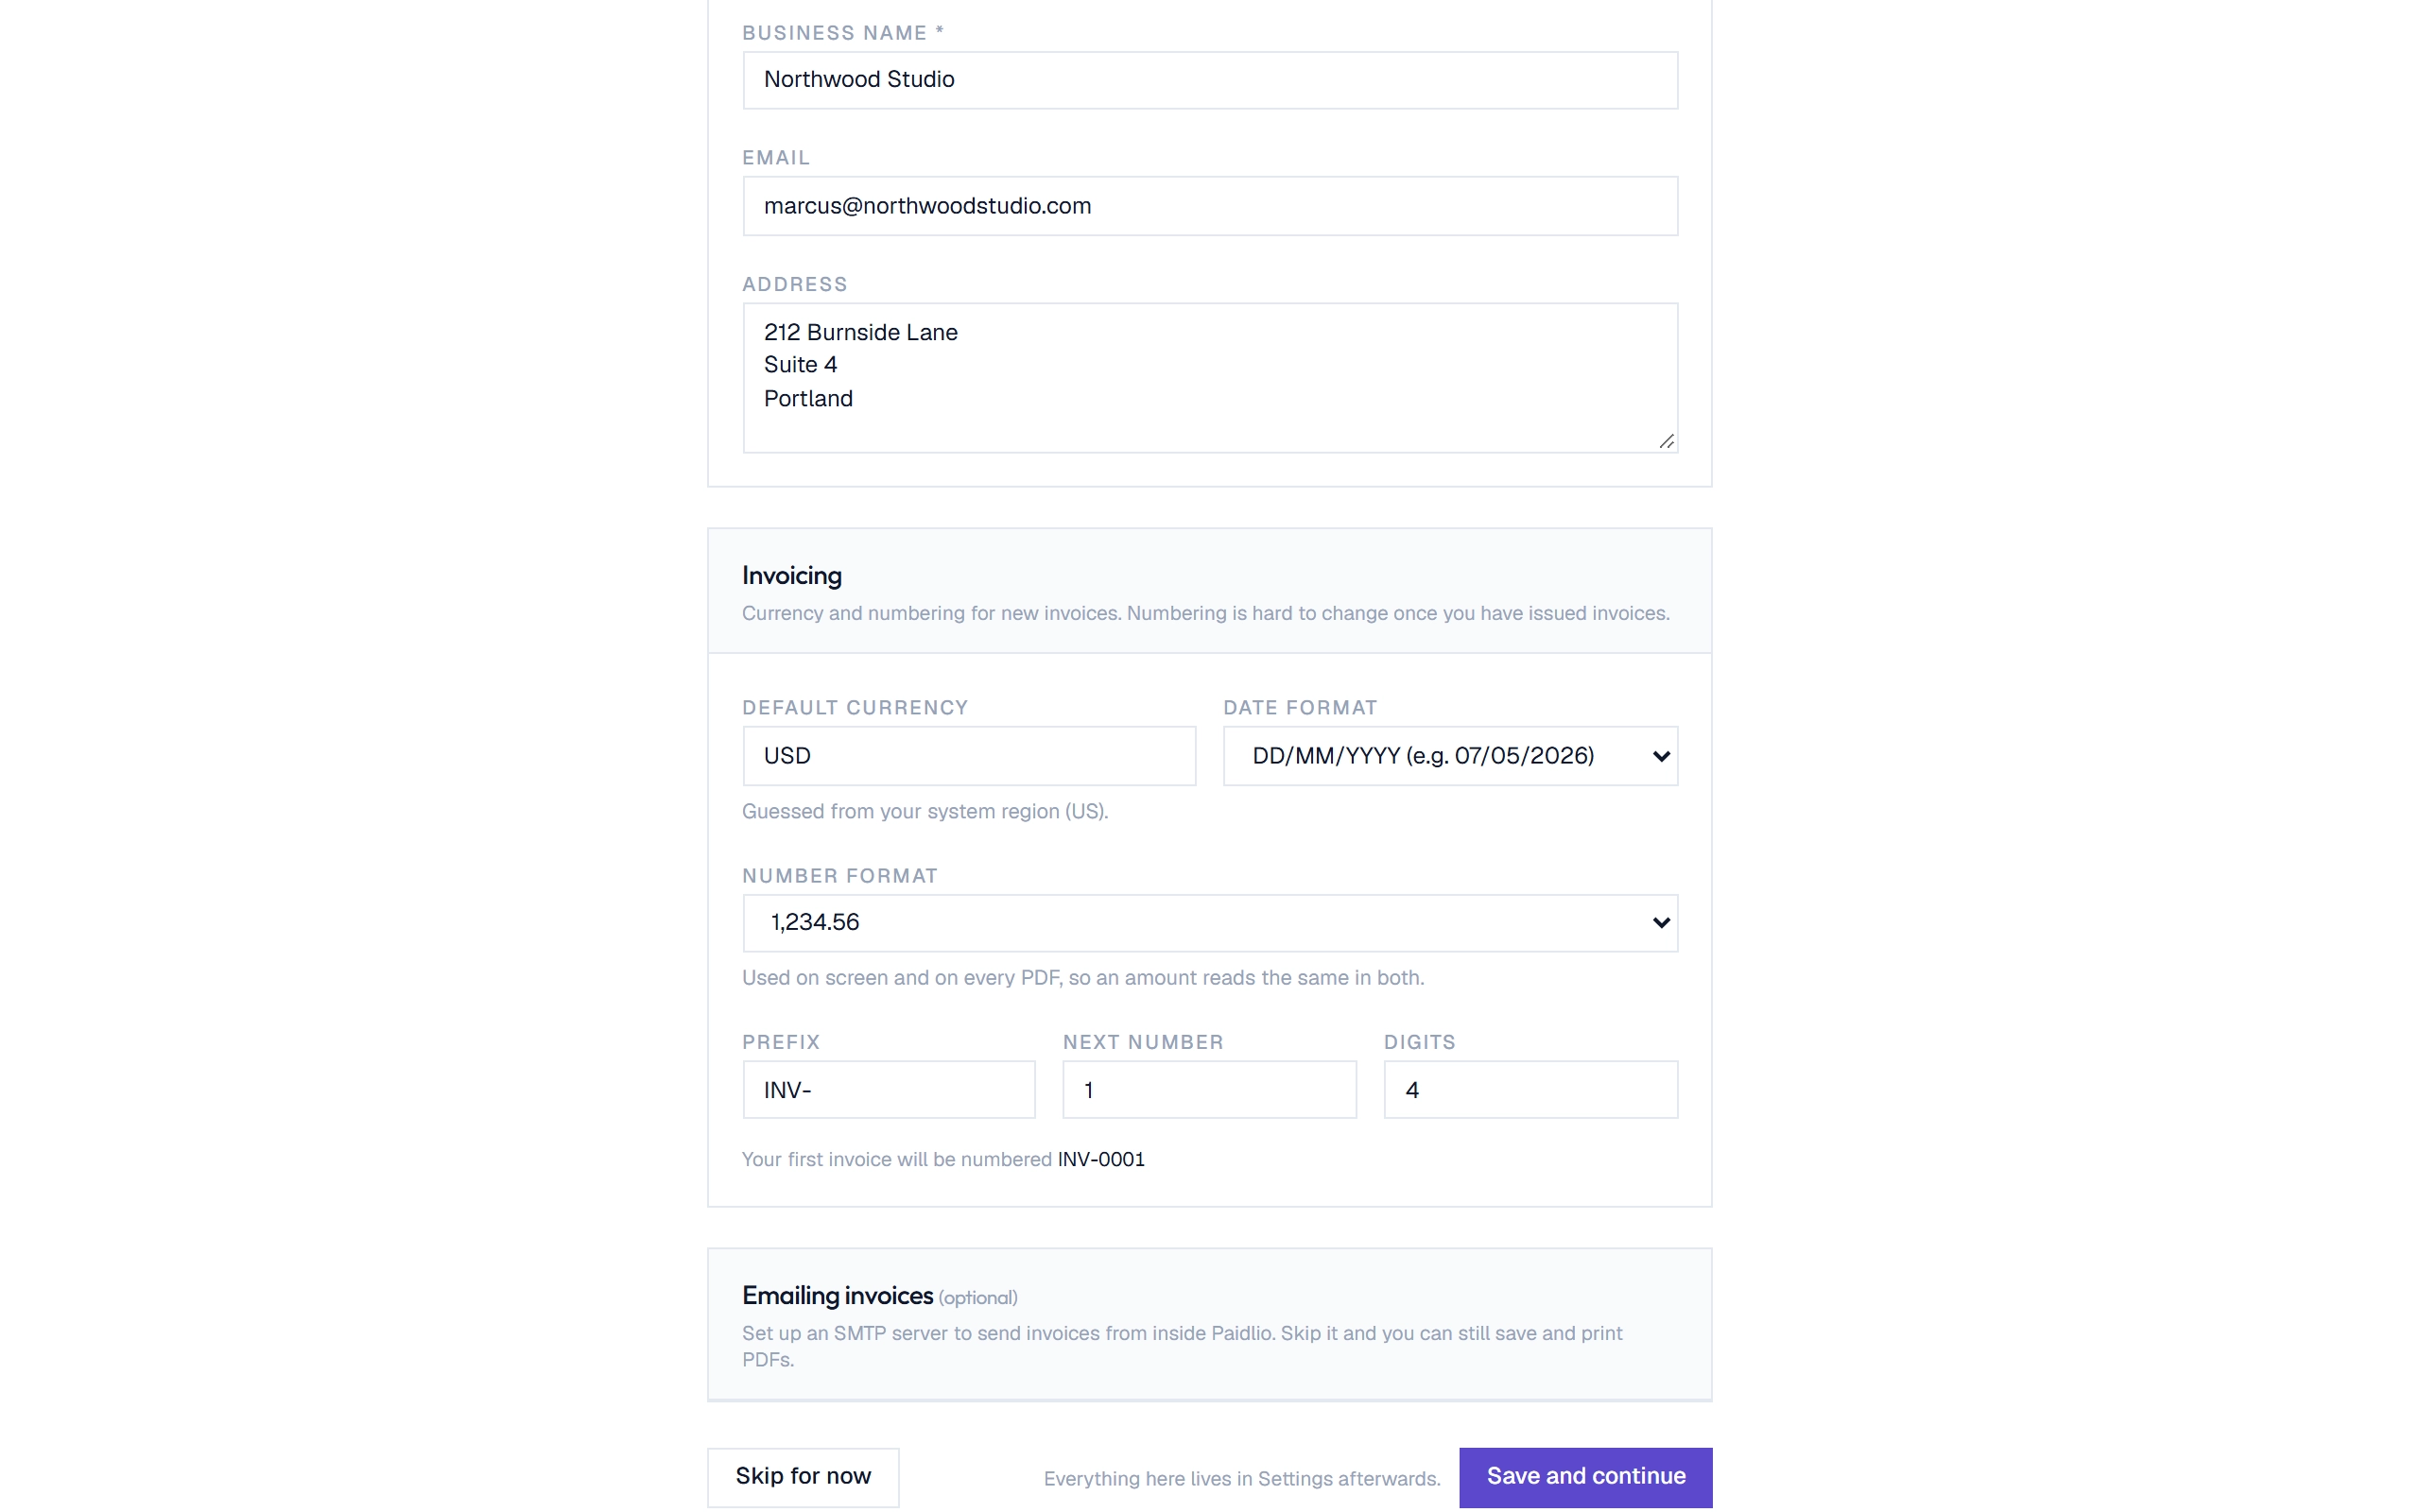
Pick your currency and formats
Paidlio suggests a currency and date format from the regional settings on your computer, and you can change either. Amounts are written the same way on screen and on every PDF. If you are carrying on from another system, set the prefix and the next number, and your first invoice number is shown underneath.
Set up your businessStep 3 of 3
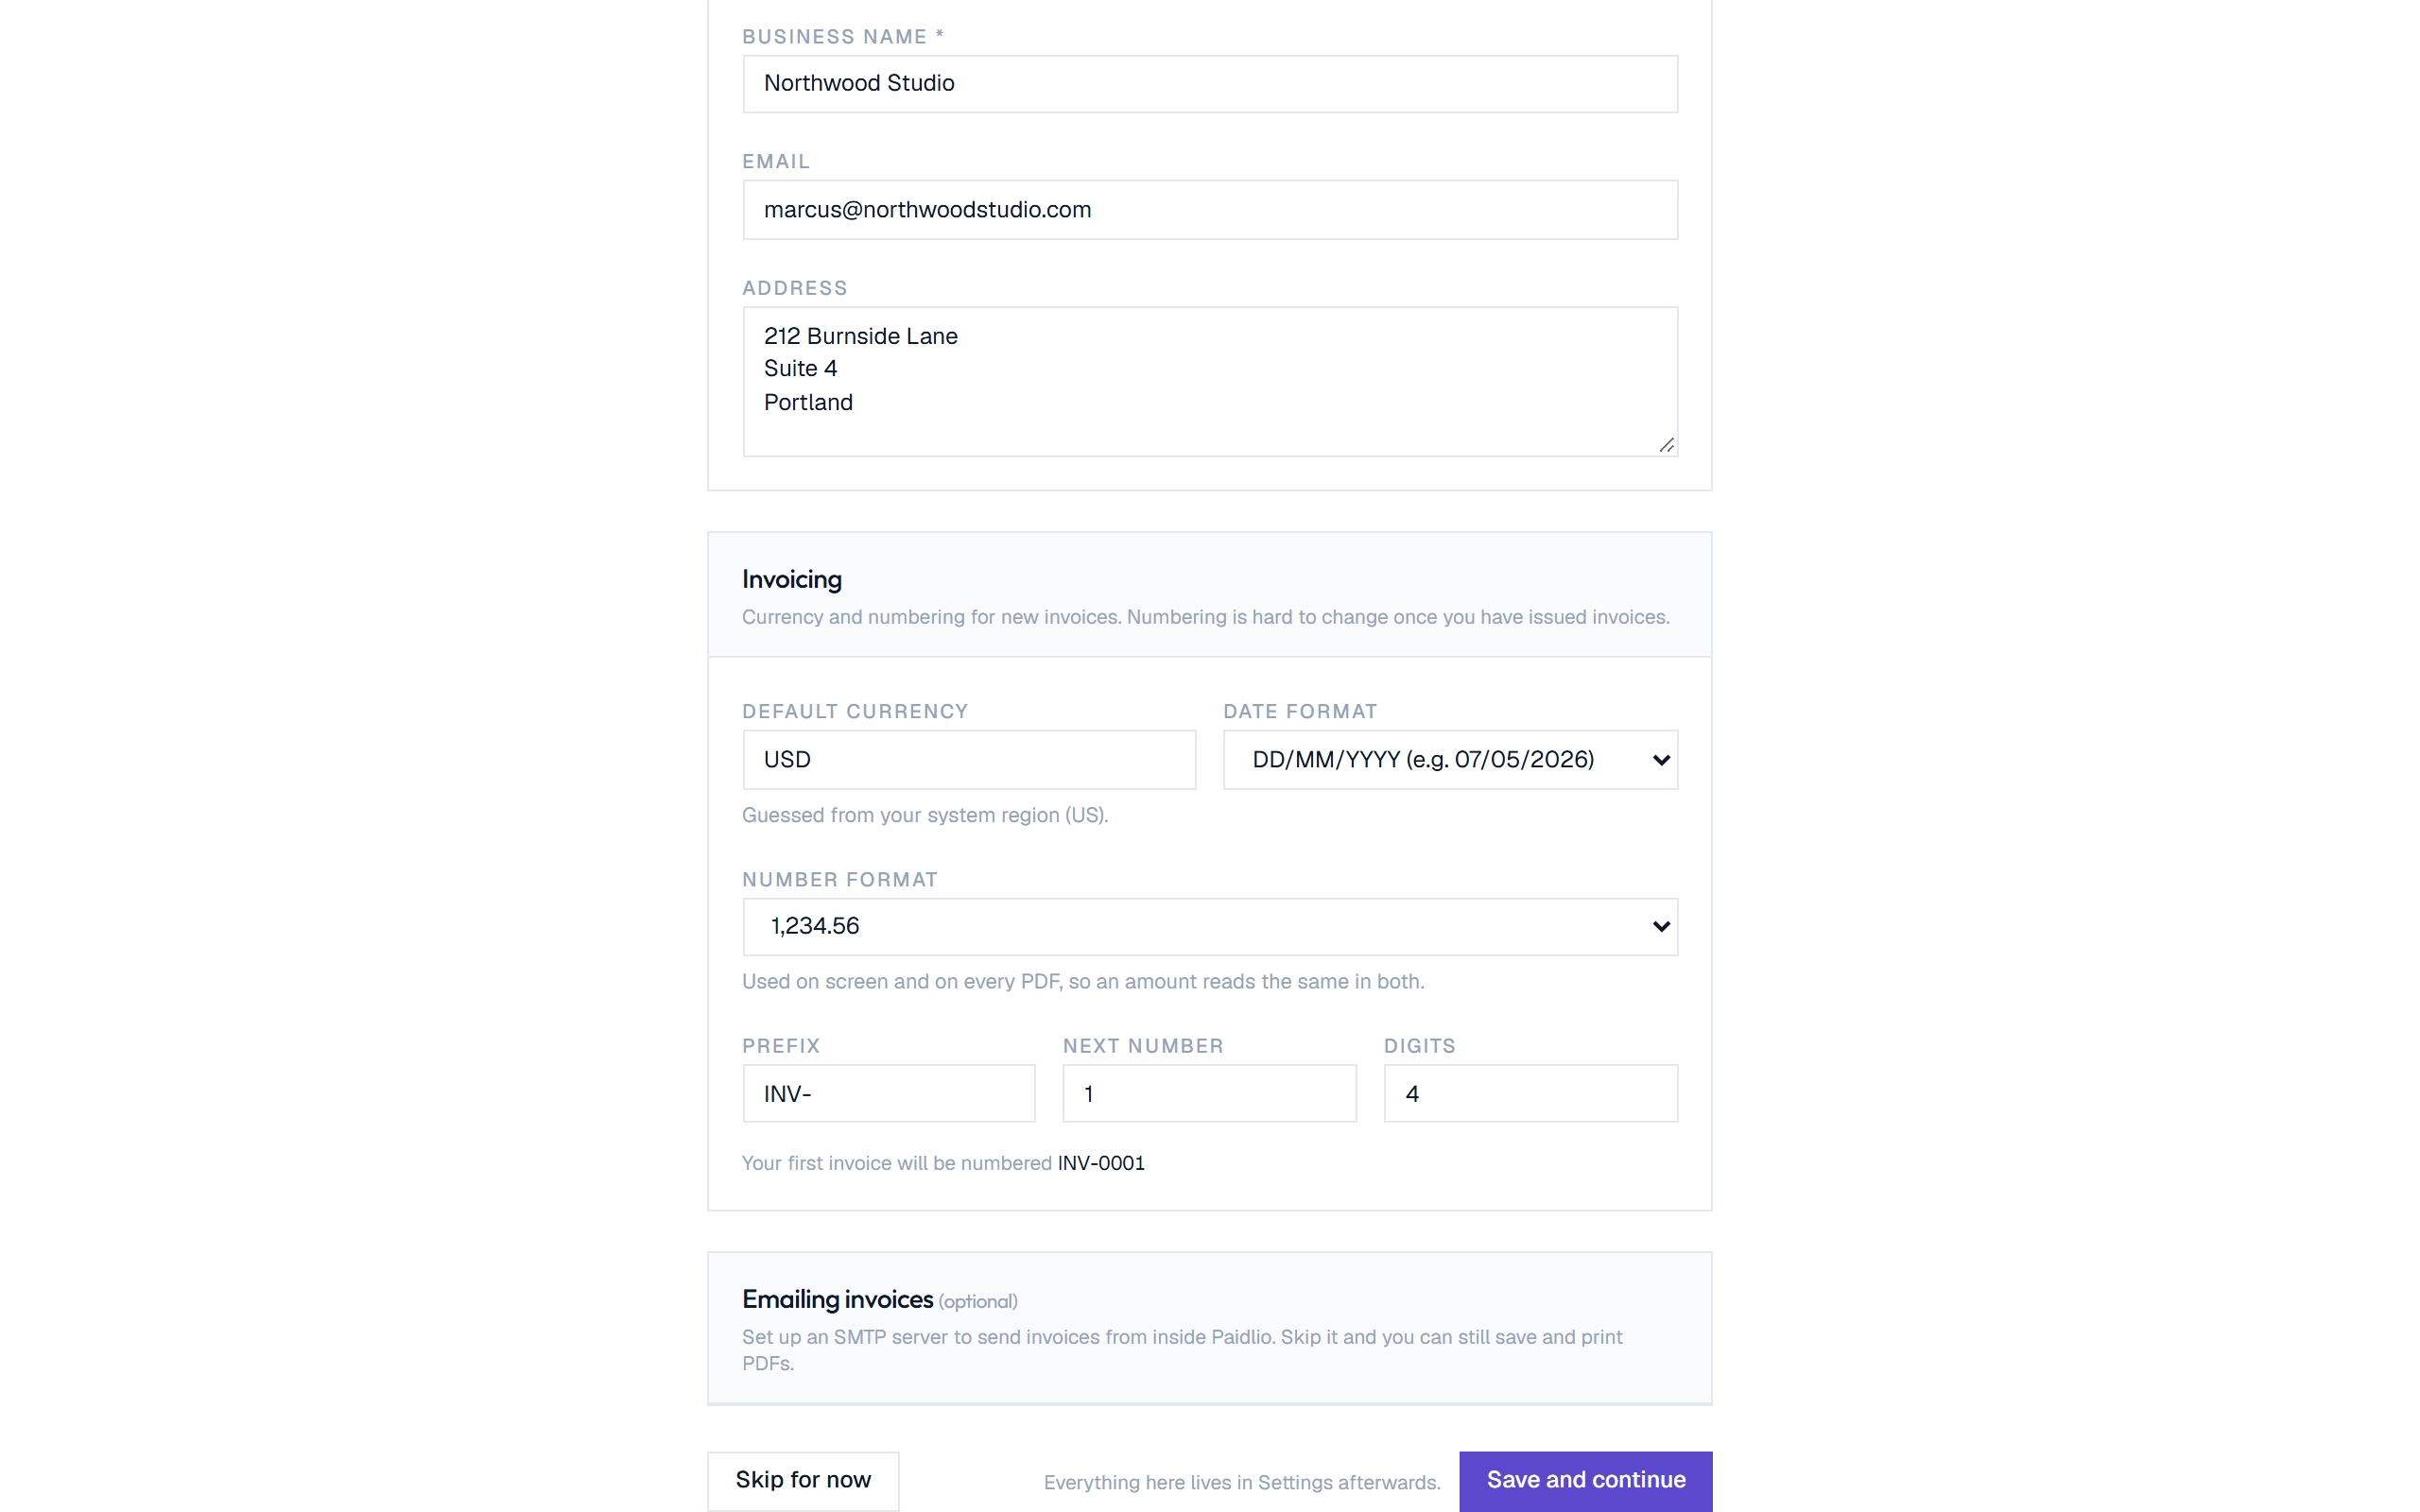
Save and you are in
Everything on this screen can be changed later under Settings. Emailing invoices from inside the app is optional. Set it up now, or skip it and save your invoices as PDFs.
Make the invoice yoursStep 1 of 3
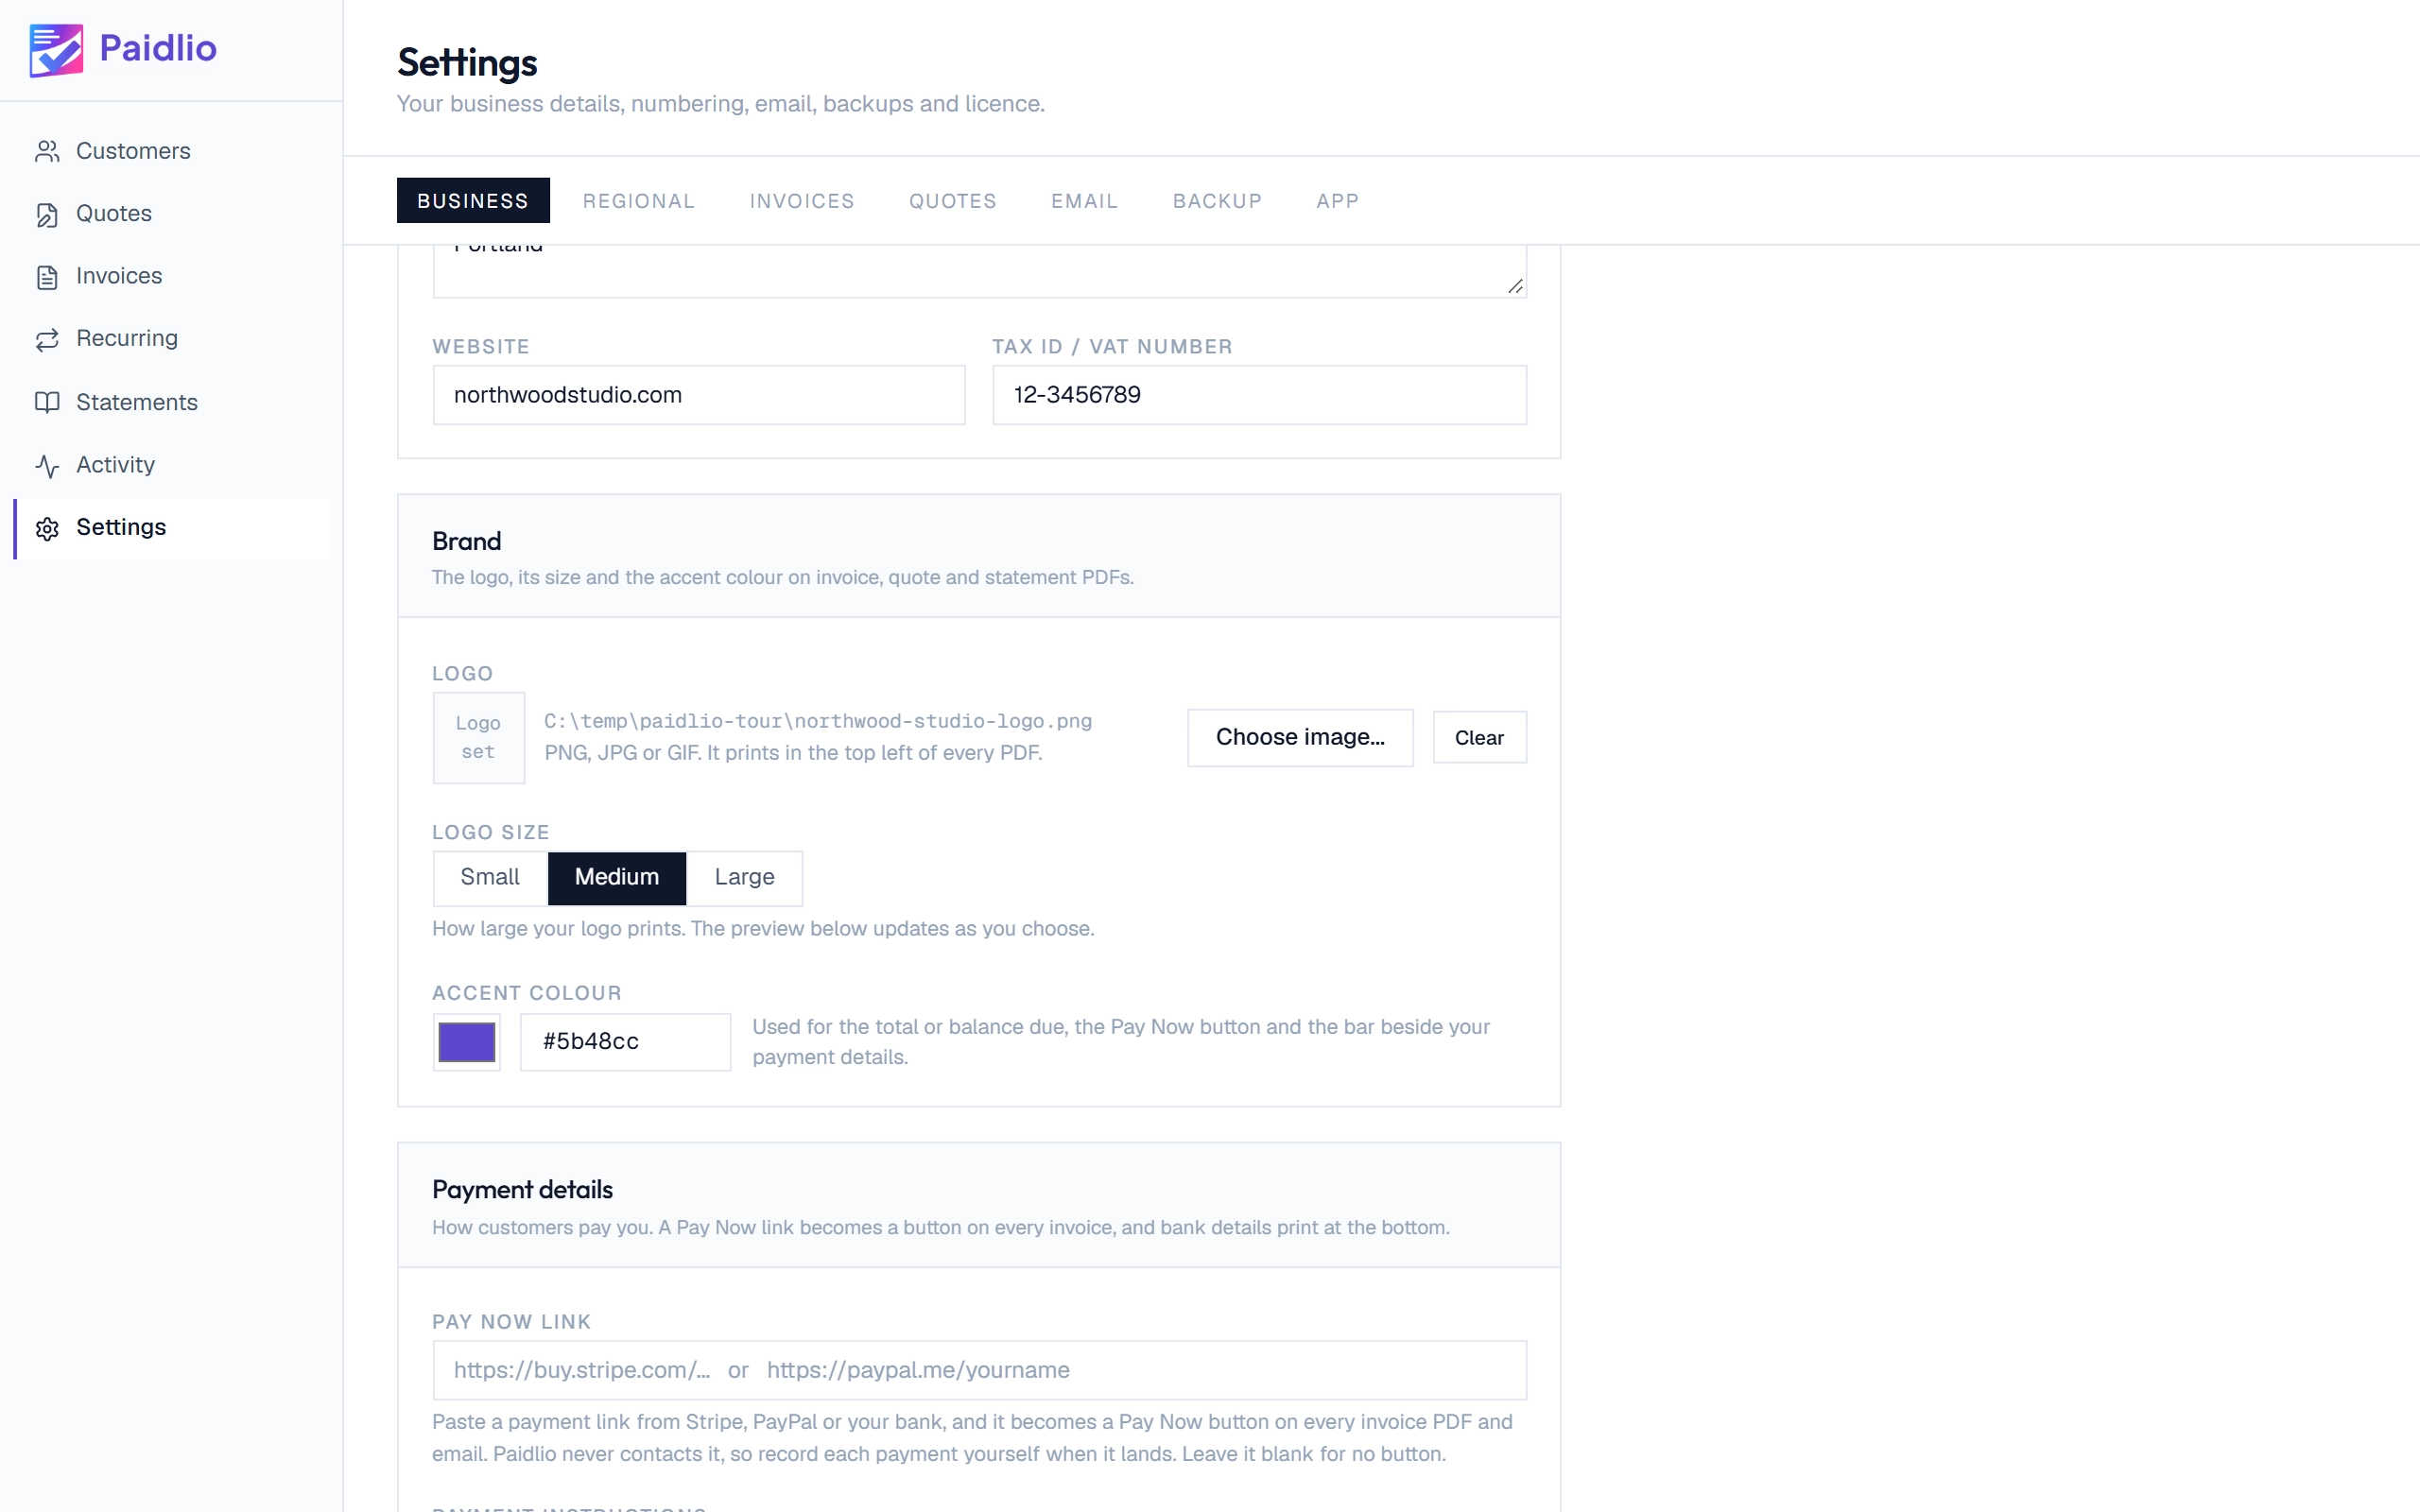
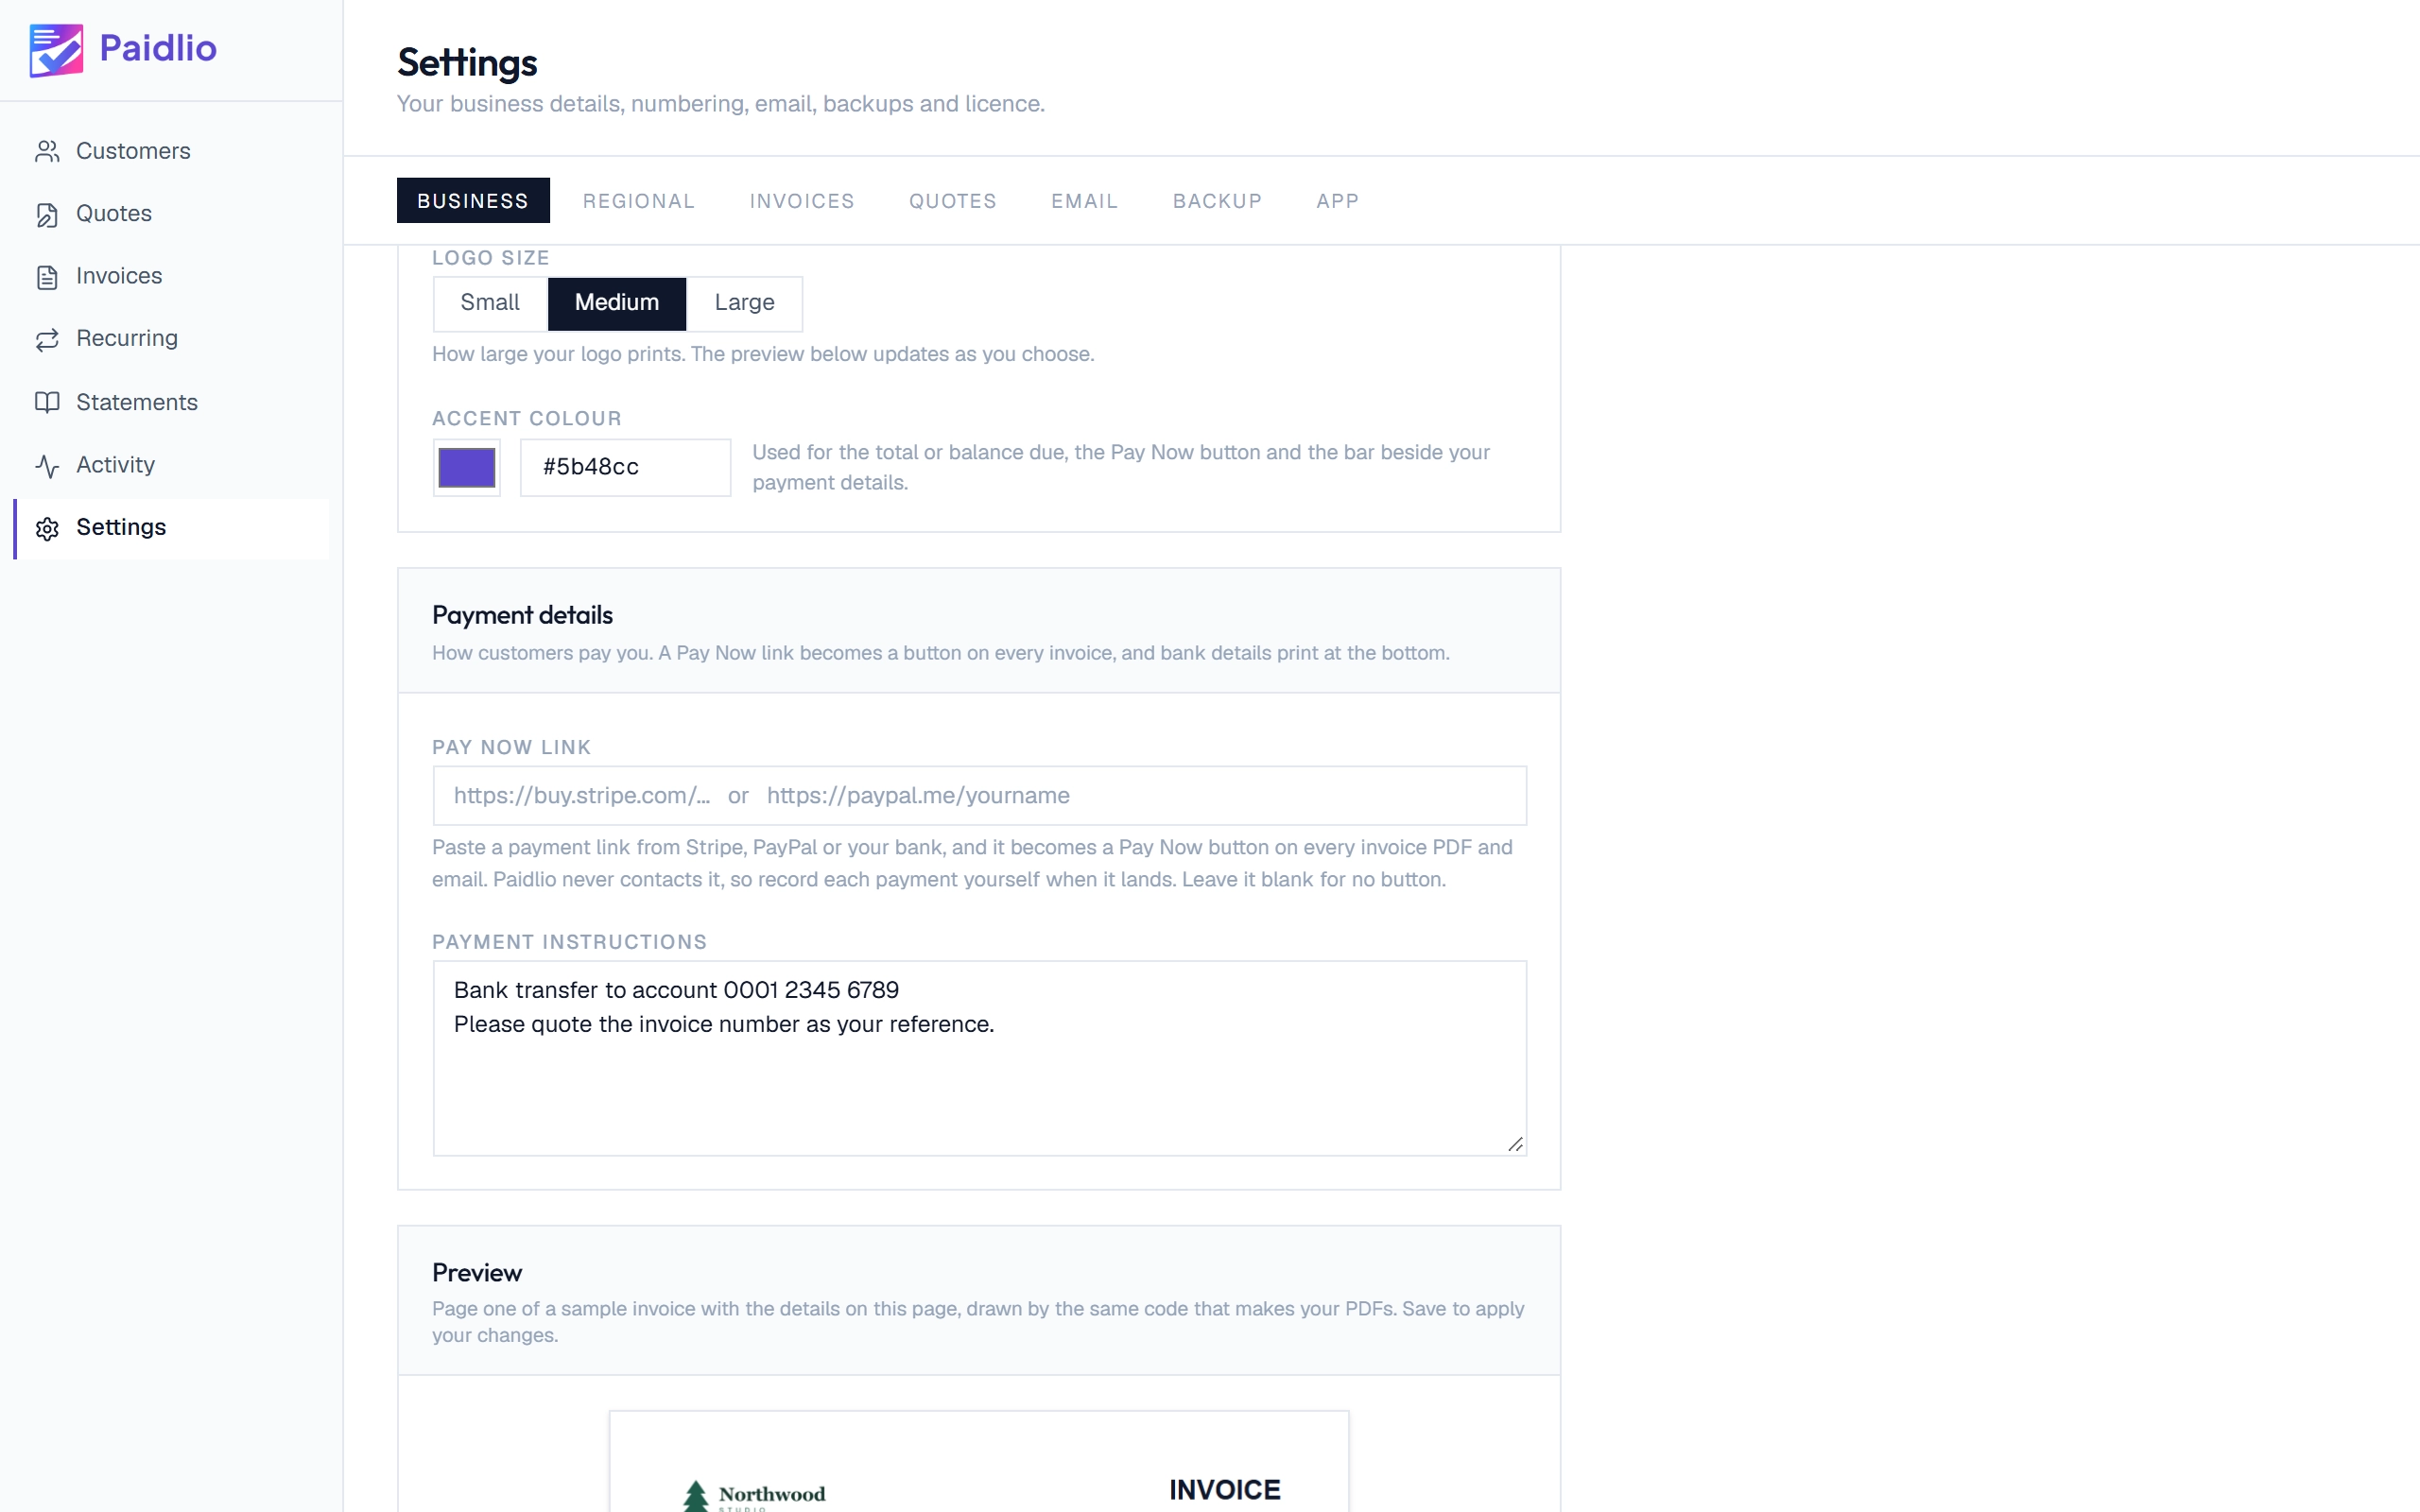
Add your logo and colour
Under Settings, Business, choose a logo file, pick how large it prints, and set an accent colour. The colour is used for the totals and the balance due on your invoices and statements.
Make the invoice yoursStep 2 of 3
Tell customers how to pay
Paste a payment link from Stripe, PayPal or your bank and it becomes a Pay Now button on every invoice PDF and email. Bank details typed underneath print at the bottom of each invoice. The money goes straight to you.
Make the invoice yoursStep 3 of 3
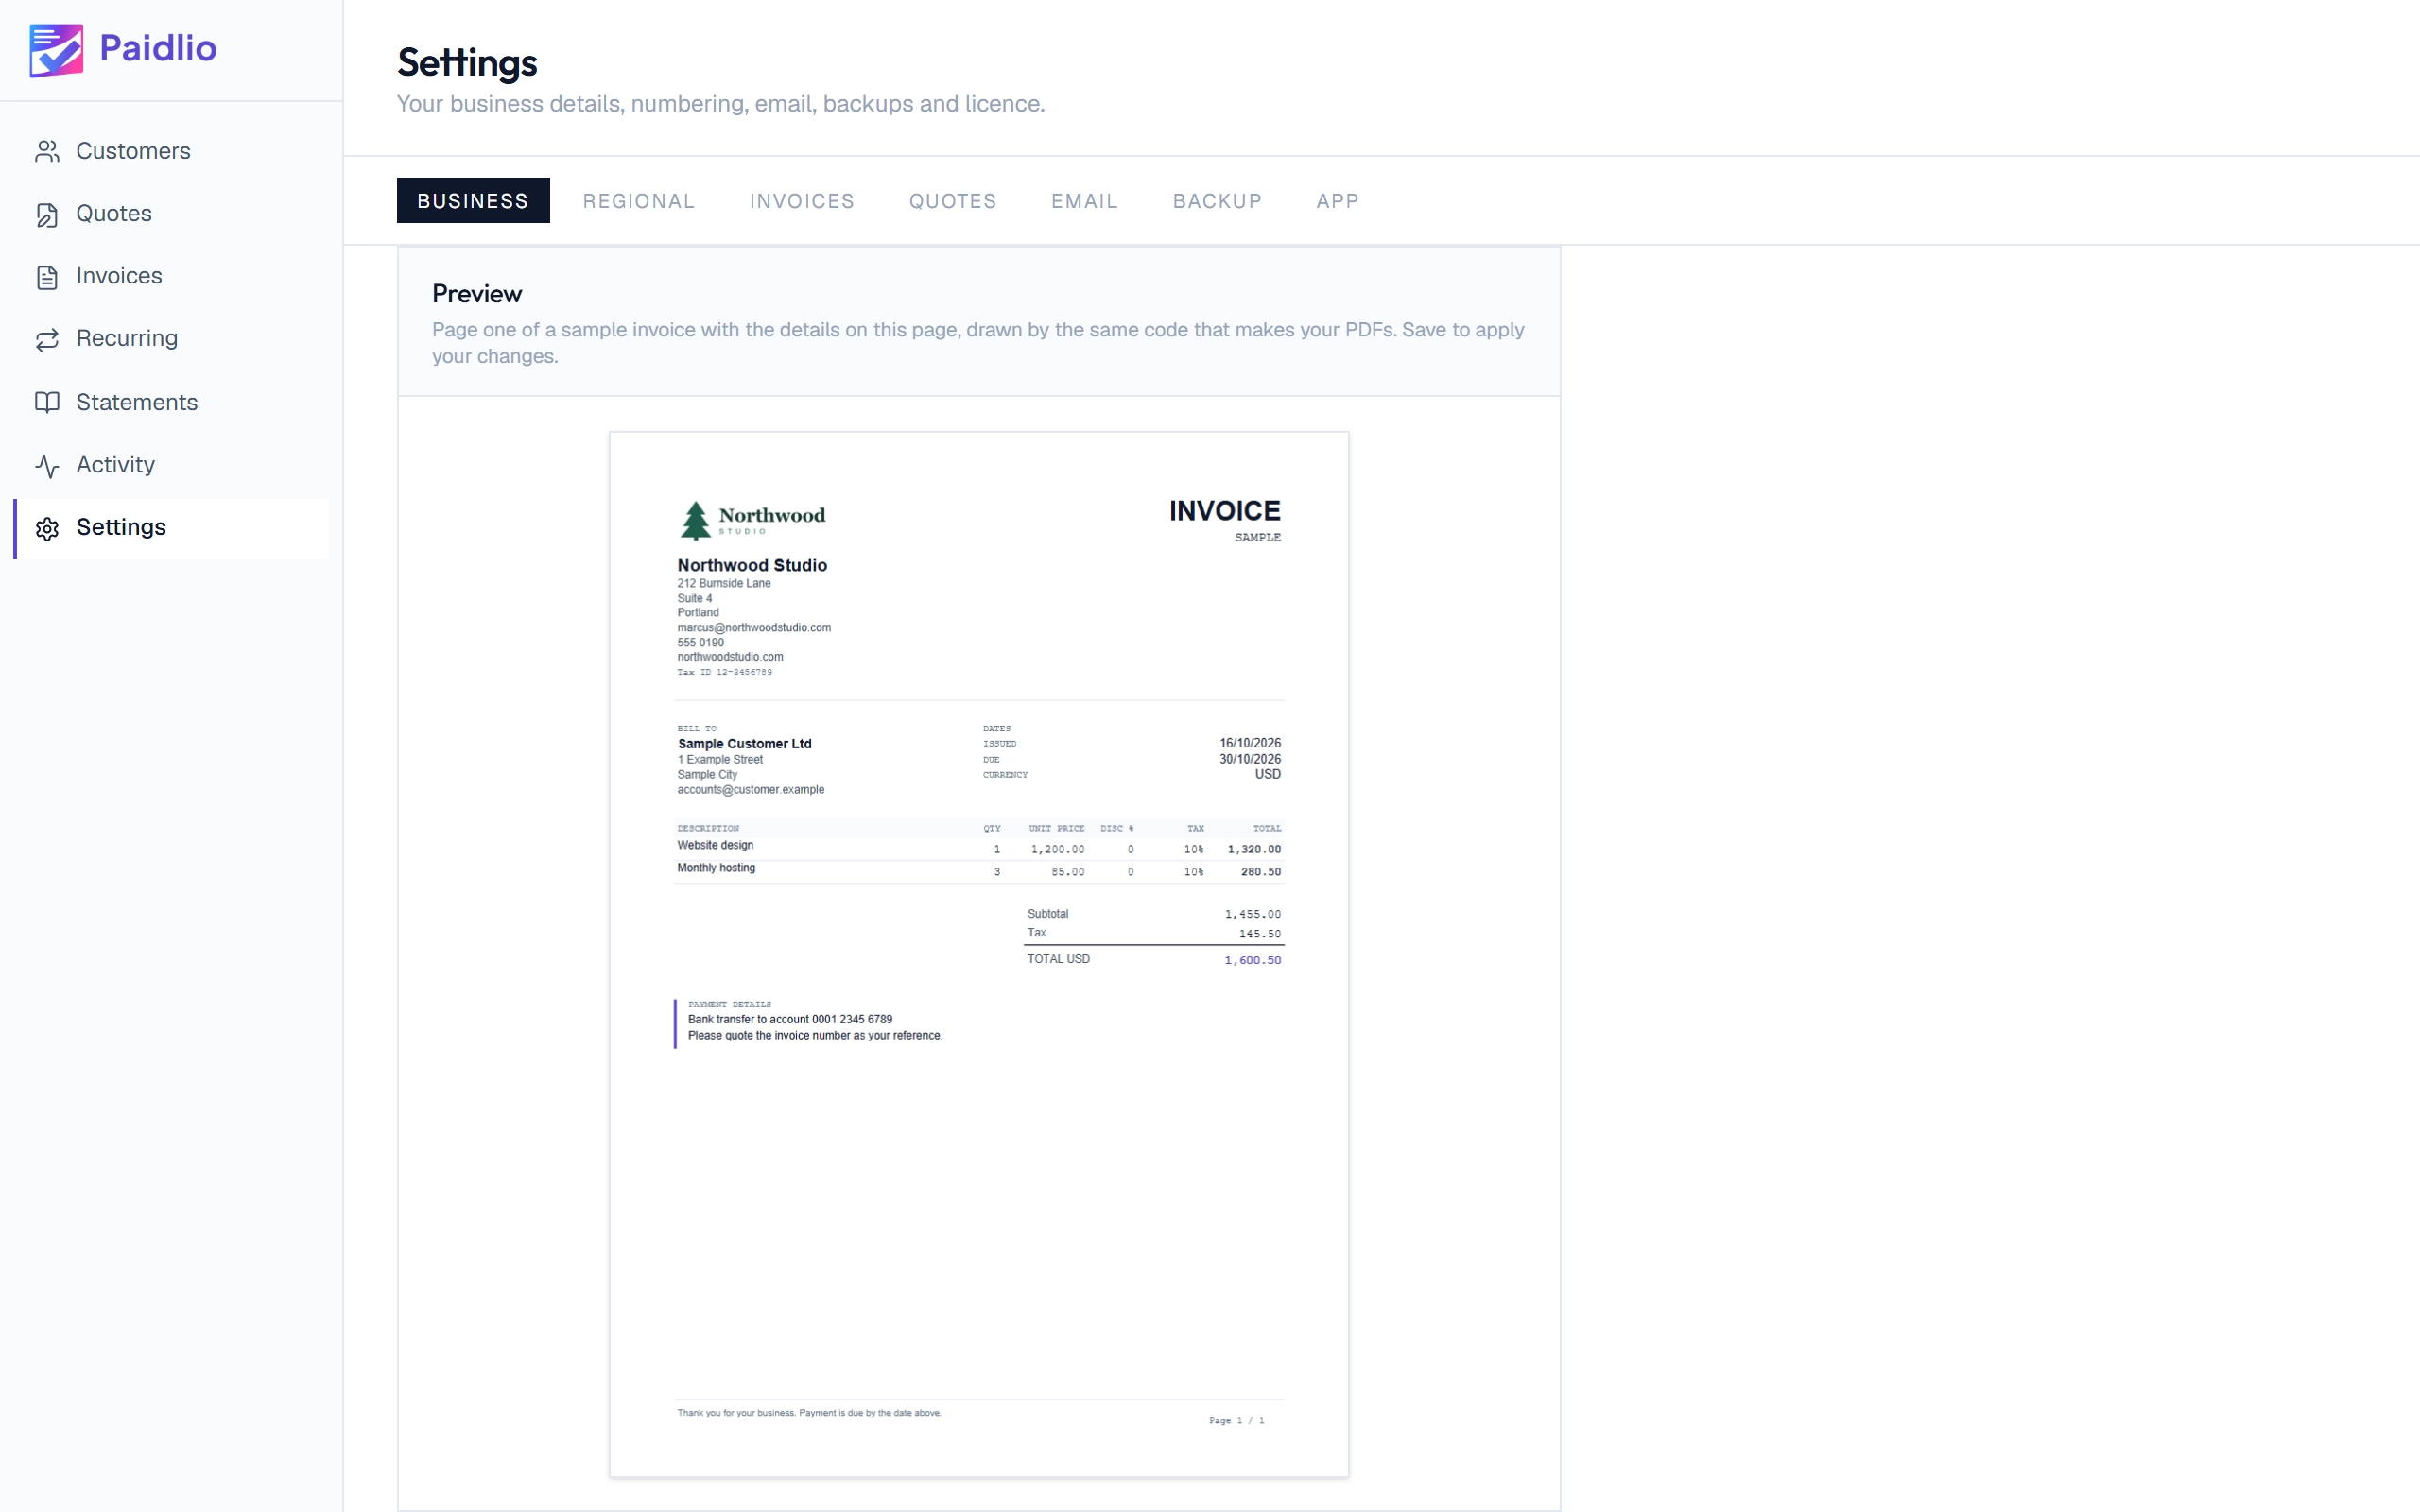
See it before you save
The preview is page one of a sample invoice, drawn from the details on this screen by the same code that makes your real PDFs. Change the logo size or the colour and it redraws.
Add a customerStep 1 of 4
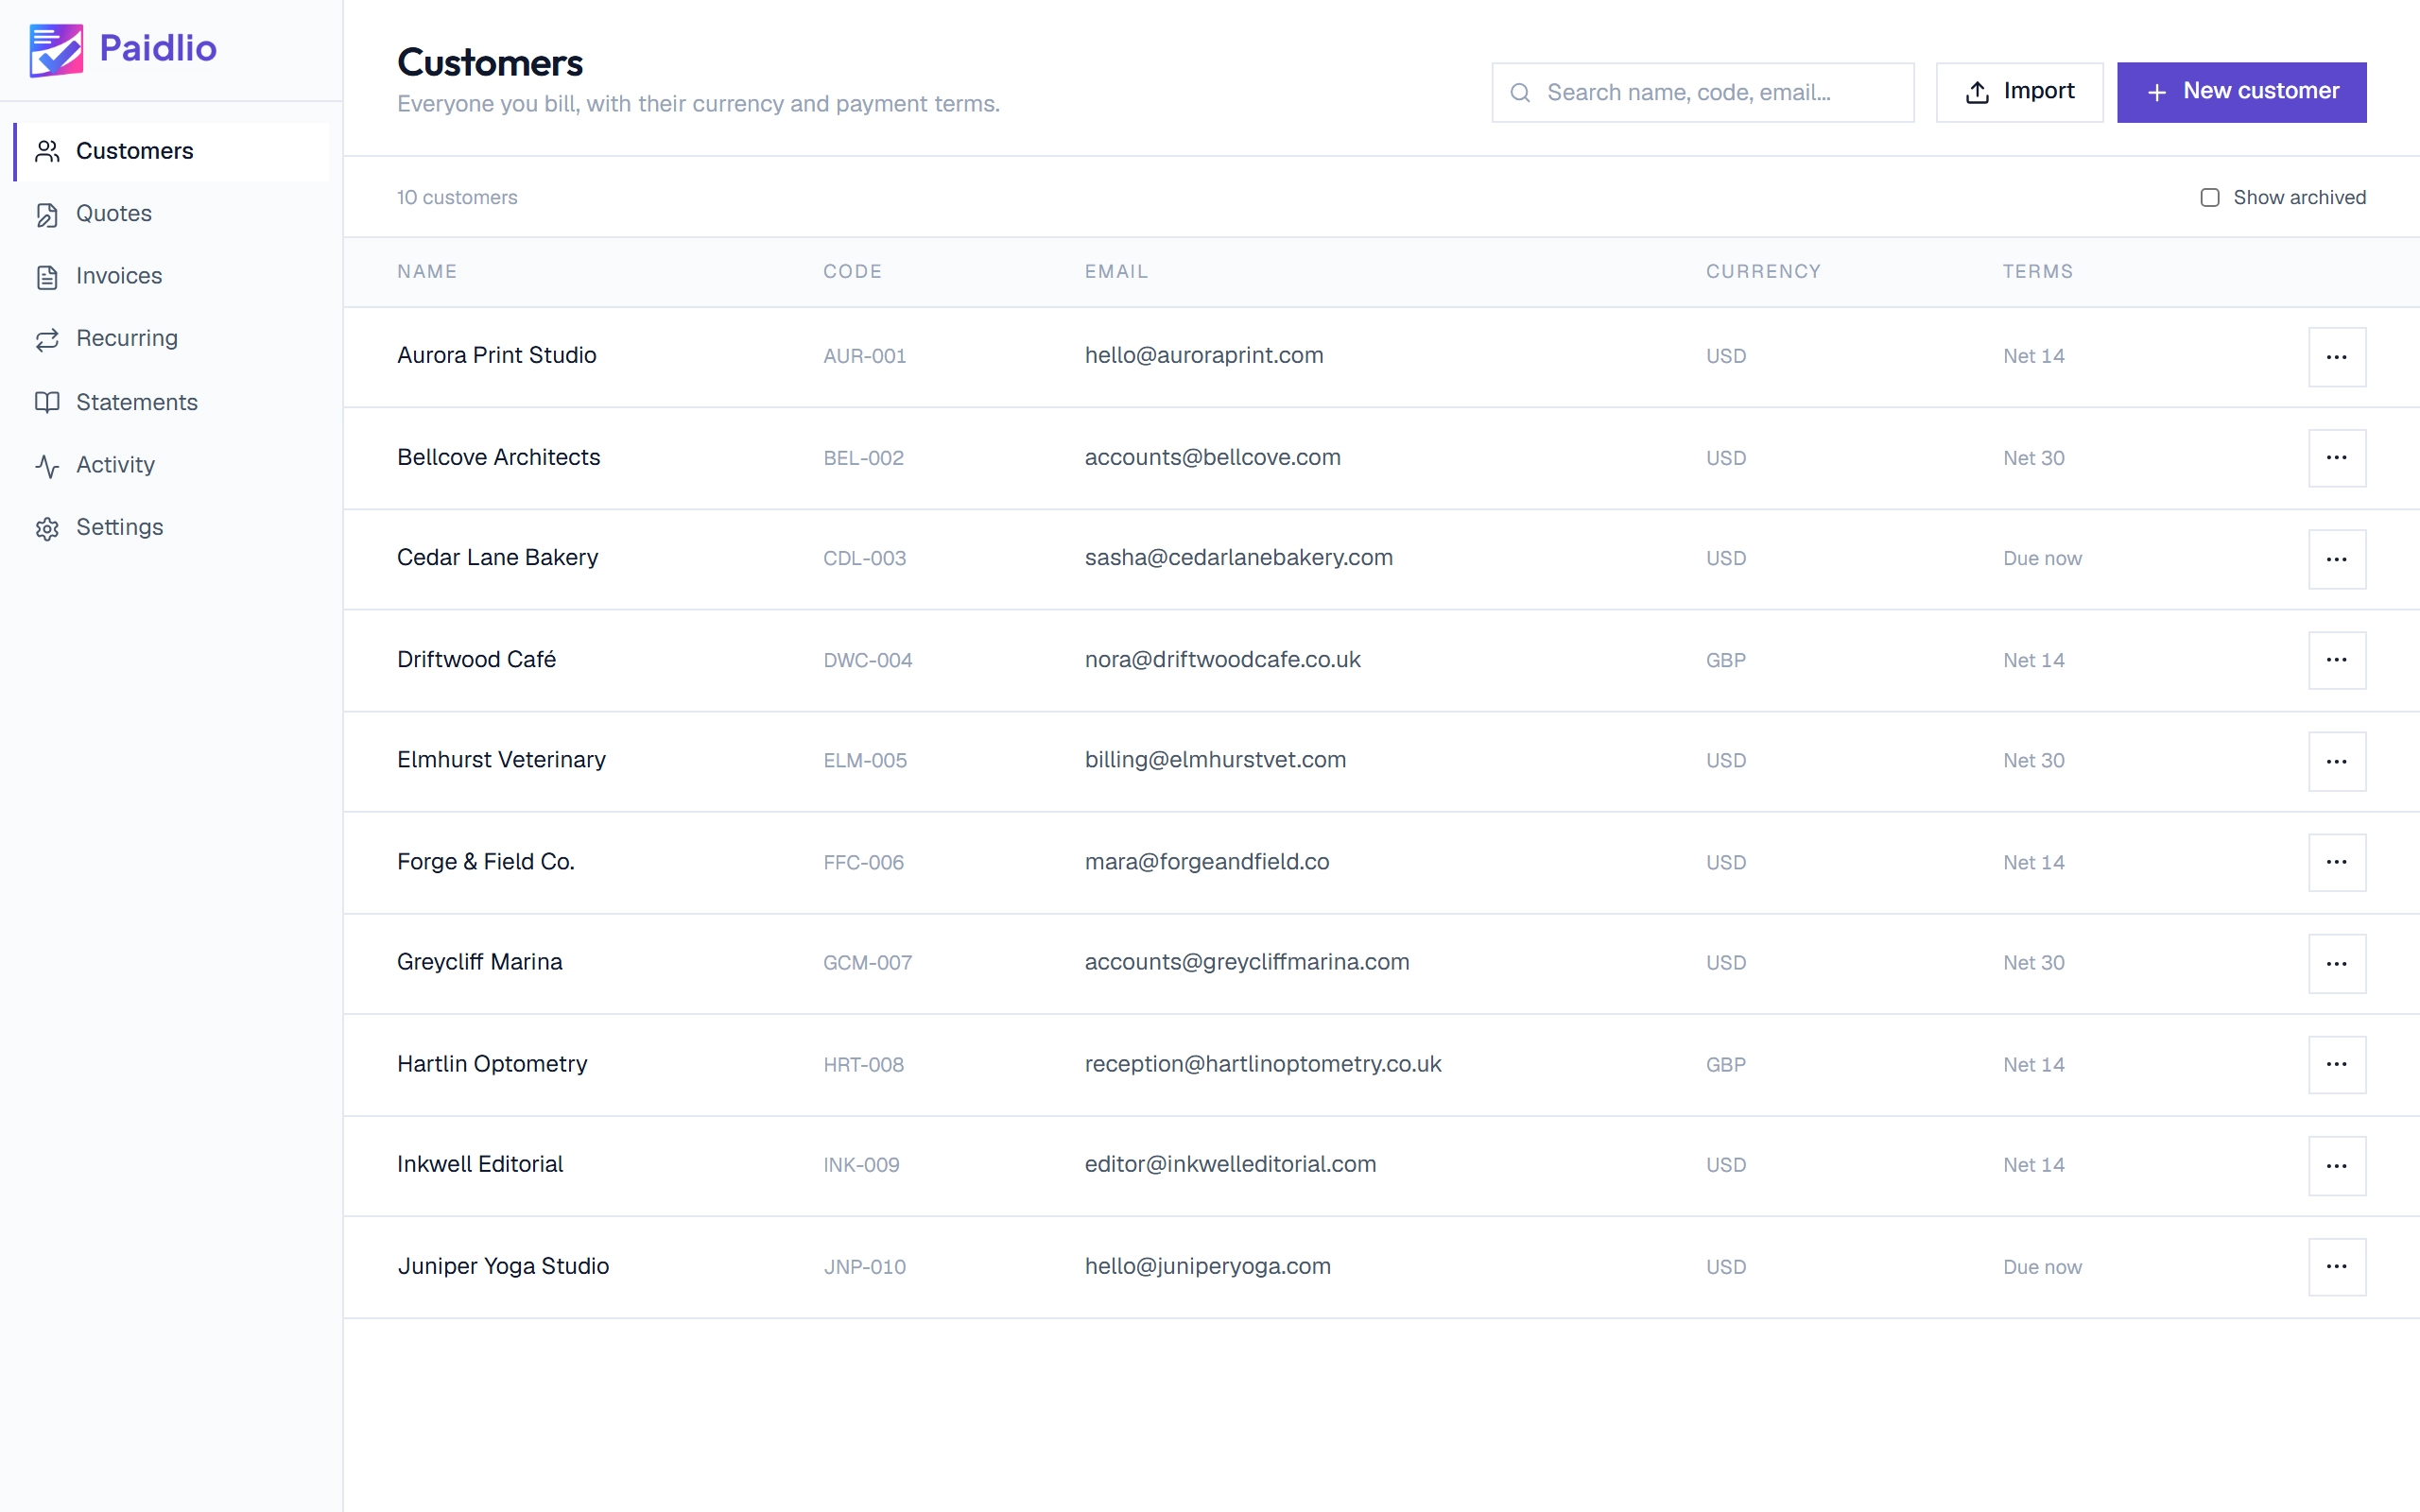
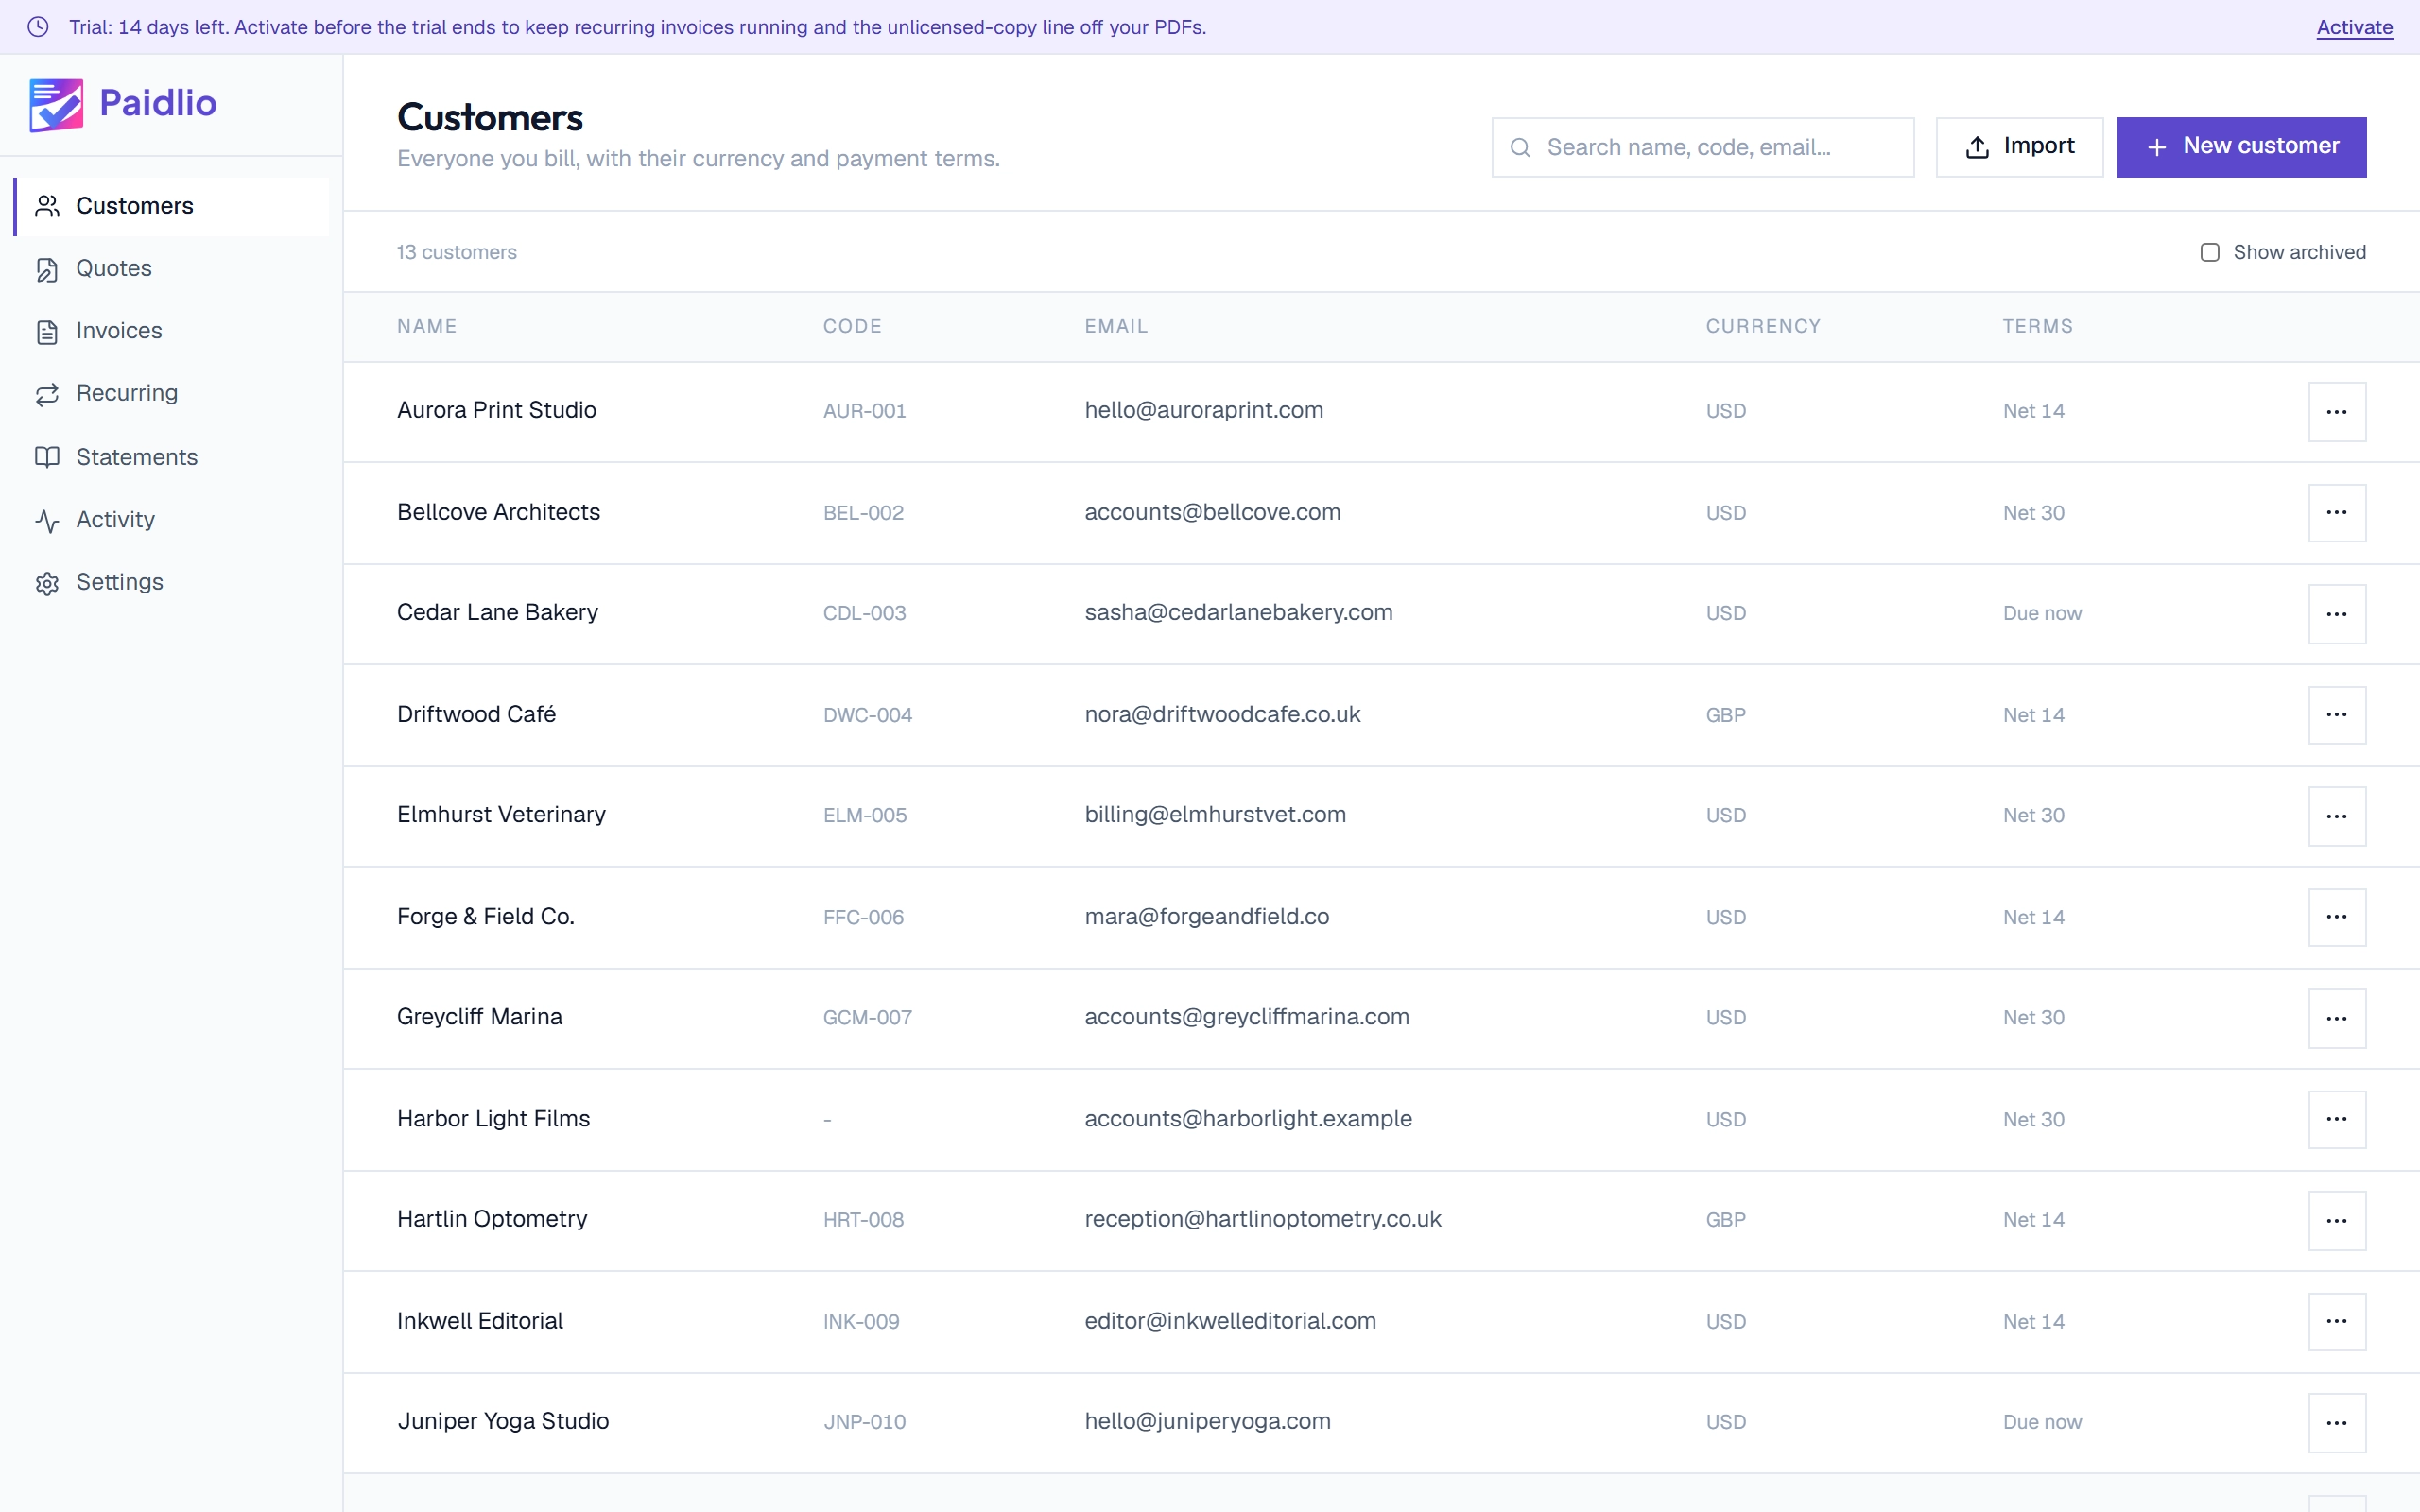
Open Customers and click New customer
Customers is the list of people you invoice, with the currency and payment terms you agreed with each. Search it by name, code or email.
Add a customerStep 2 of 4
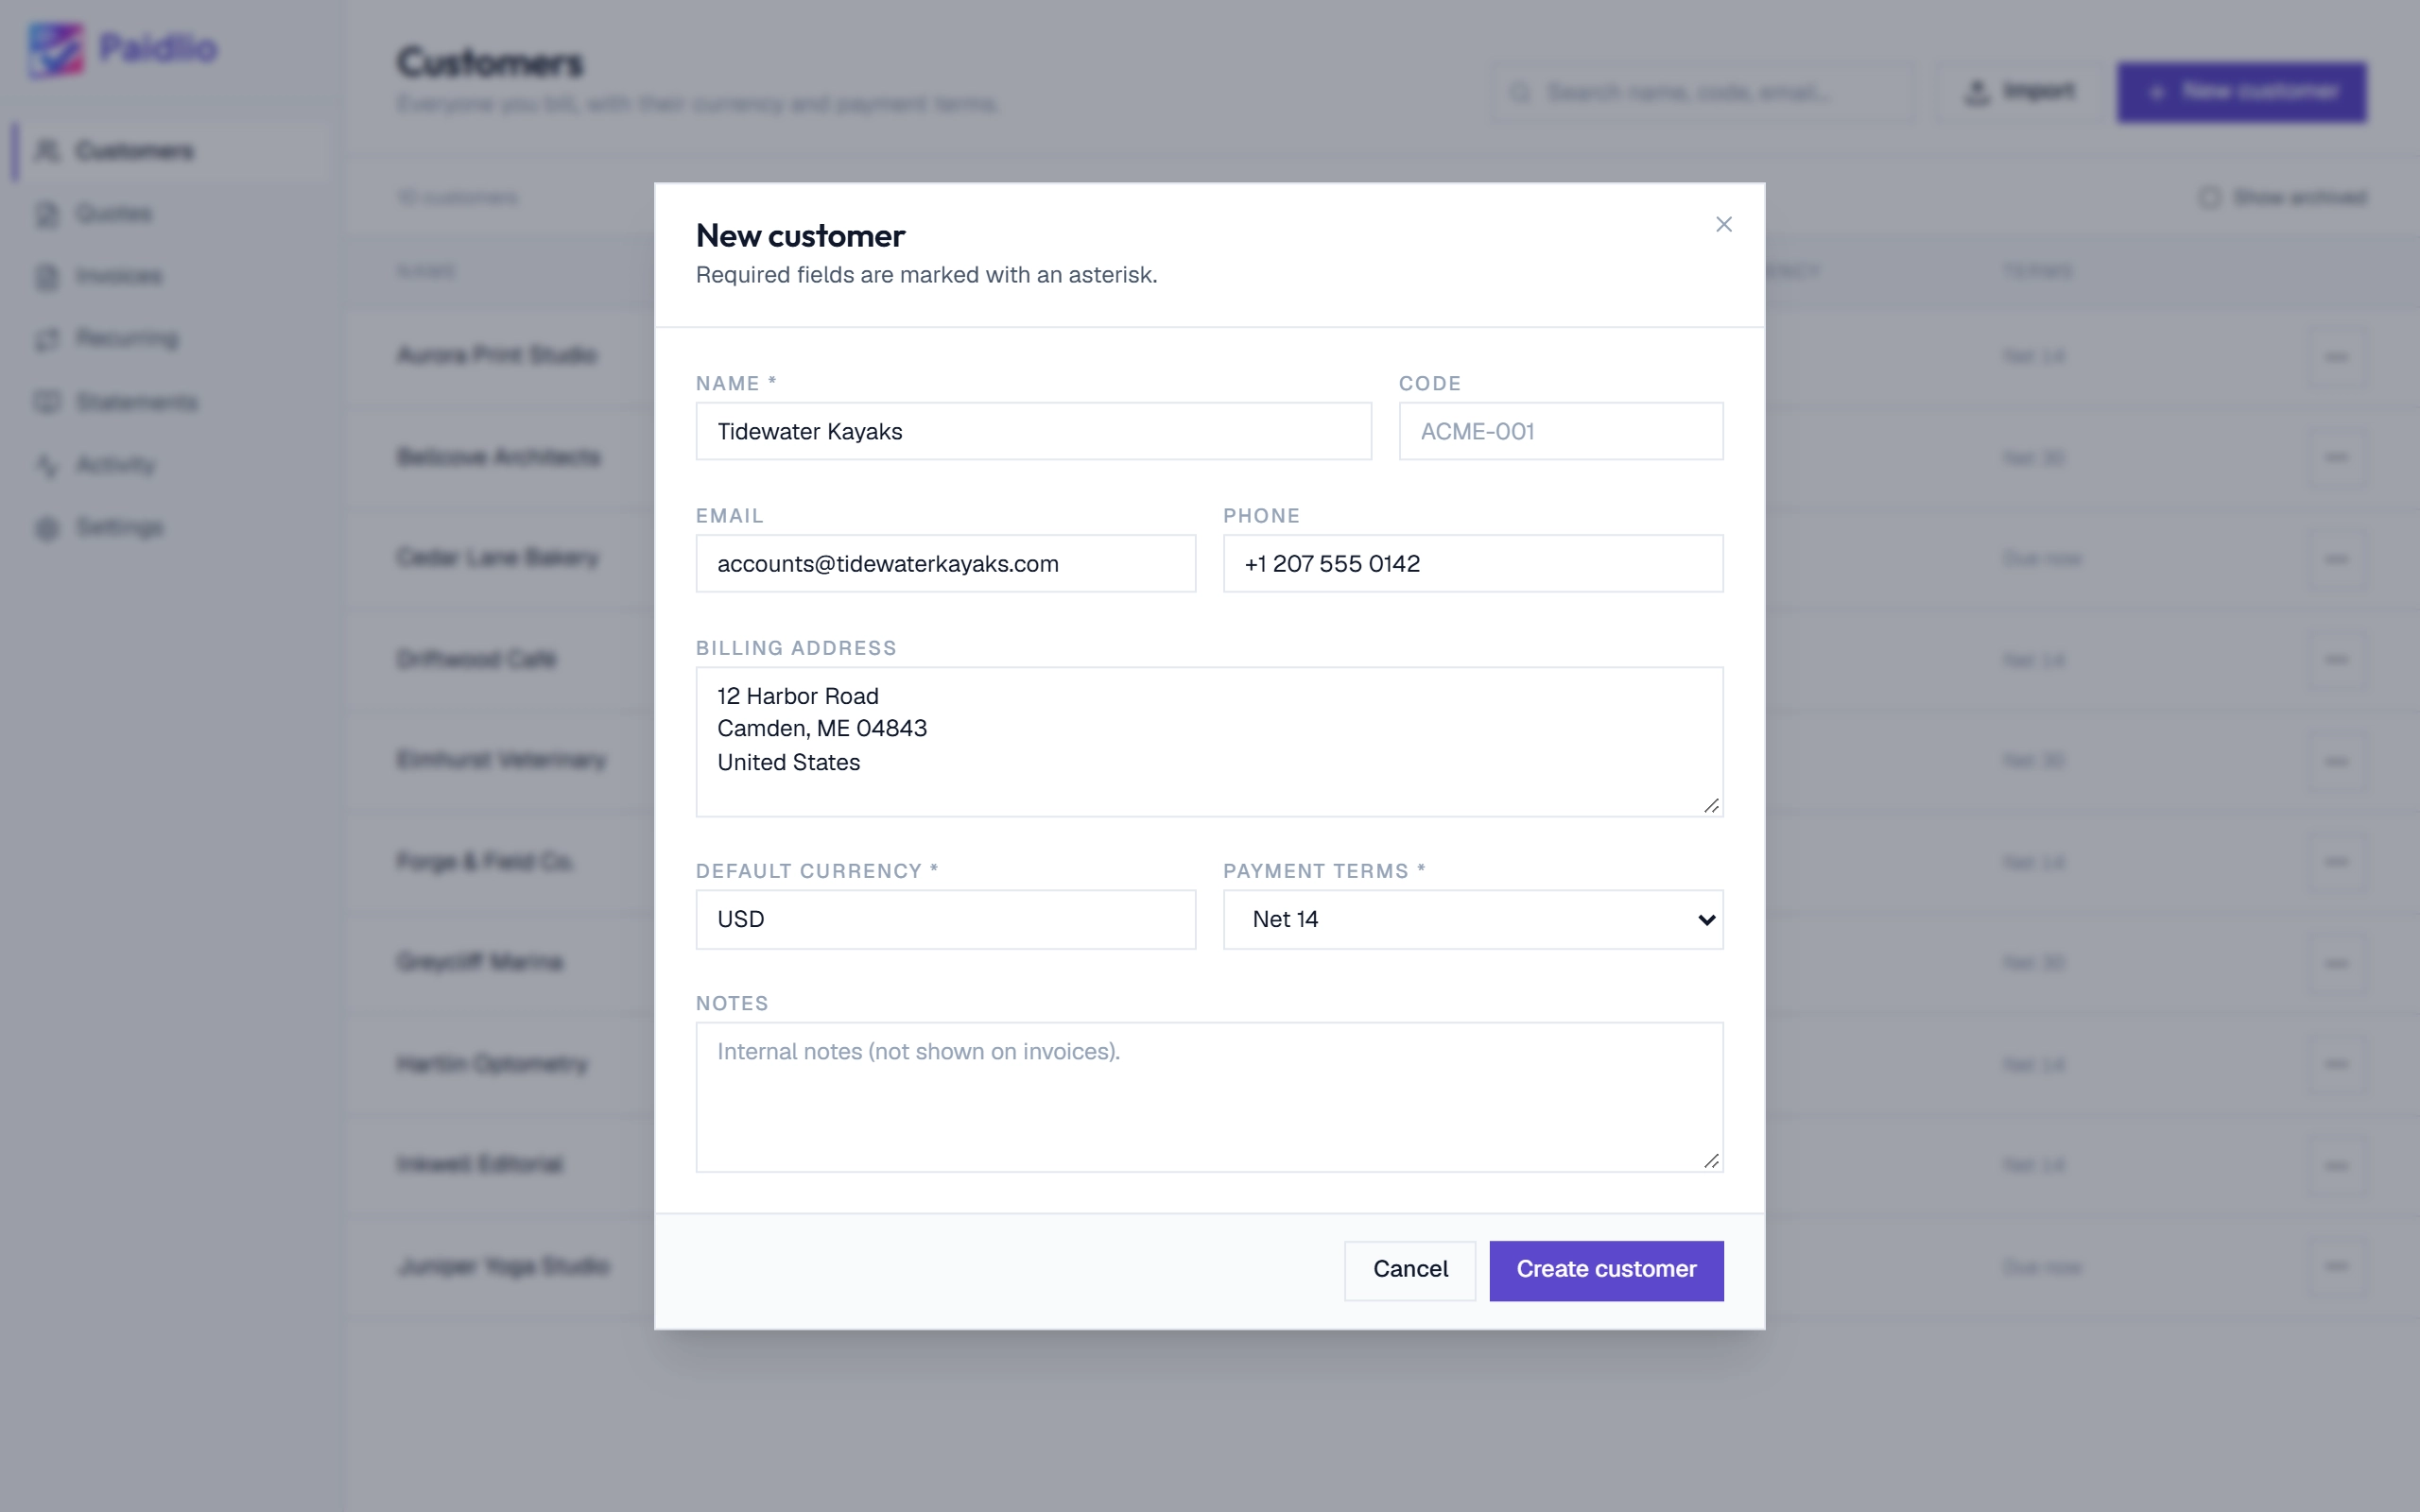
Fill in their details
The name, currency and payment terms are all Paidlio needs. The currency and terms you choose here are filled in on every new invoice for this customer, so a Net 14 client gets a due date 14 days out without you working it out.
Add a customerStep 3 of 4
Create the customer
Click Create customer and they join the list, ready to invoice.
Add a customerStep 4 of 4
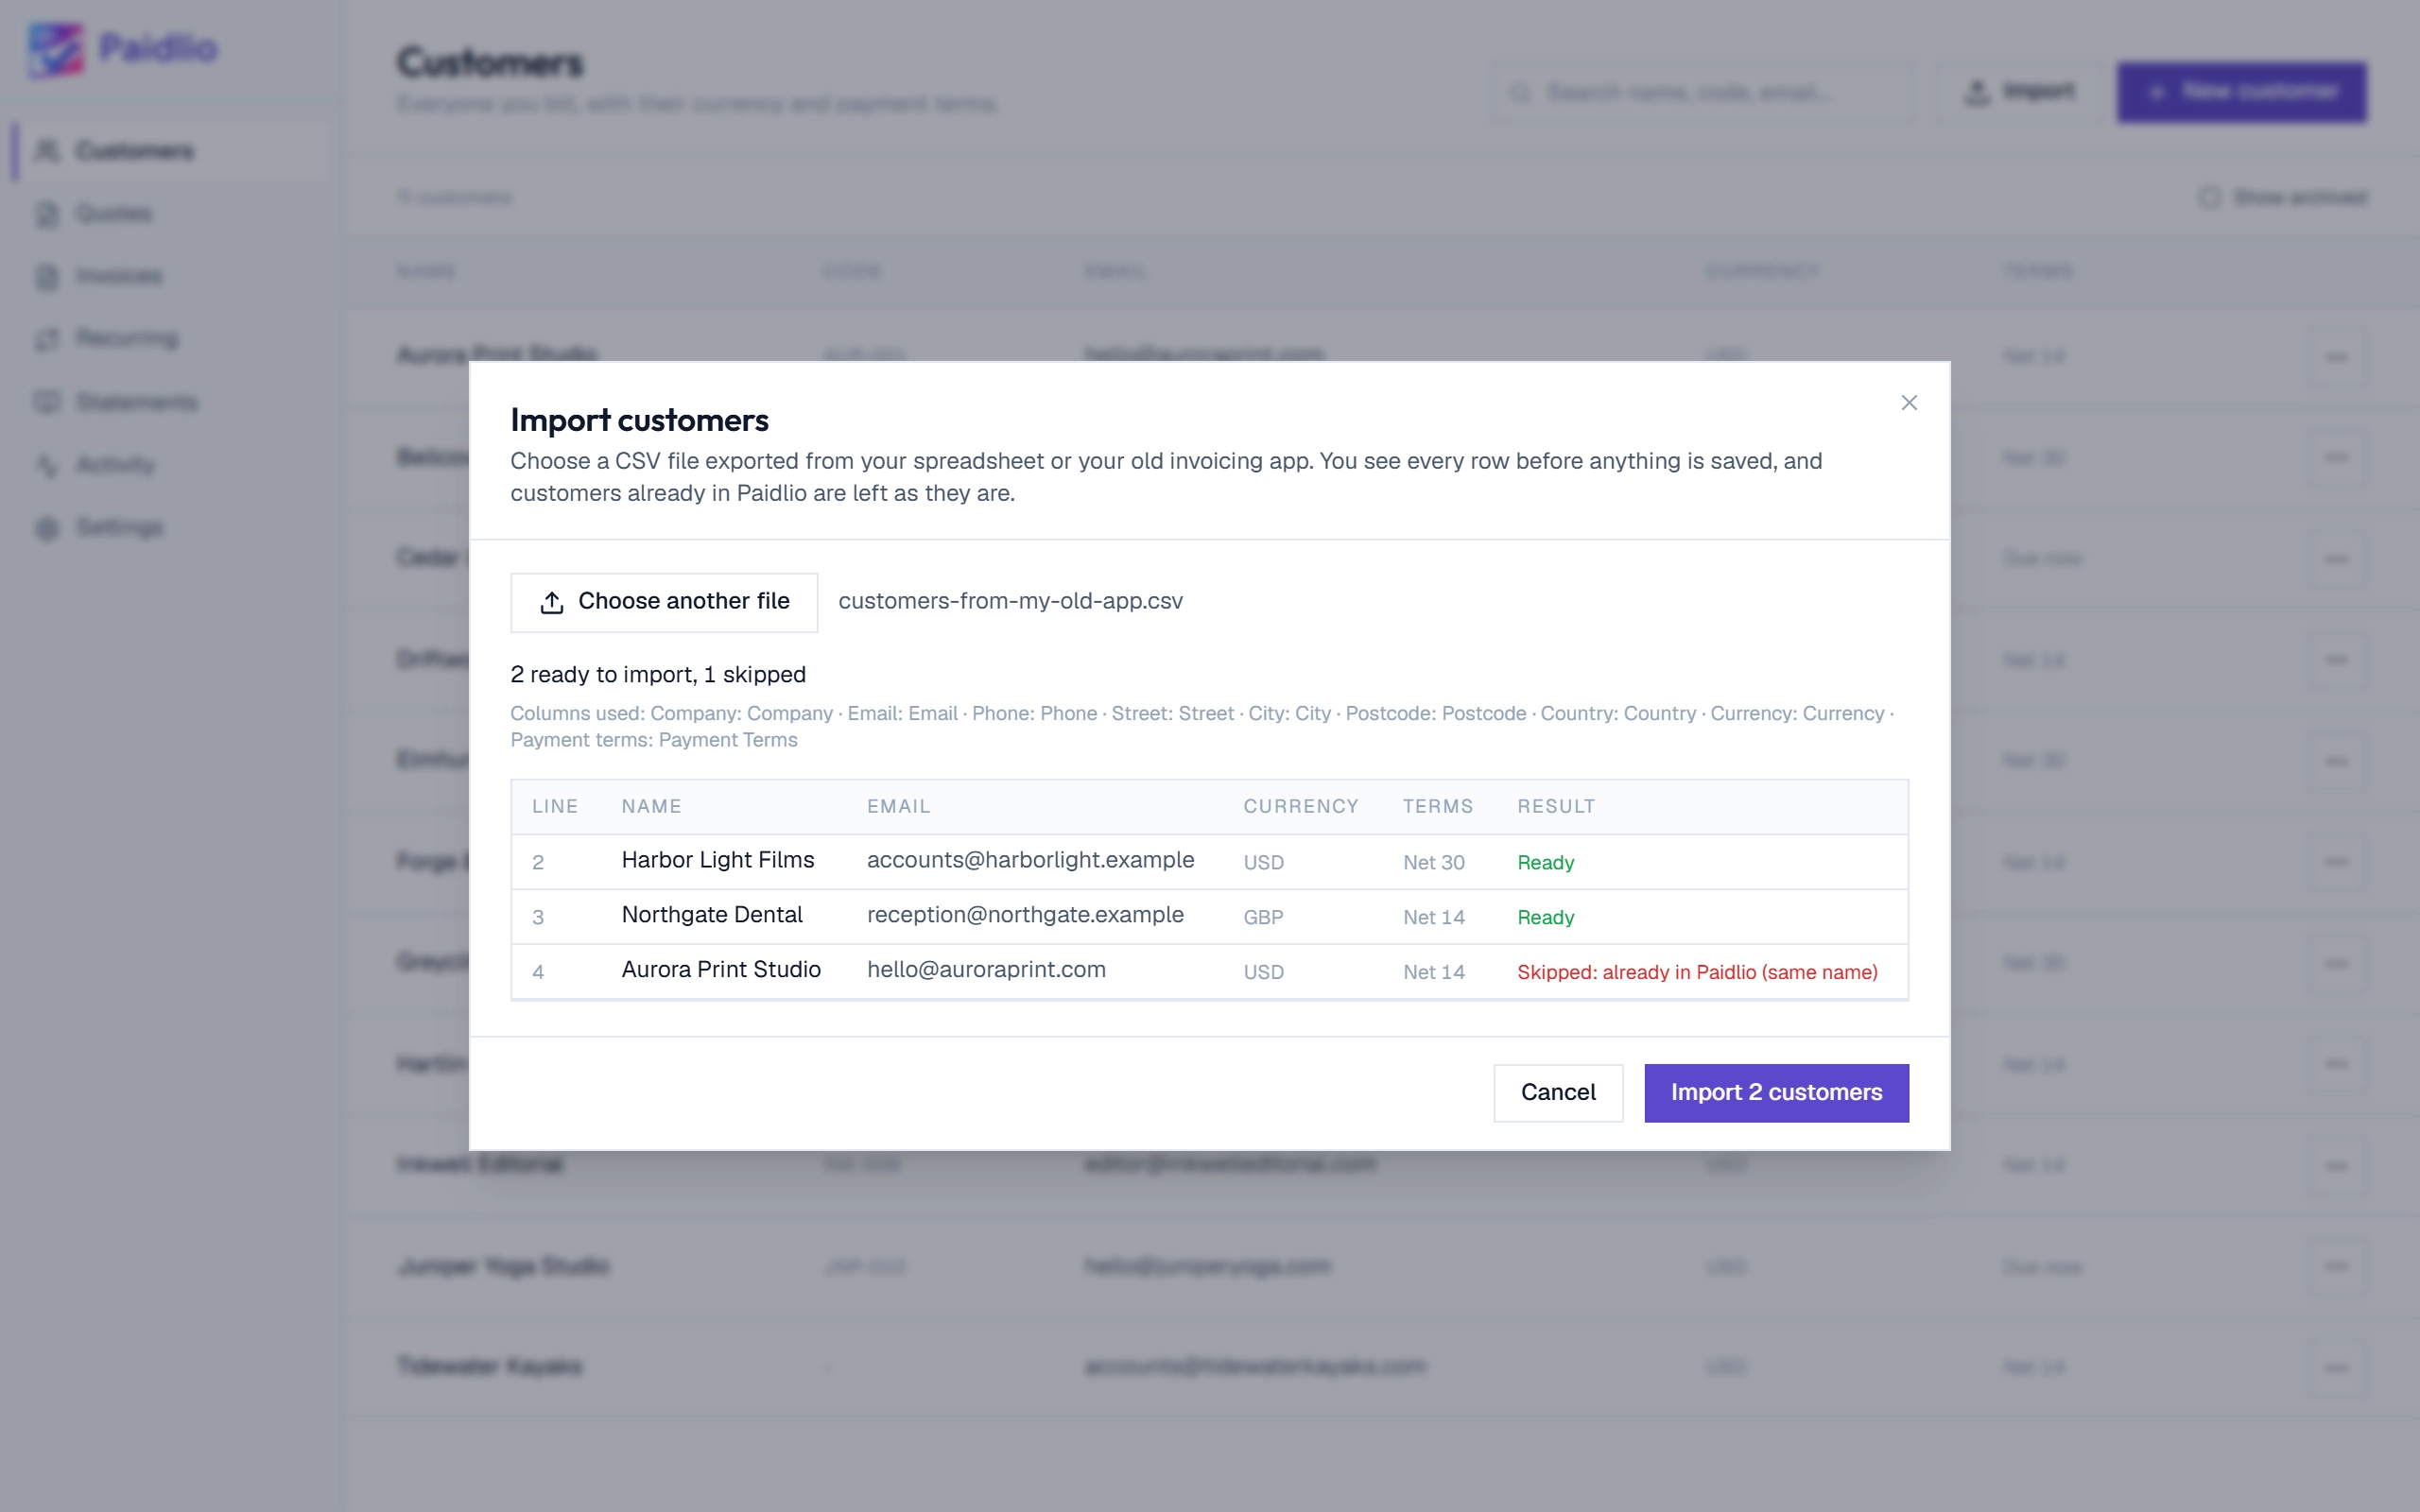
Or bring your whole list with you
Moving from another app or a spreadsheet? Export your customers as a CSV file, click Import and choose it. Paidlio shows every row before anything is saved, and anyone already in Paidlio is skipped rather than changed, with the reason beside it.
Create an invoiceStep 1 of 4
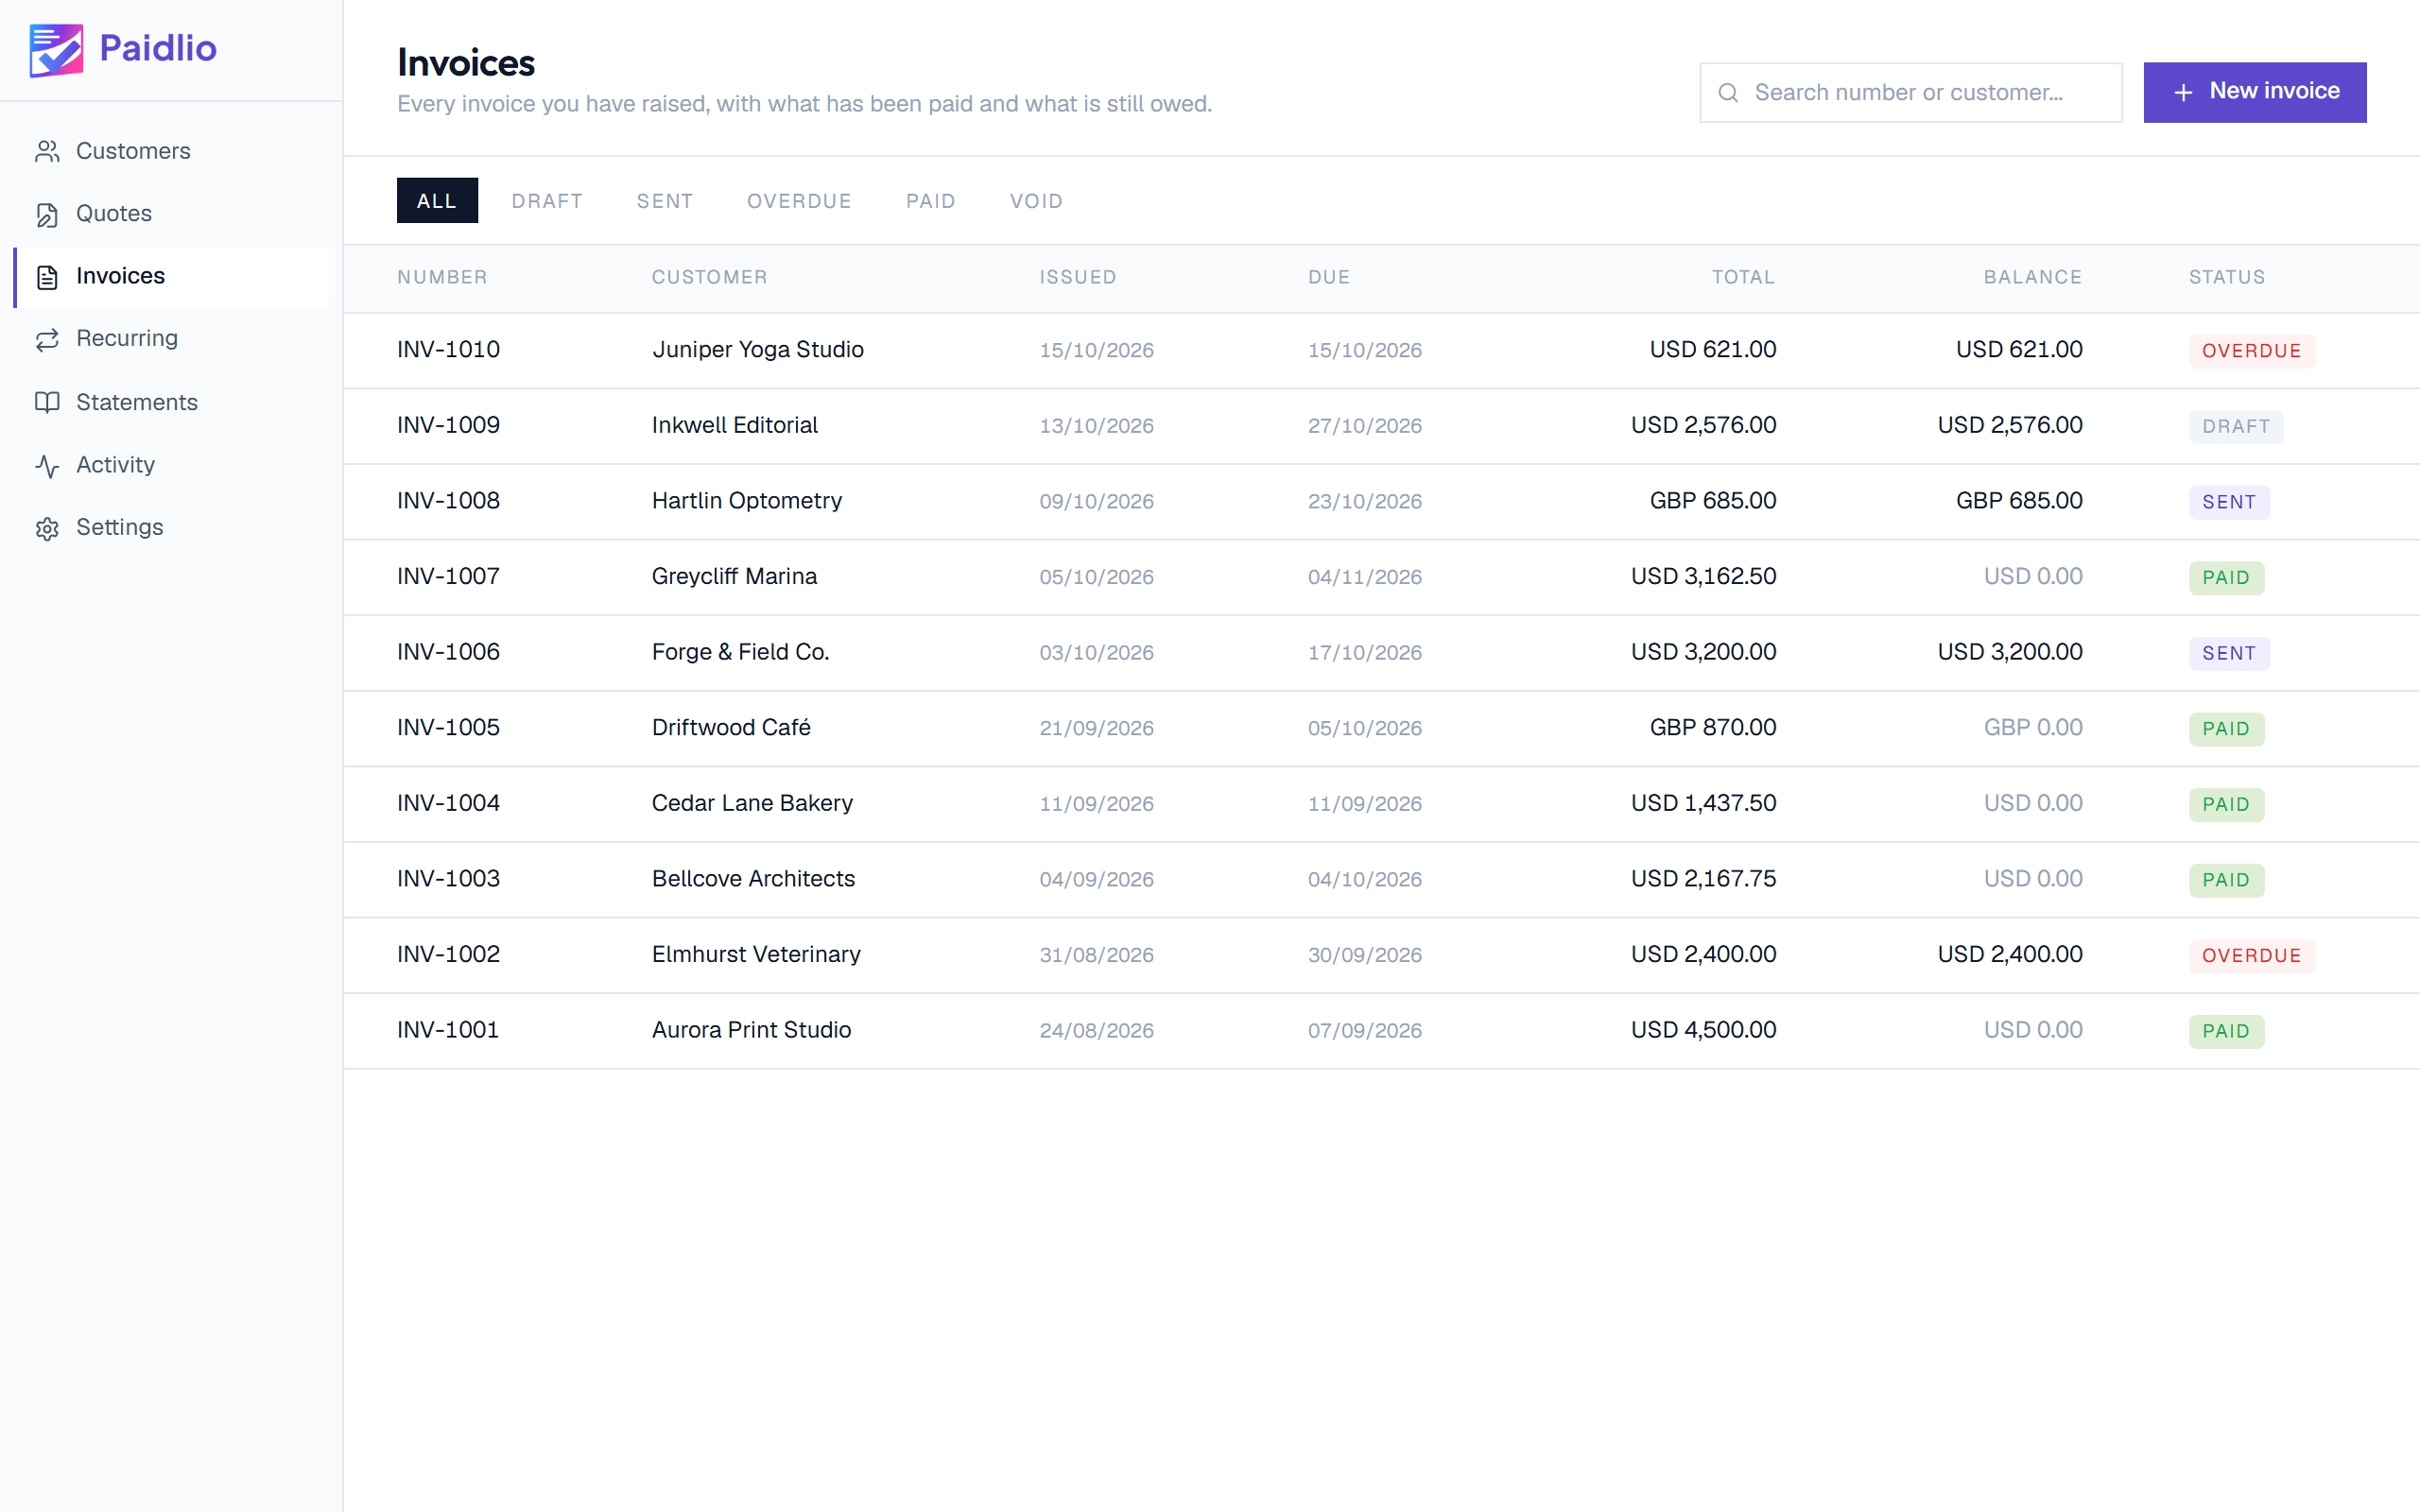
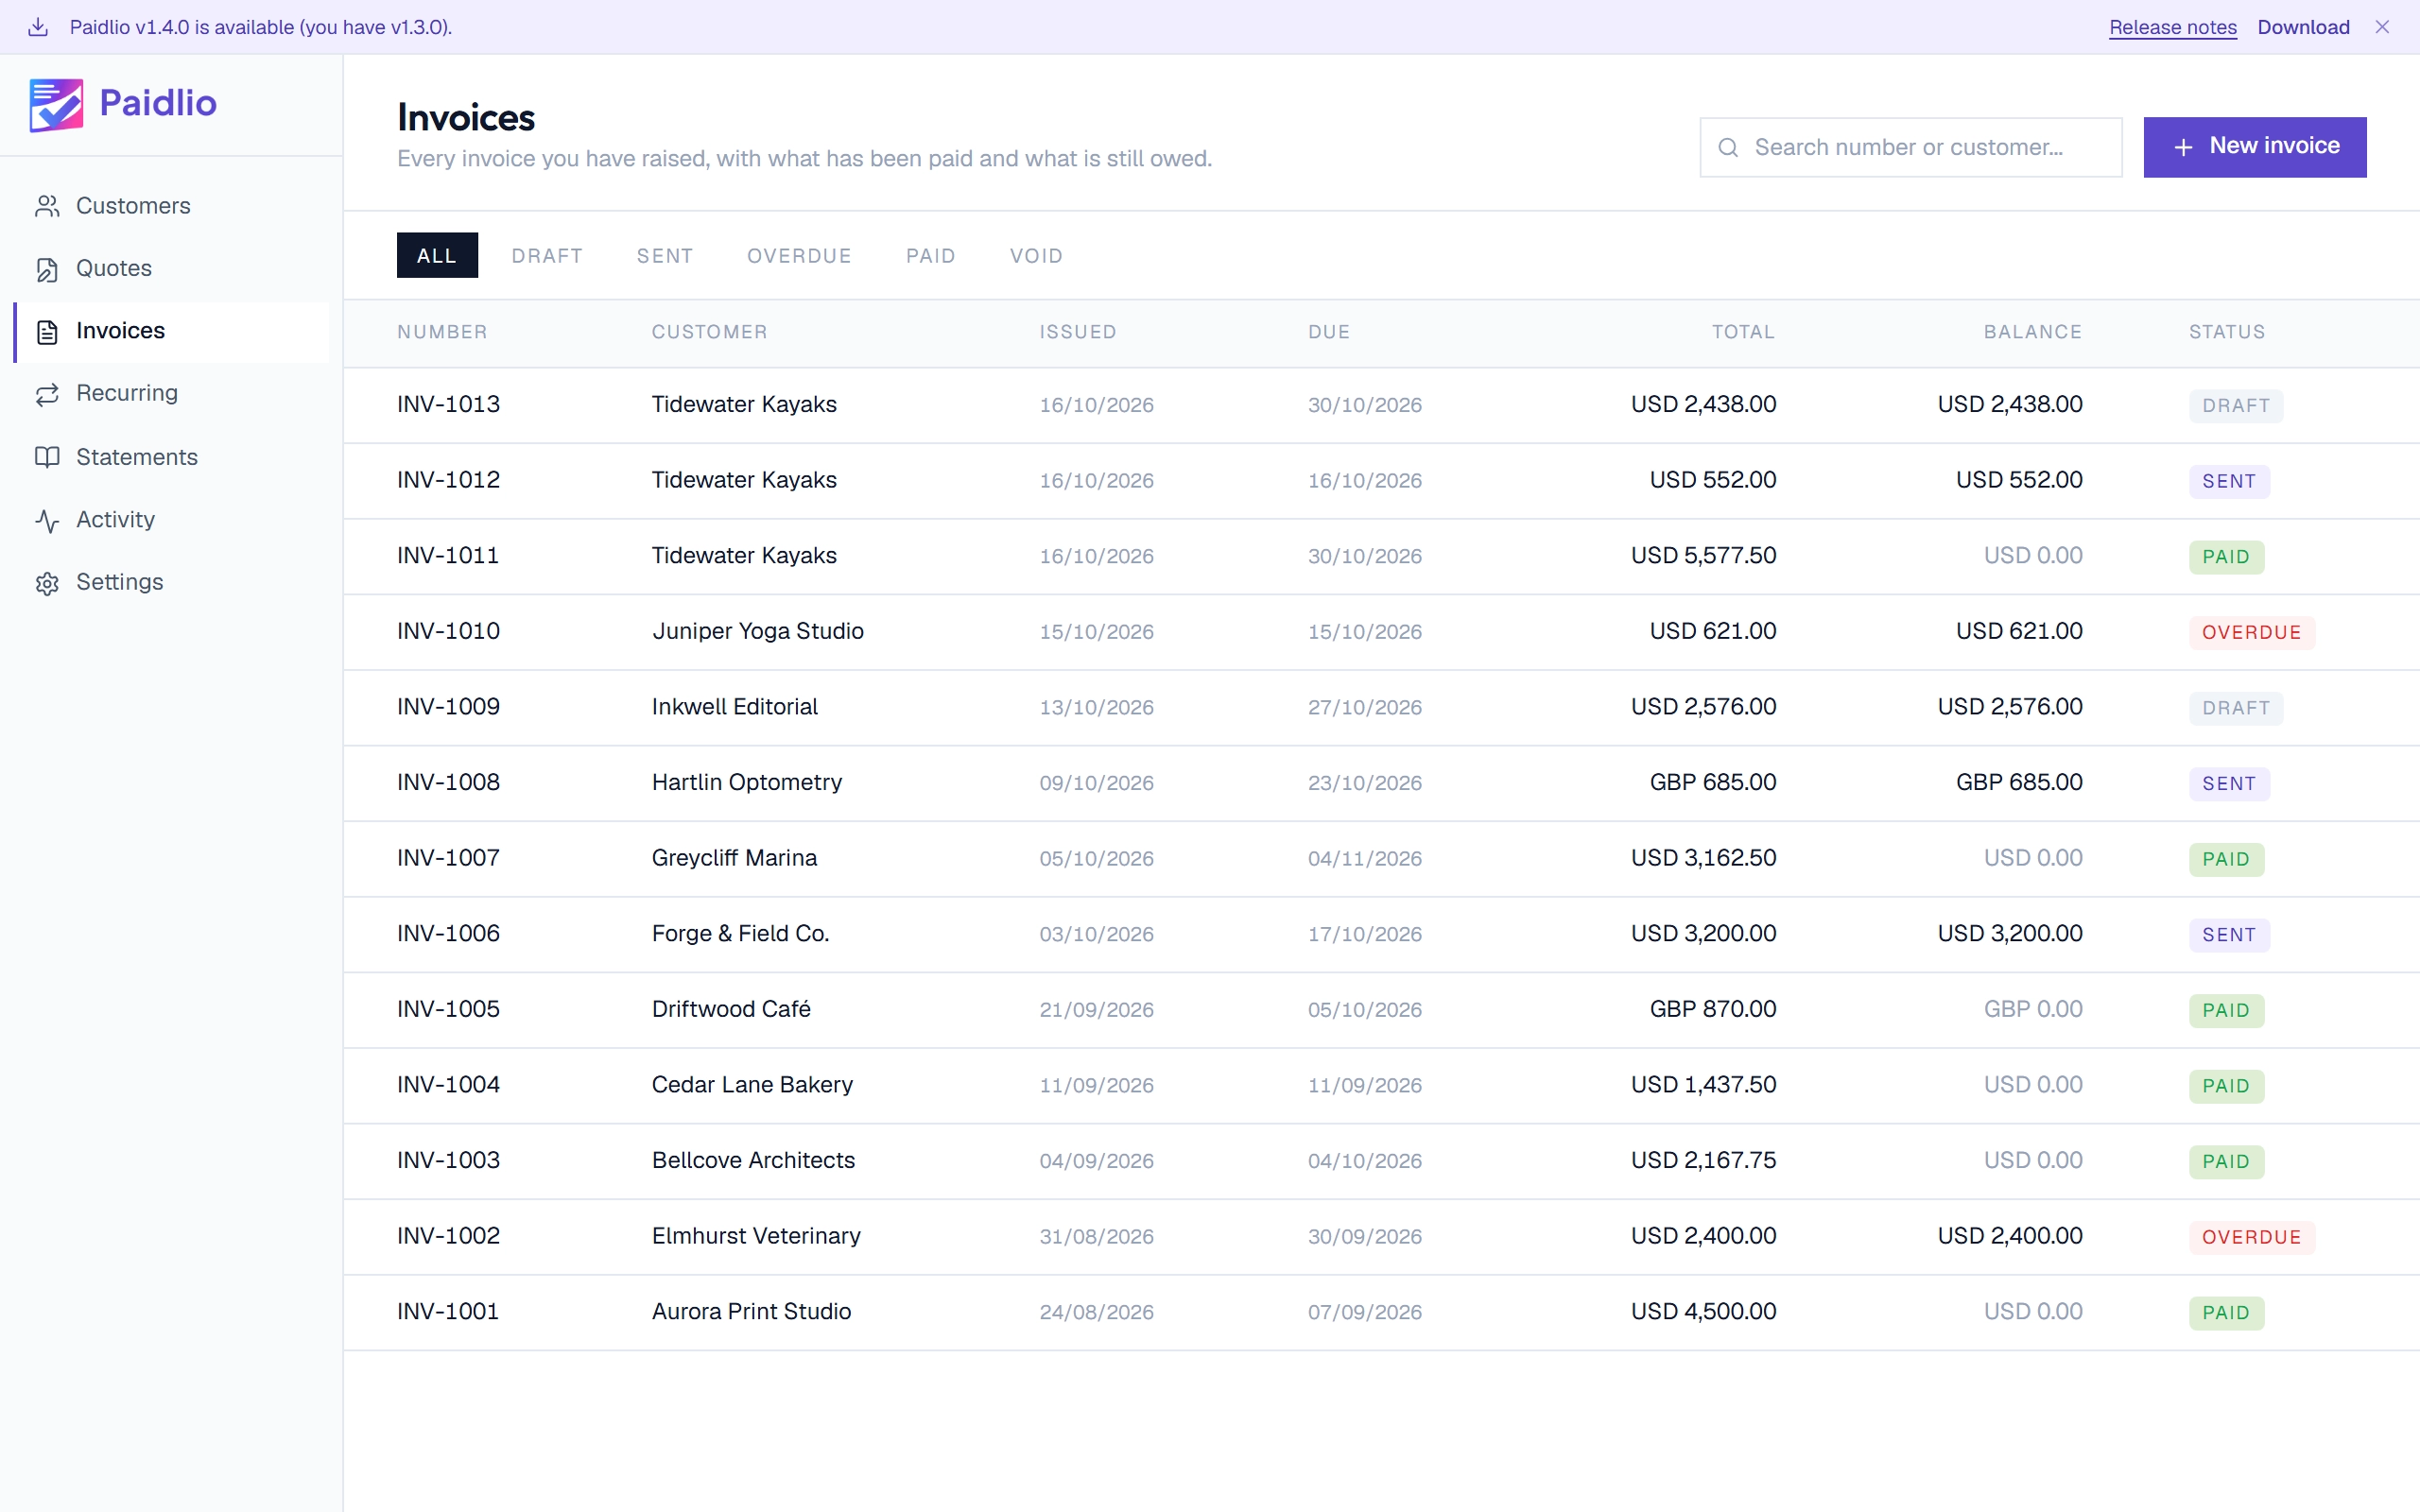
Open Invoices and click New invoice
Every invoice you have raised is listed here with its total, what is still owed and its status. The filters along the top narrow the list to drafts, sent, overdue, paid or void. Customers you bill in another currency sit in the same list.
Create an invoiceStep 2 of 4
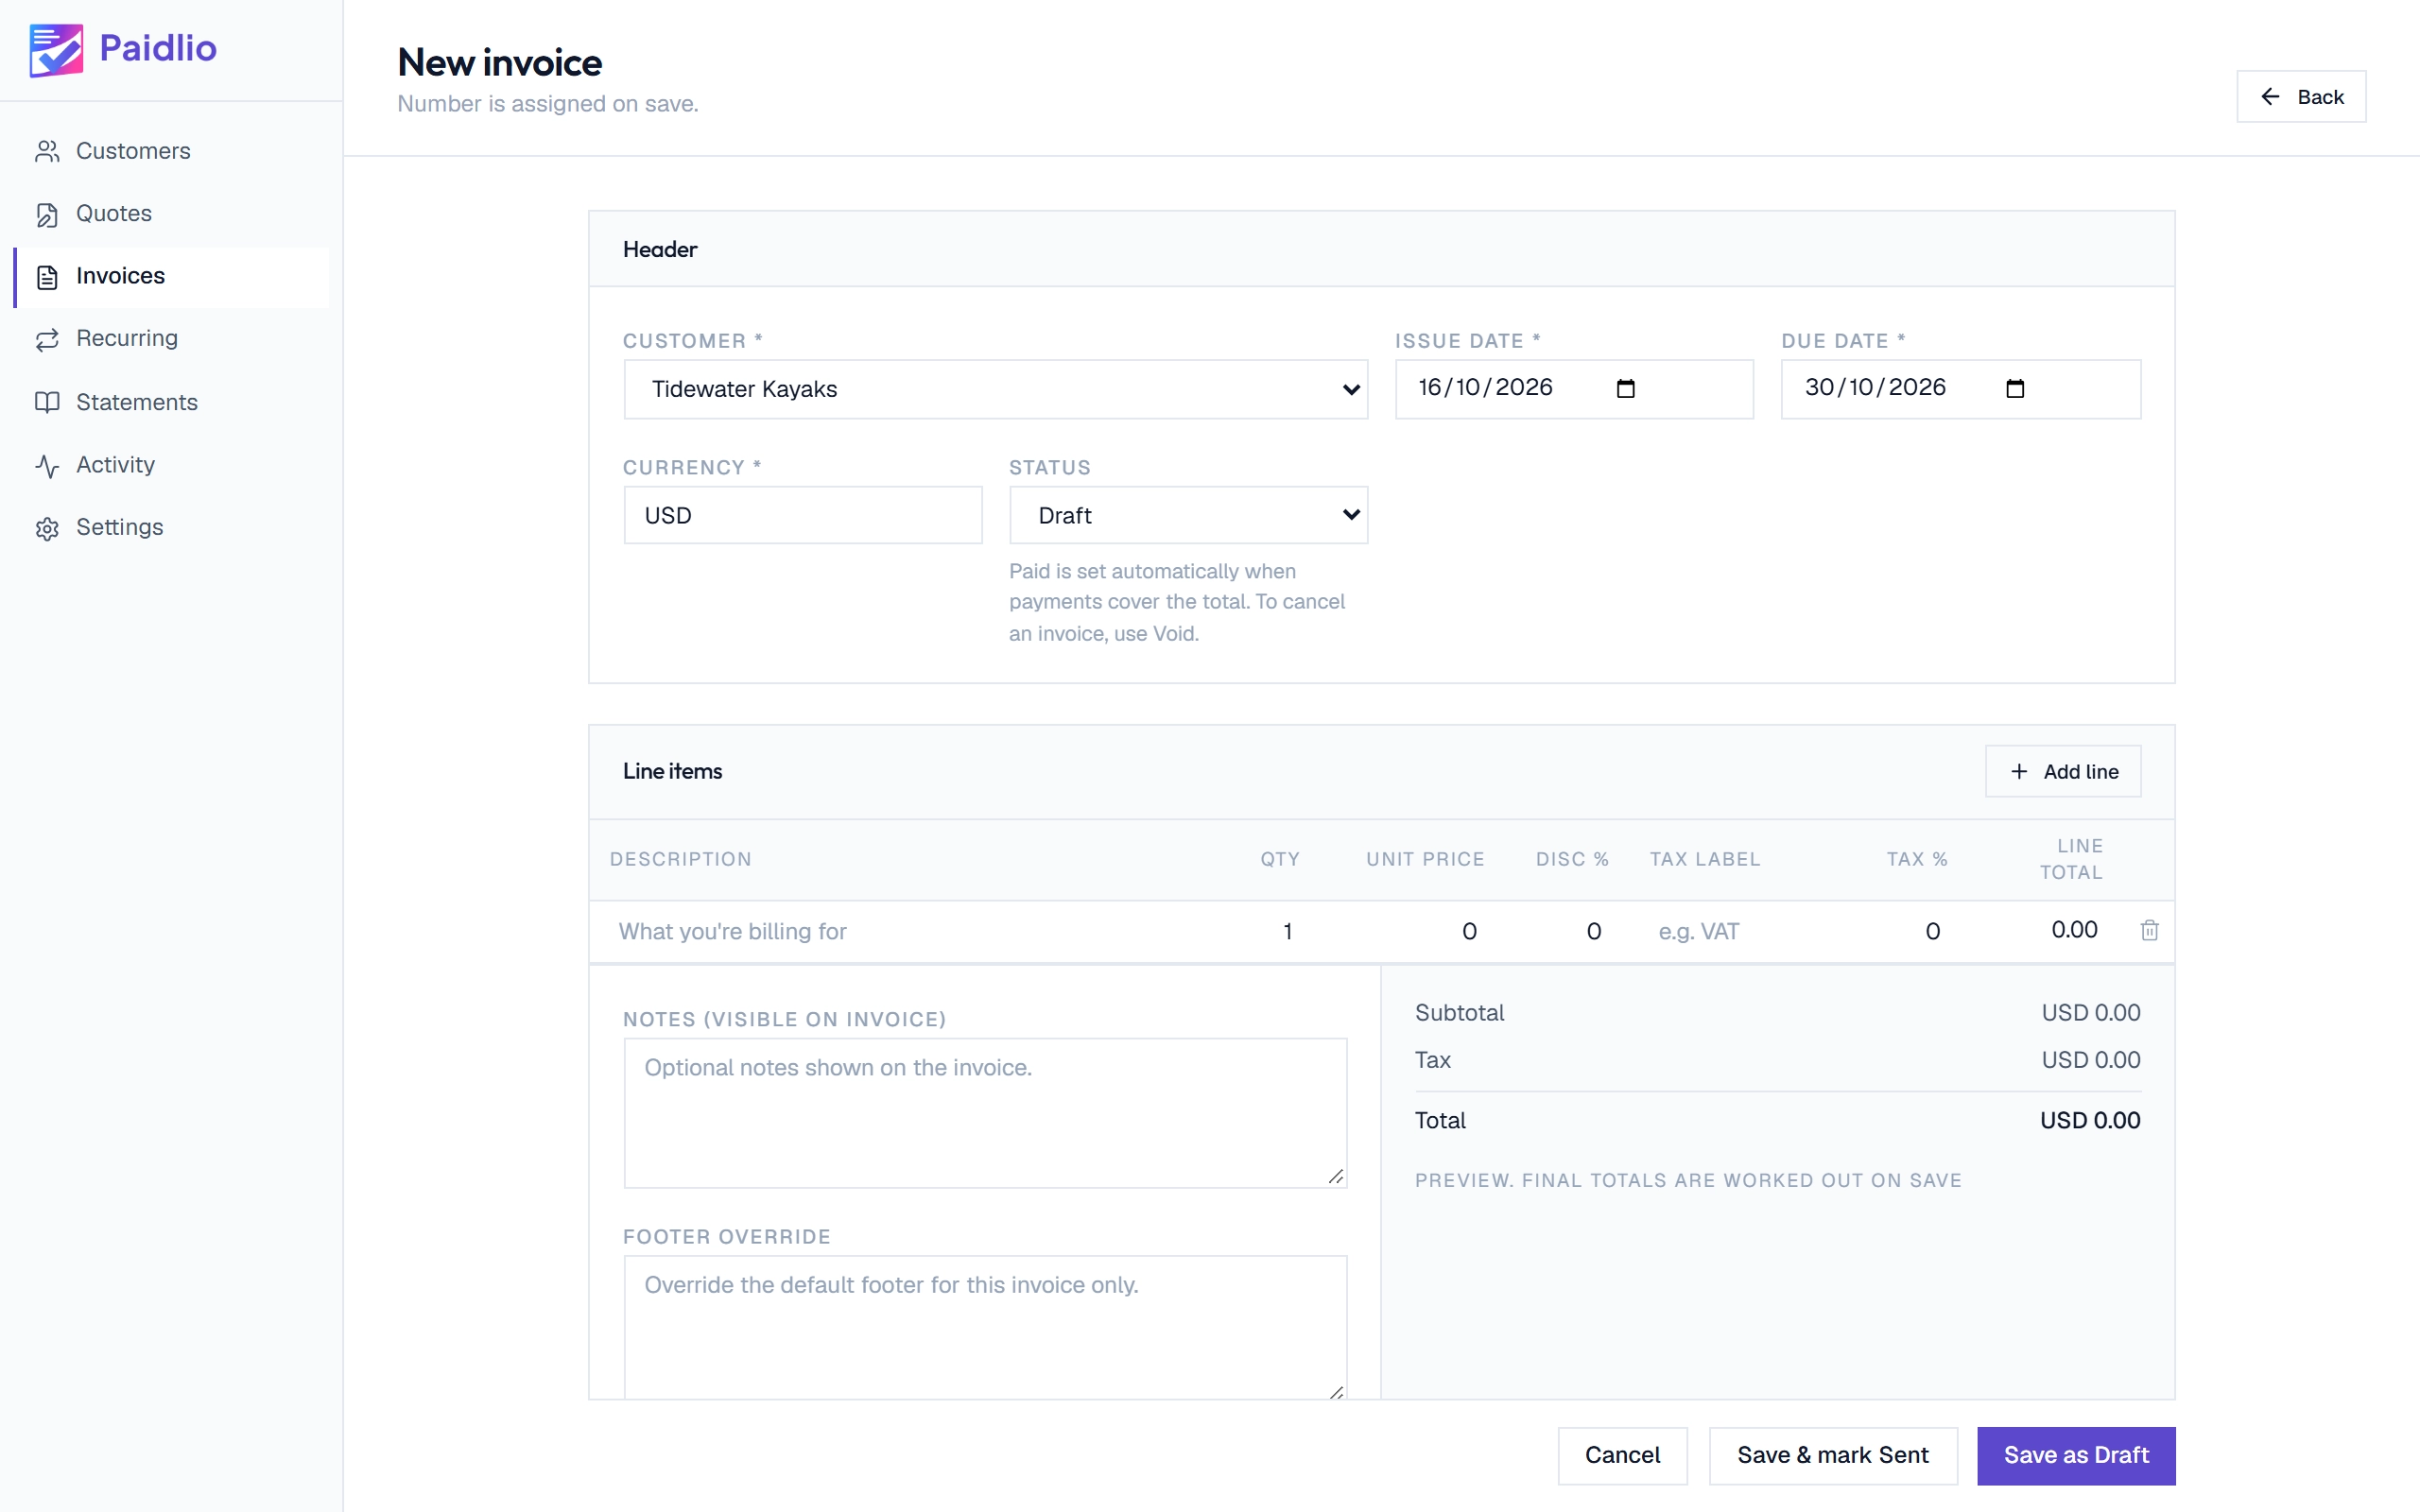
Choose the customer
Pick the customer and Paidlio fills in their currency and works out the due date from their payment terms. You can still change either one for this invoice.
Create an invoiceStep 3 of 4
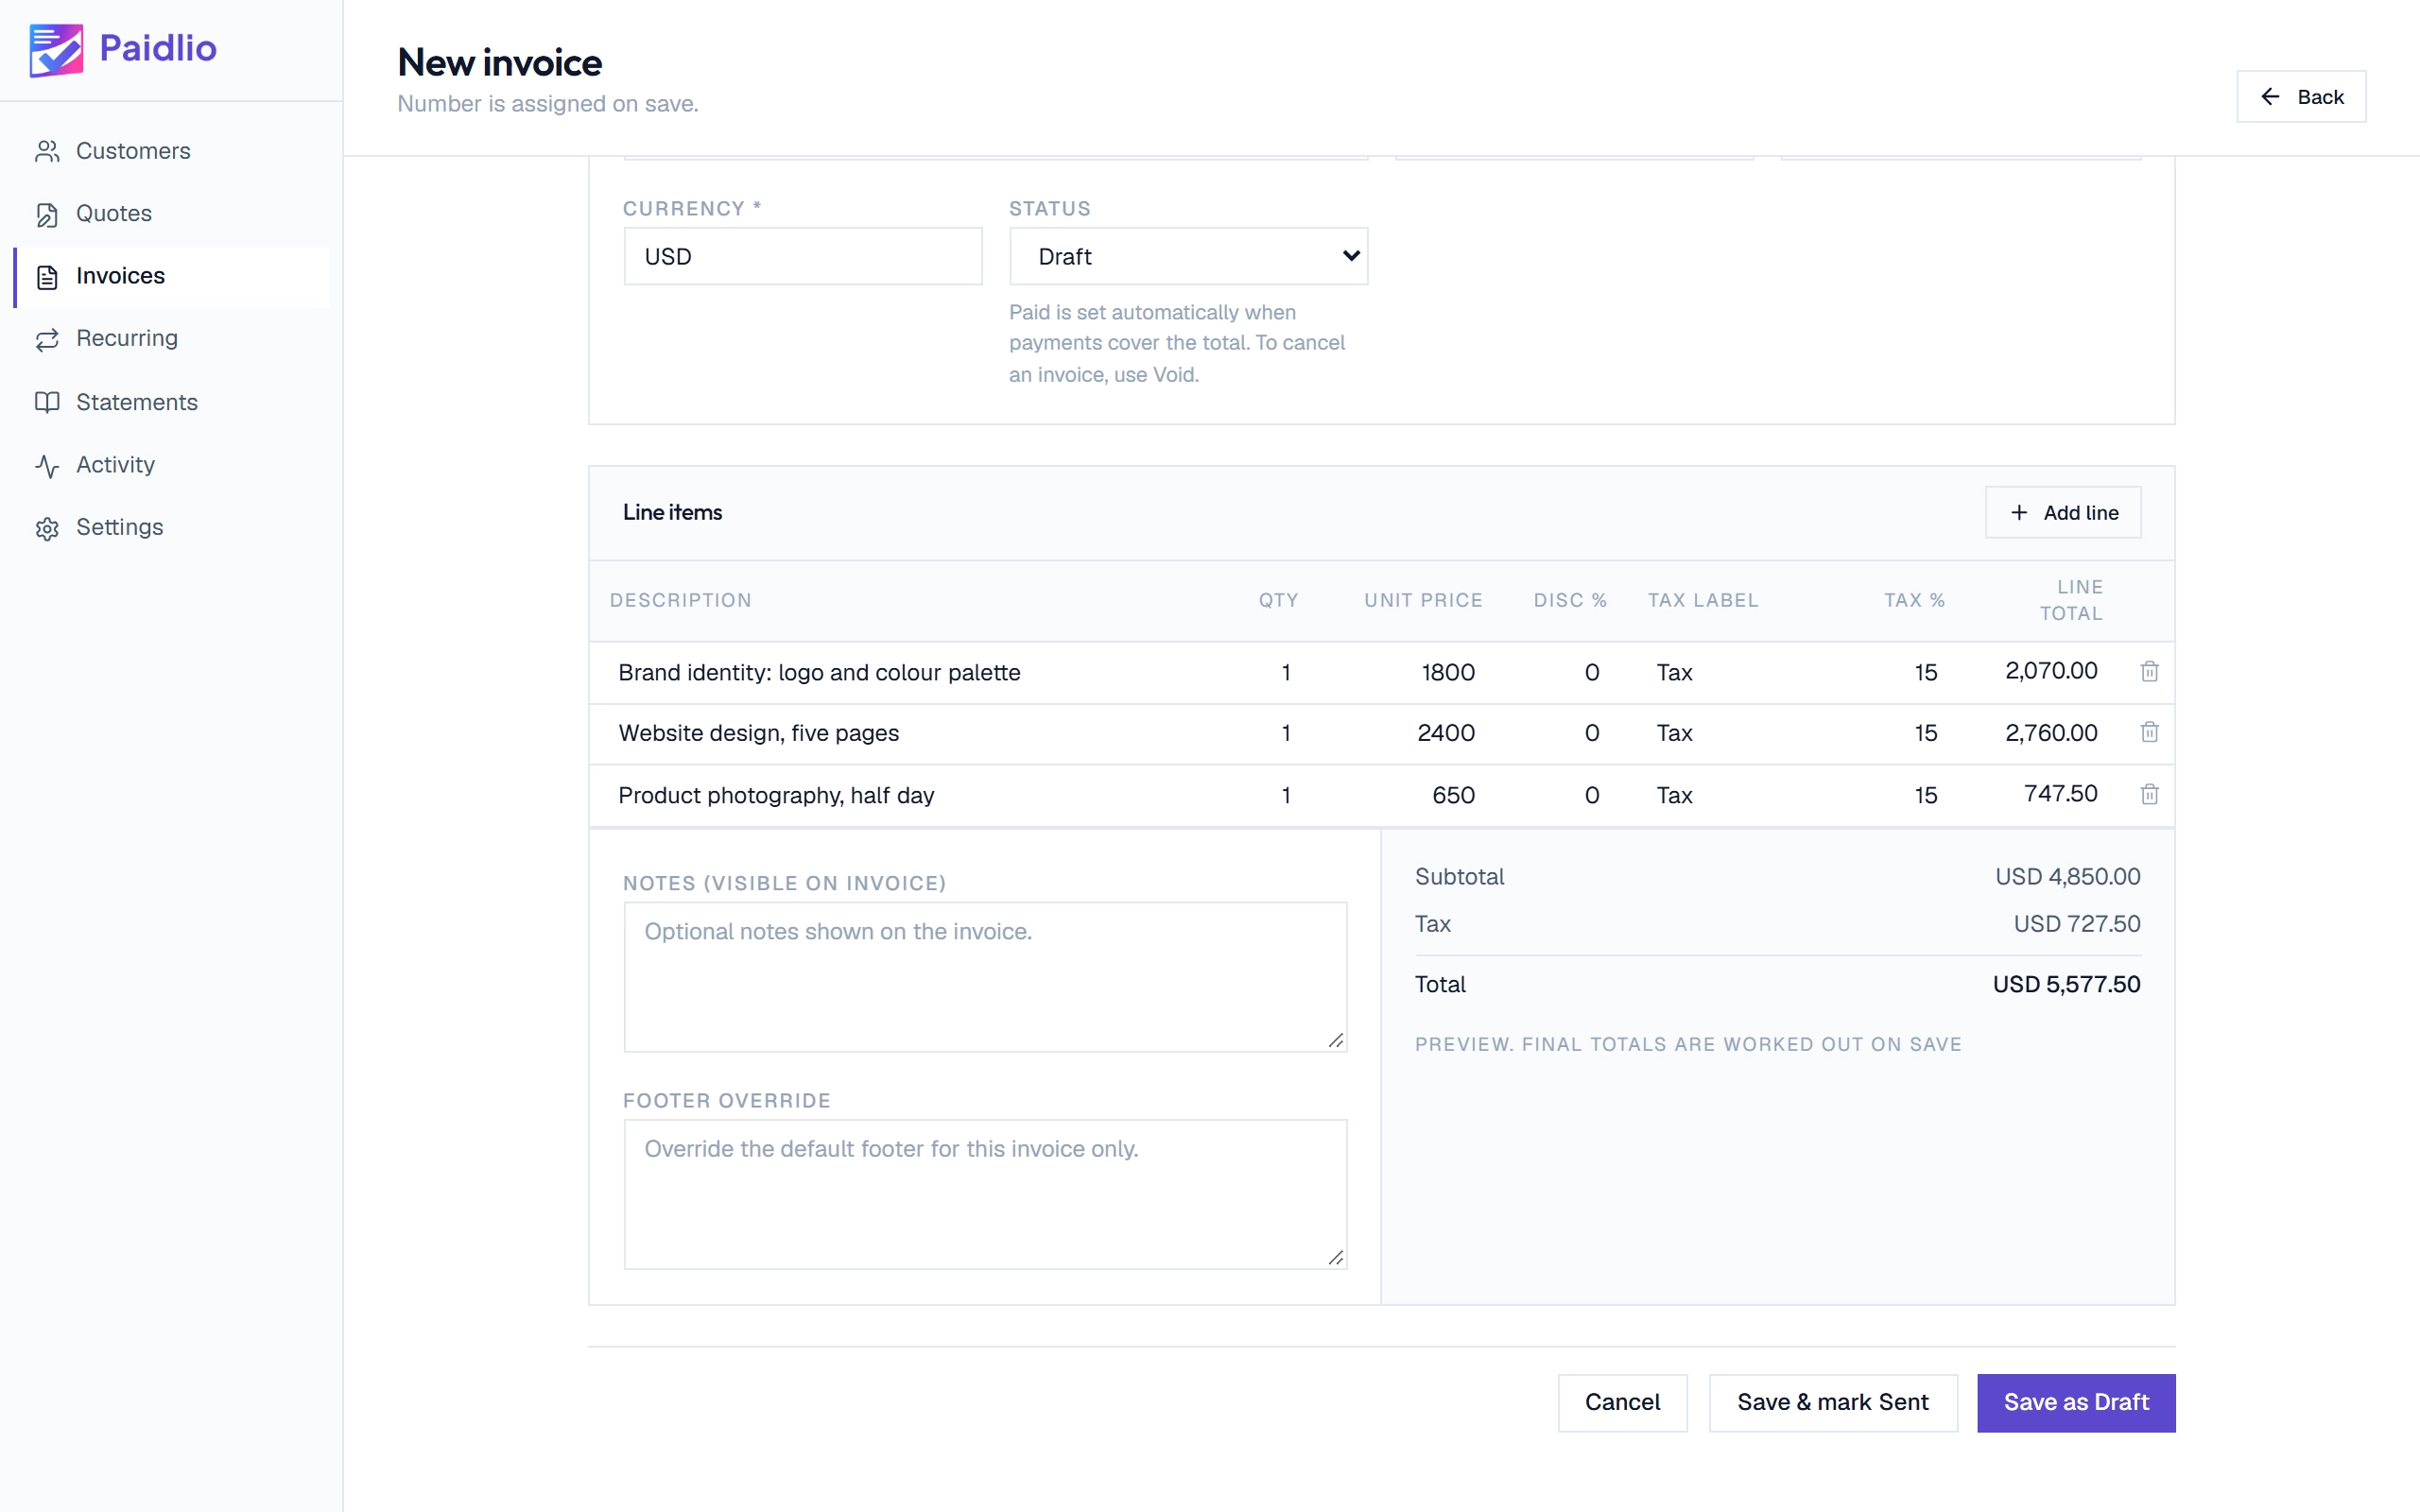
Add what you are billing for
Each line has a description, a quantity and a price. Tax is two fields, a label and a rate, so it prints the way your customer expects, whether that is VAT, GST or sales tax. The totals beside the lines update as you type.
Create an invoiceStep 4 of 4
Save it as sent or as a draft
Saving gives the invoice the next number in your sequence. Use Save and mark Sent when it is ready to go. Use Save as Draft if you are still working on it, and it stays off their statement until you send it.
Send itStep 1 of 3
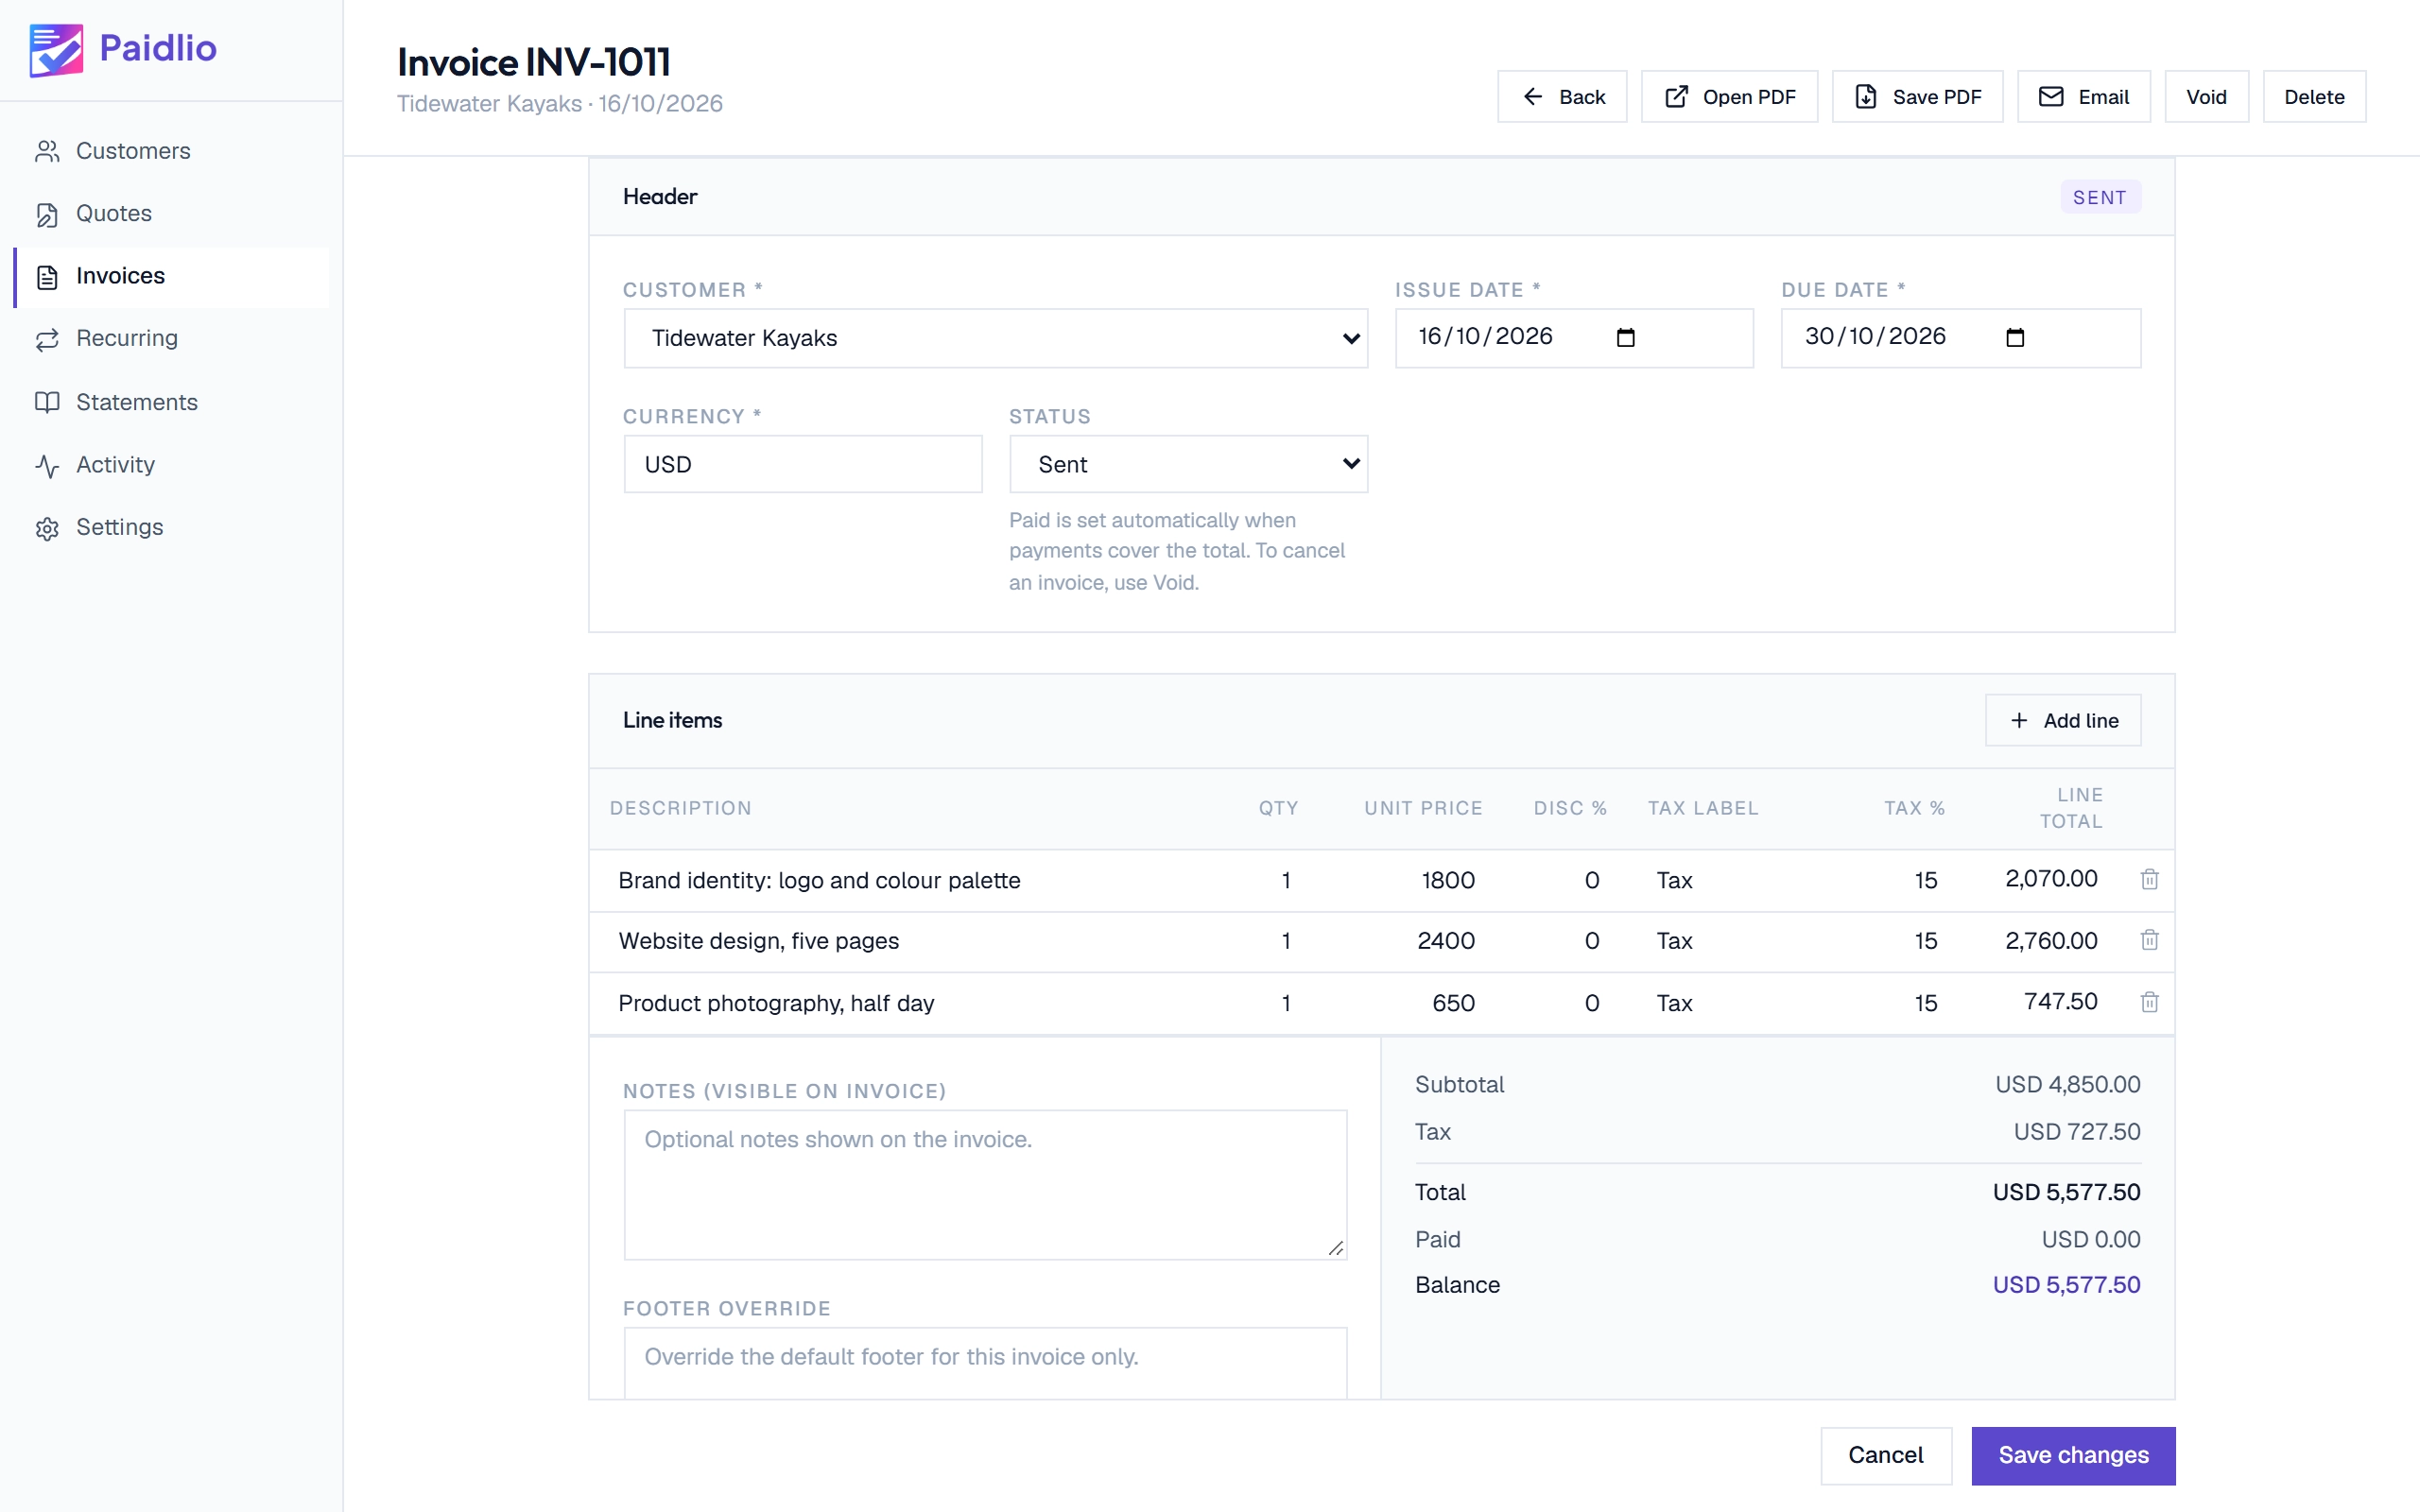
Save the PDF or email it
A saved invoice has its own toolbar. Save PDF writes the file wherever you choose, Open PDF shows it in your PDF viewer, and Email sends it from your own address once email is set up.
Send itStep 2 of 3
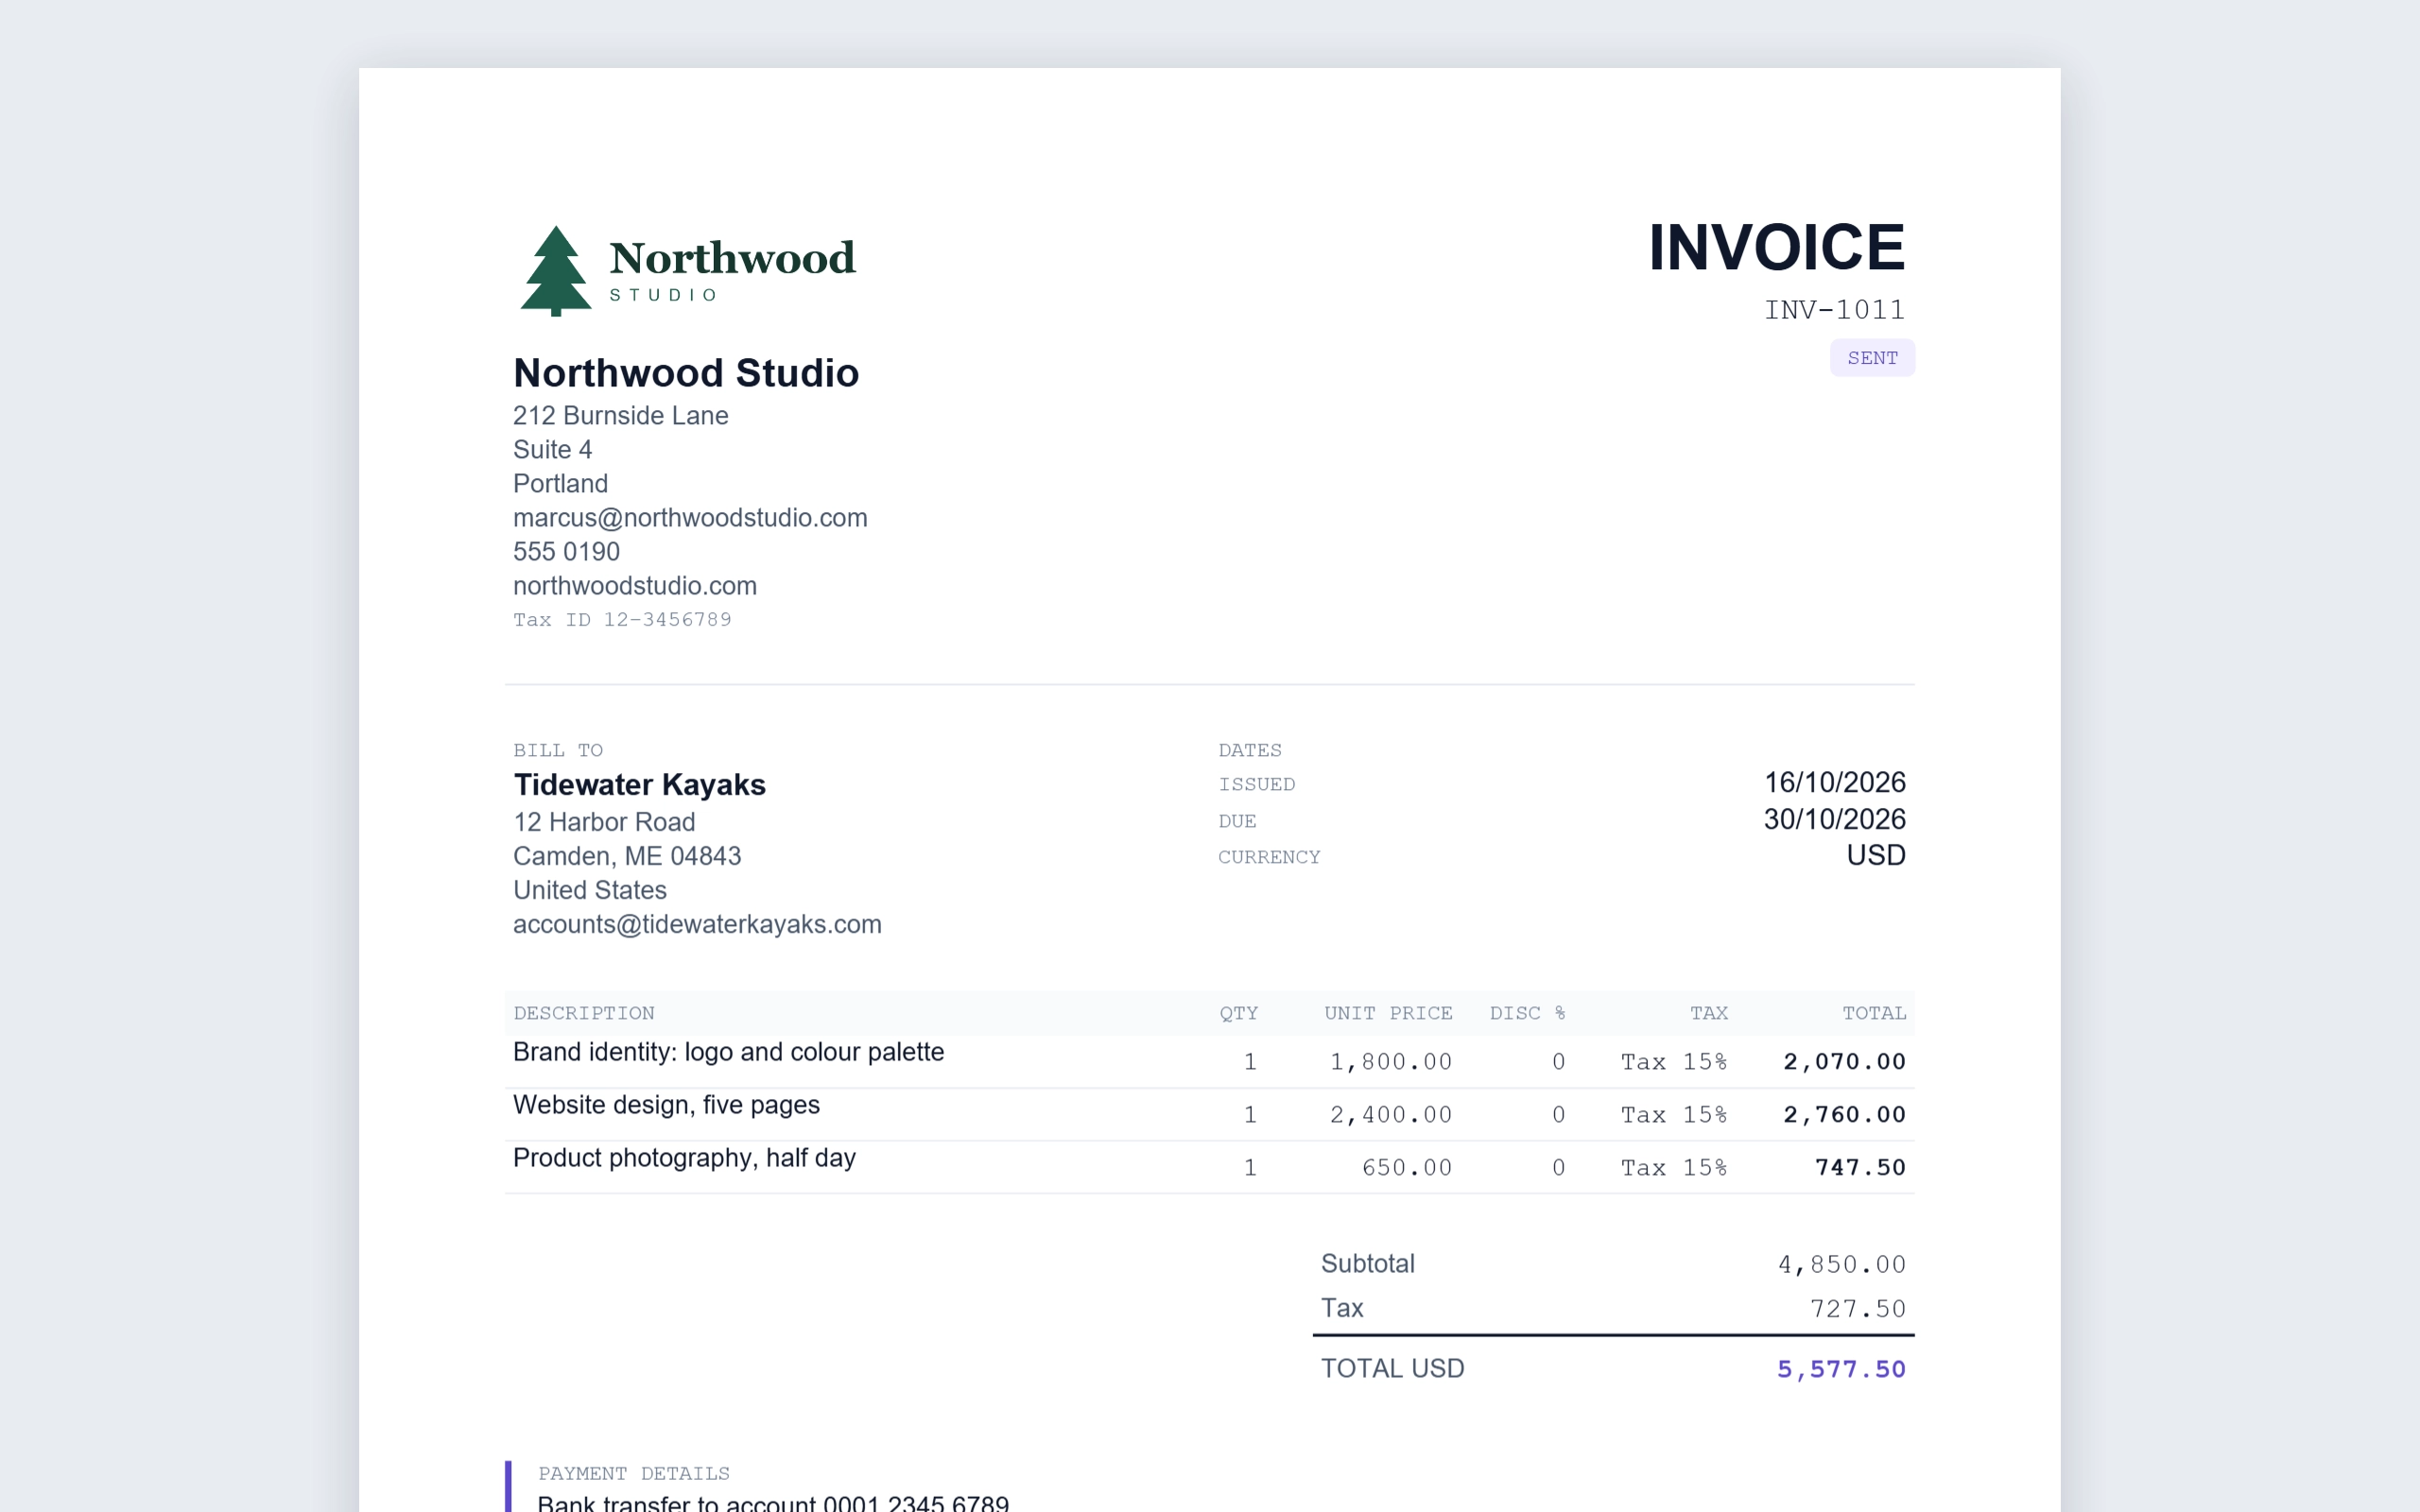
This is what your customer receives
Your logo and letterhead at the top, their details, each line with its tax, and the total in your accent colour. Your payment details print underneath. The PDF is made on your own computer.
Send itStep 3 of 3
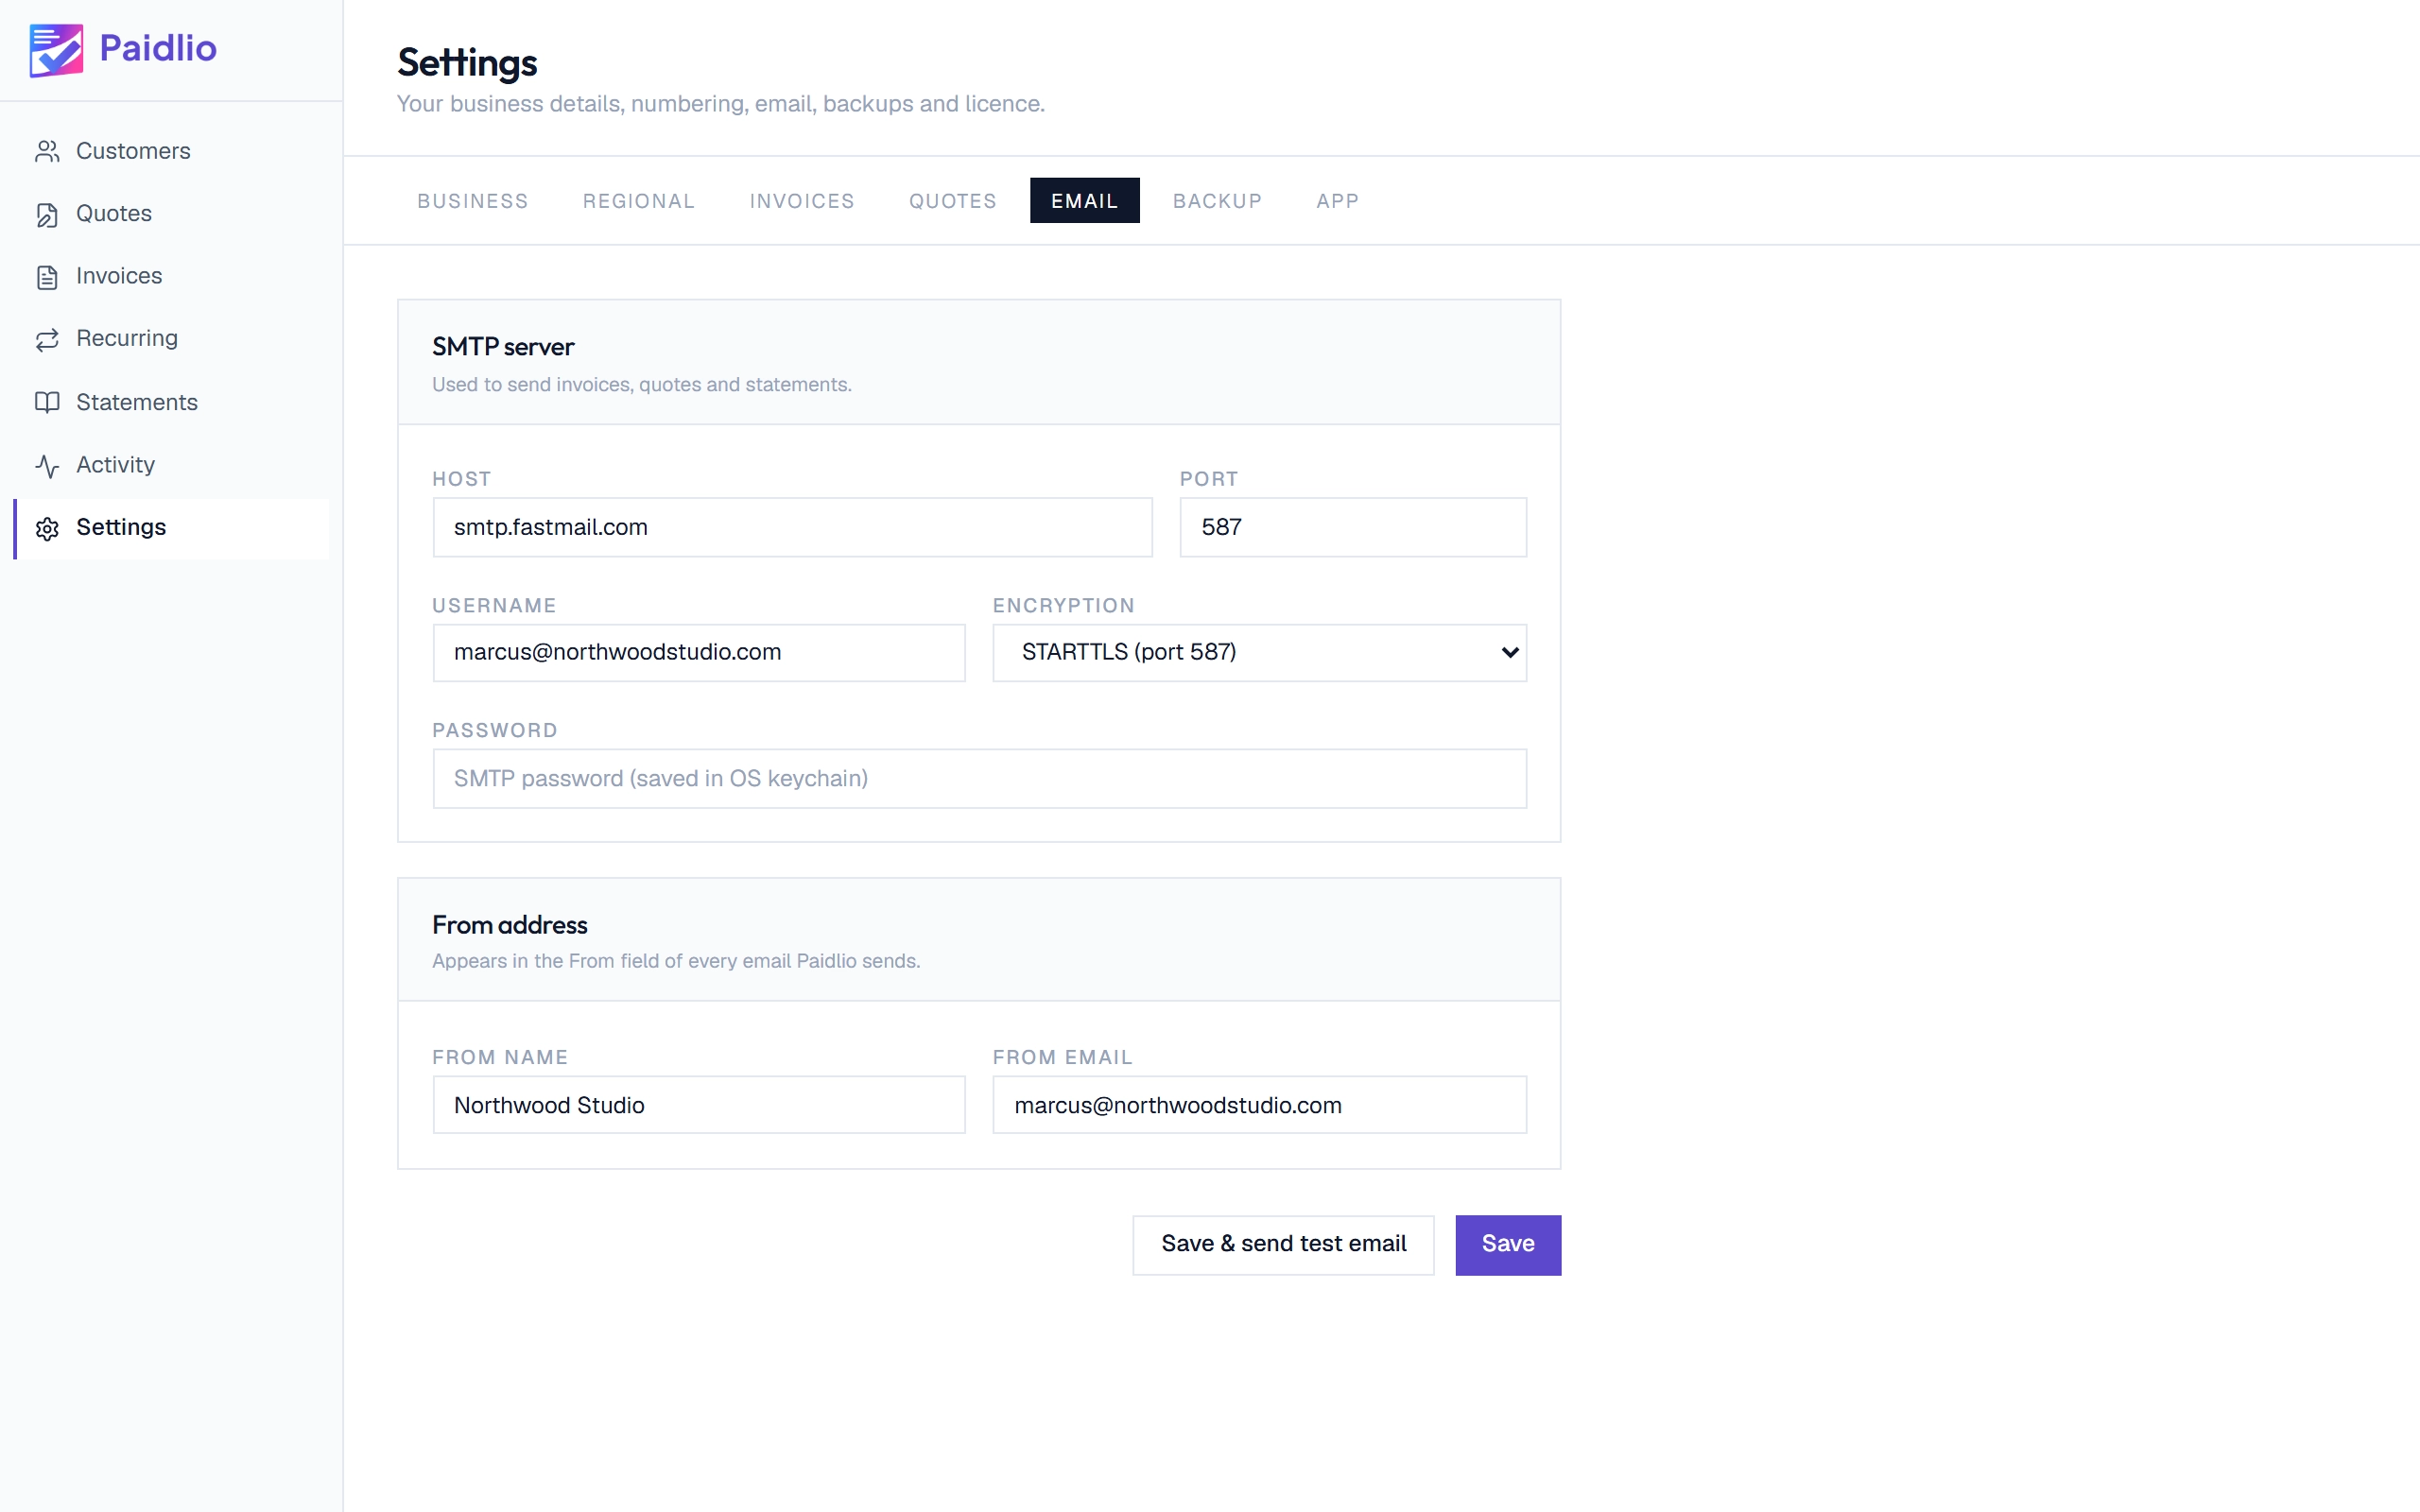
Email from your own address
To send from inside Paidlio, enter the SMTP details from your mail provider once under Settings, Email. Invoices, quotes and statements then go out from your own address with the PDF attached. Save and send test email checks the details work.
Record a paymentStep 1 of 3
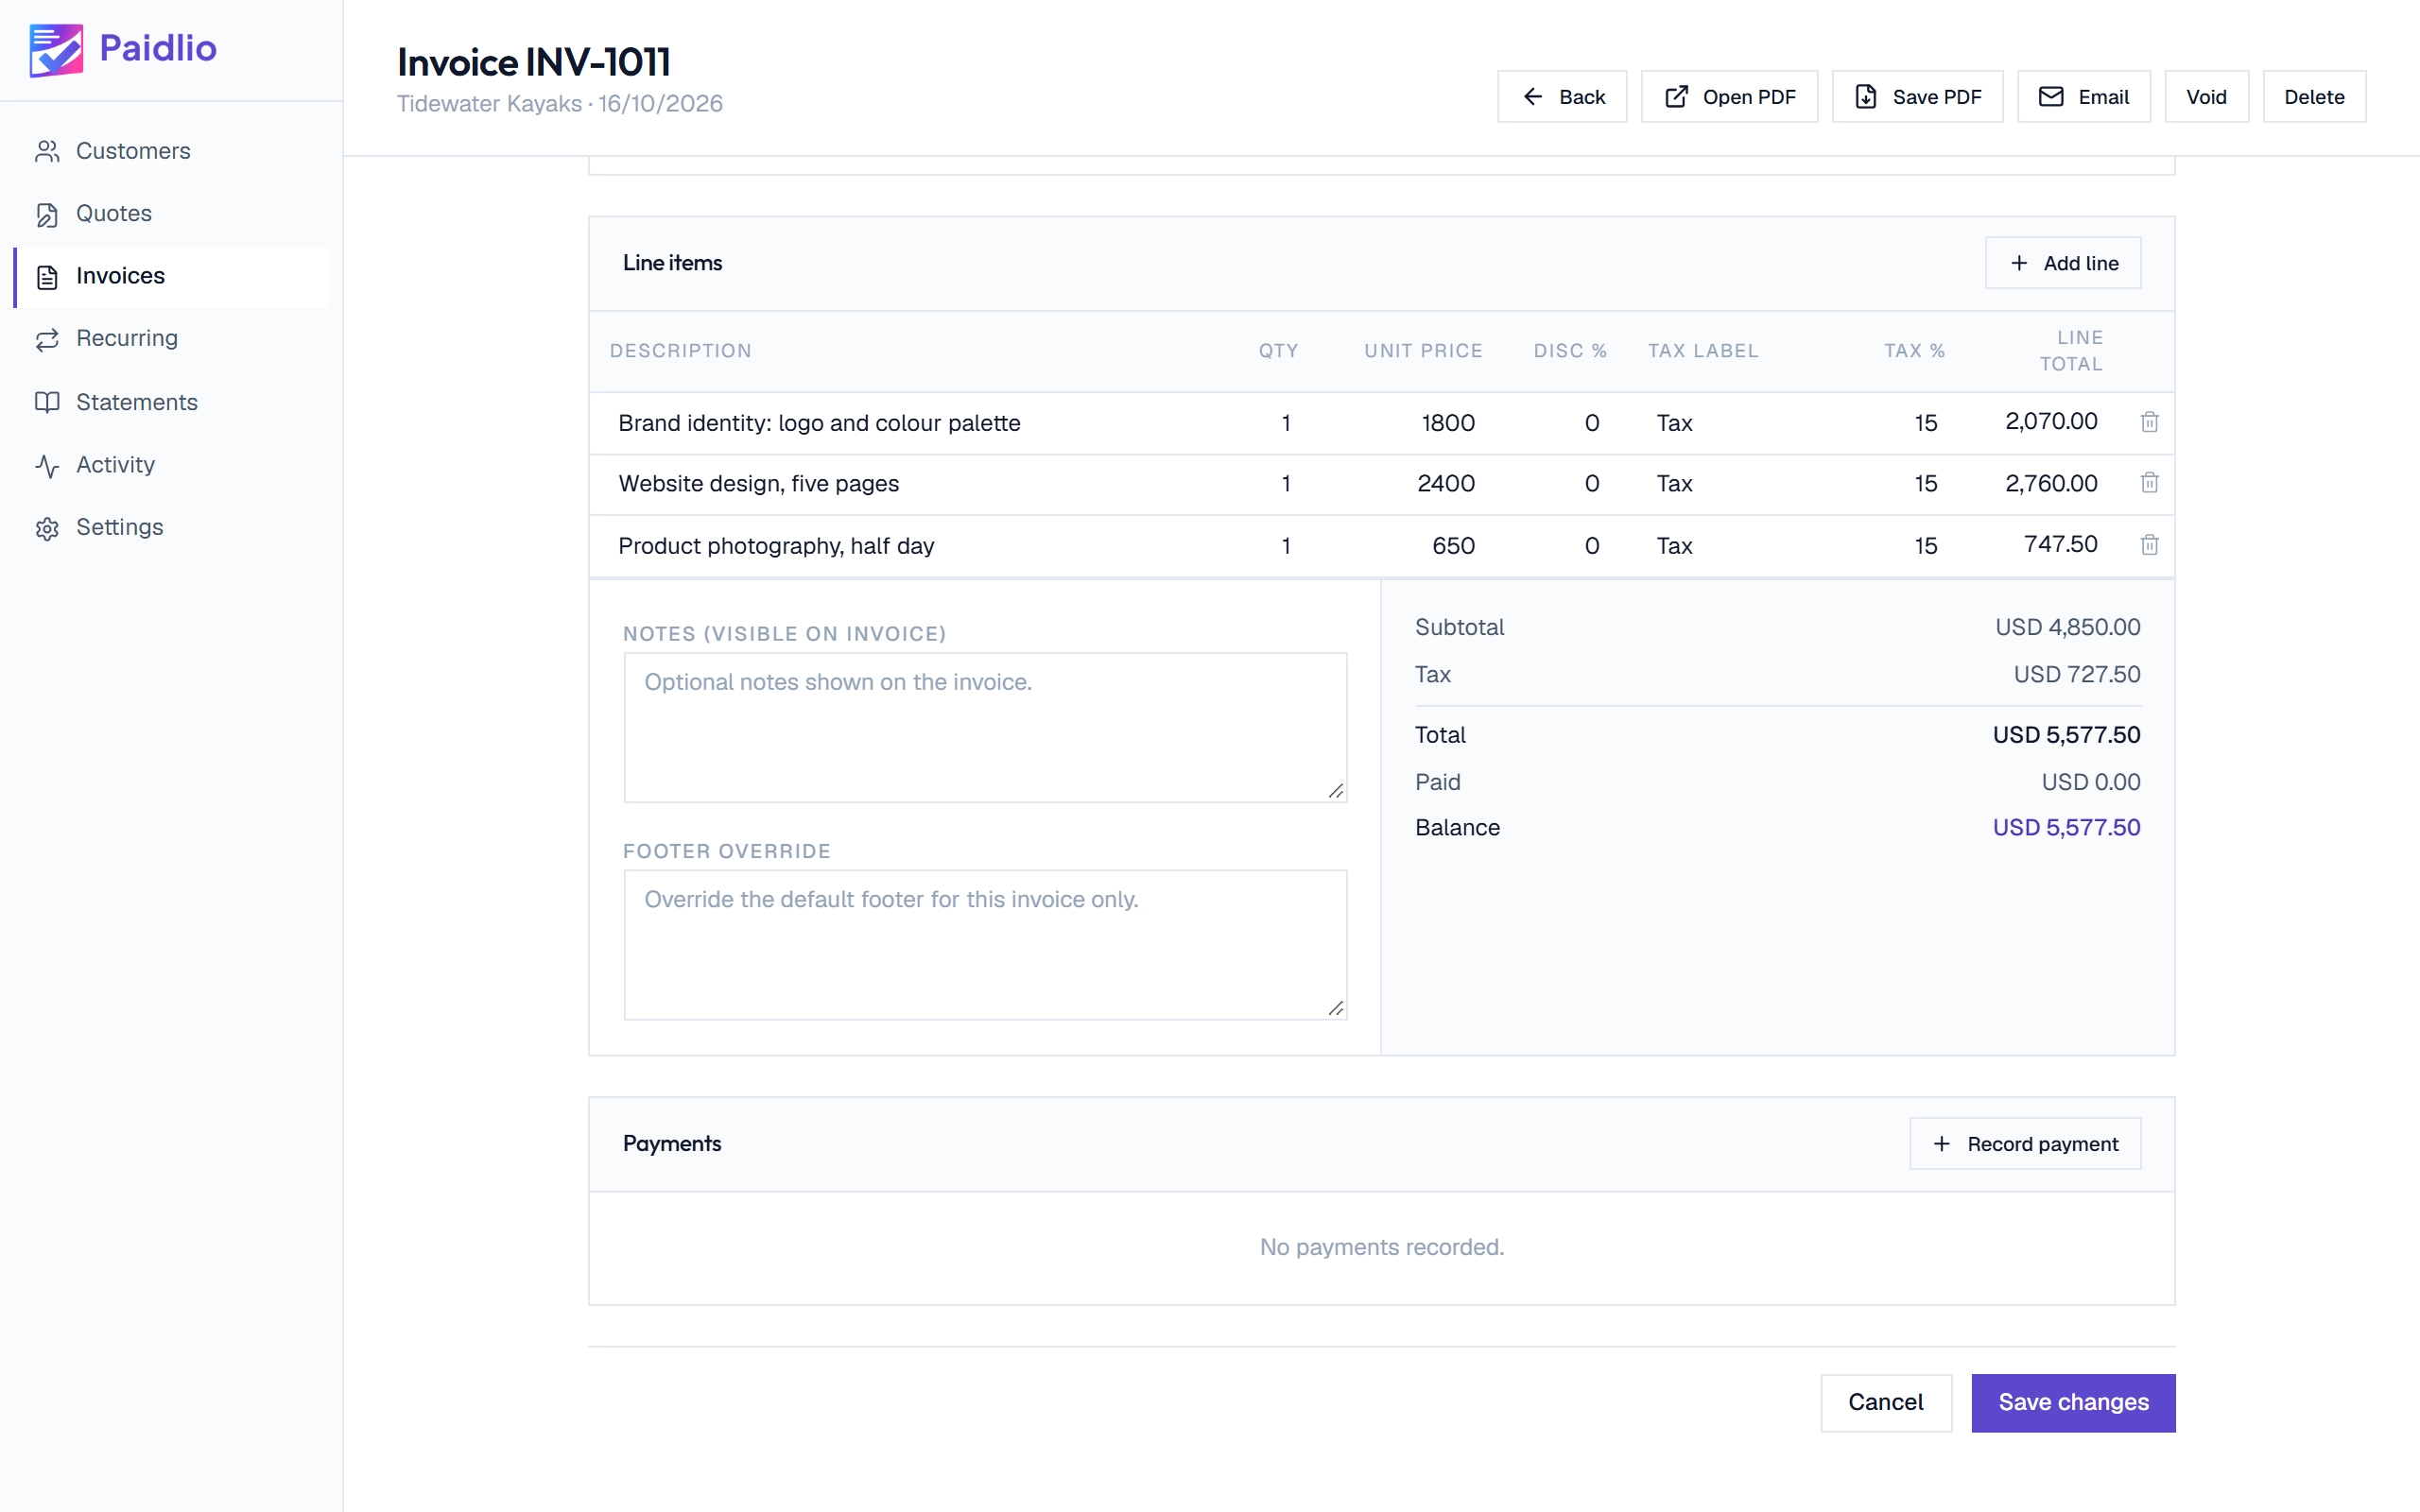
Open the invoice and click Record payment
When the money arrives, open the invoice and scroll down to Payments. The totals above show what has been paid so far and the balance still owed.
Record a paymentStep 2 of 3
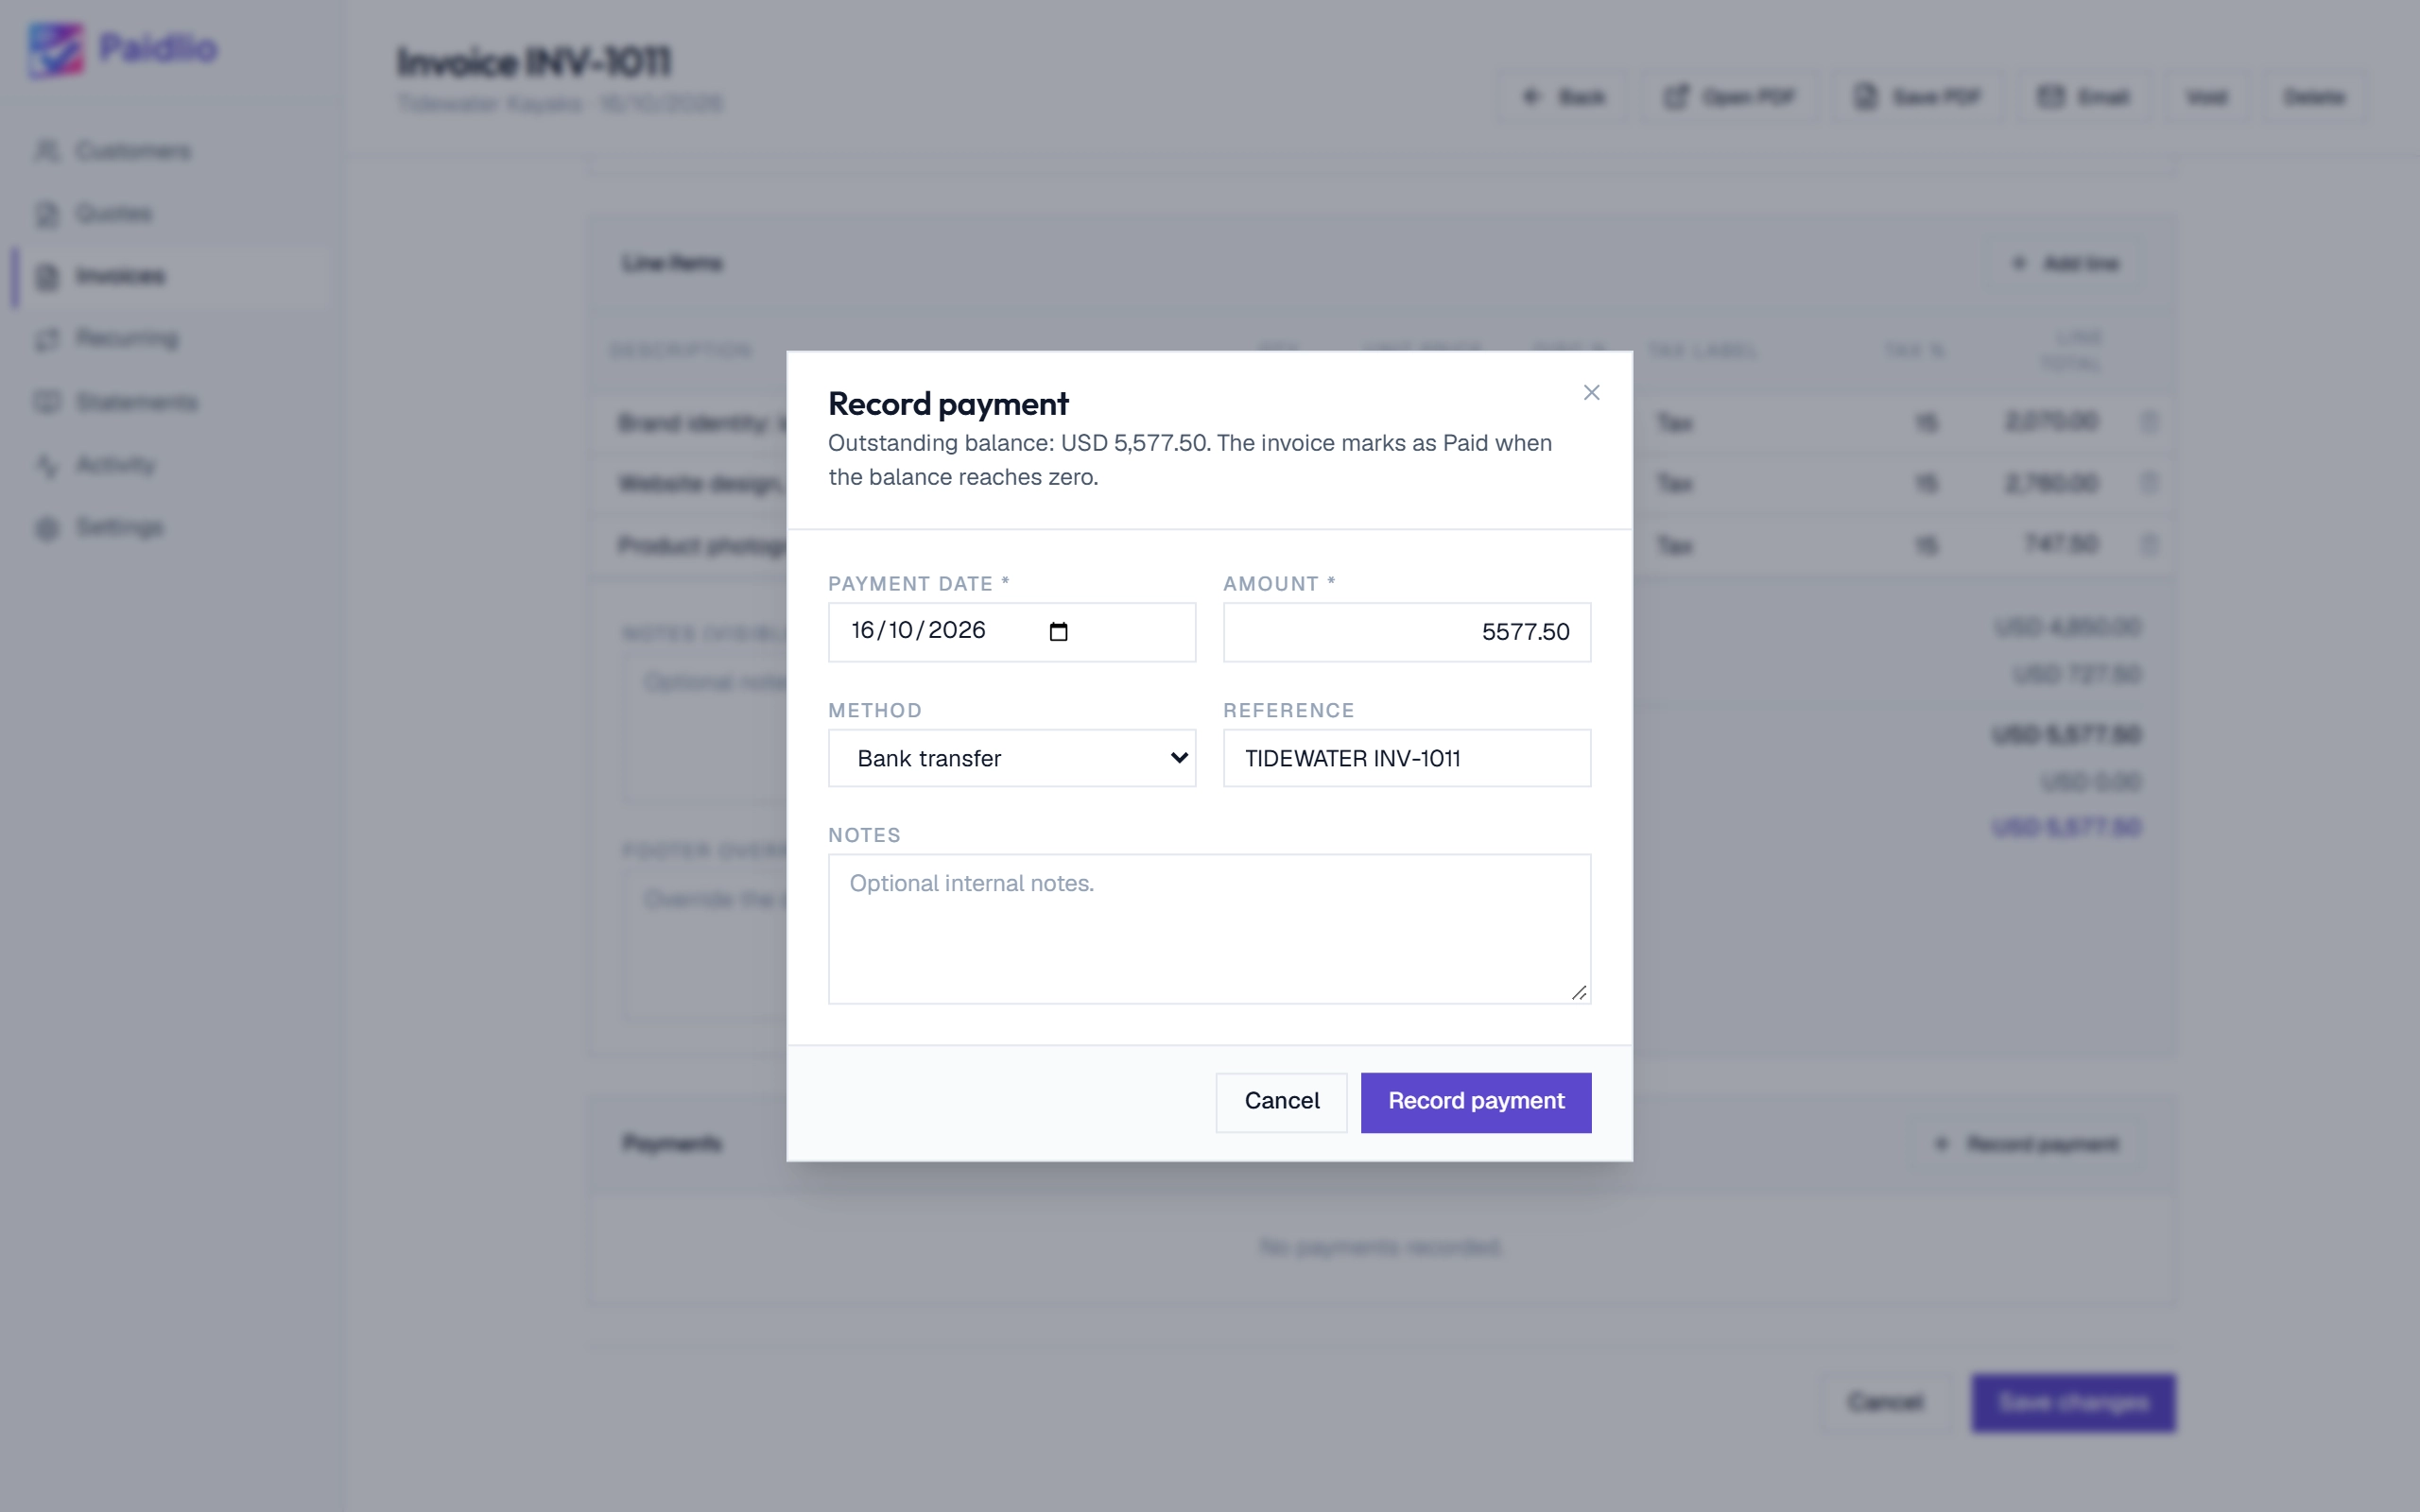
Enter the amount
Type what you received, and add the method and a reference if you want them on record. Part payments are fine, just record each one as it lands.
Record a paymentStep 3 of 3
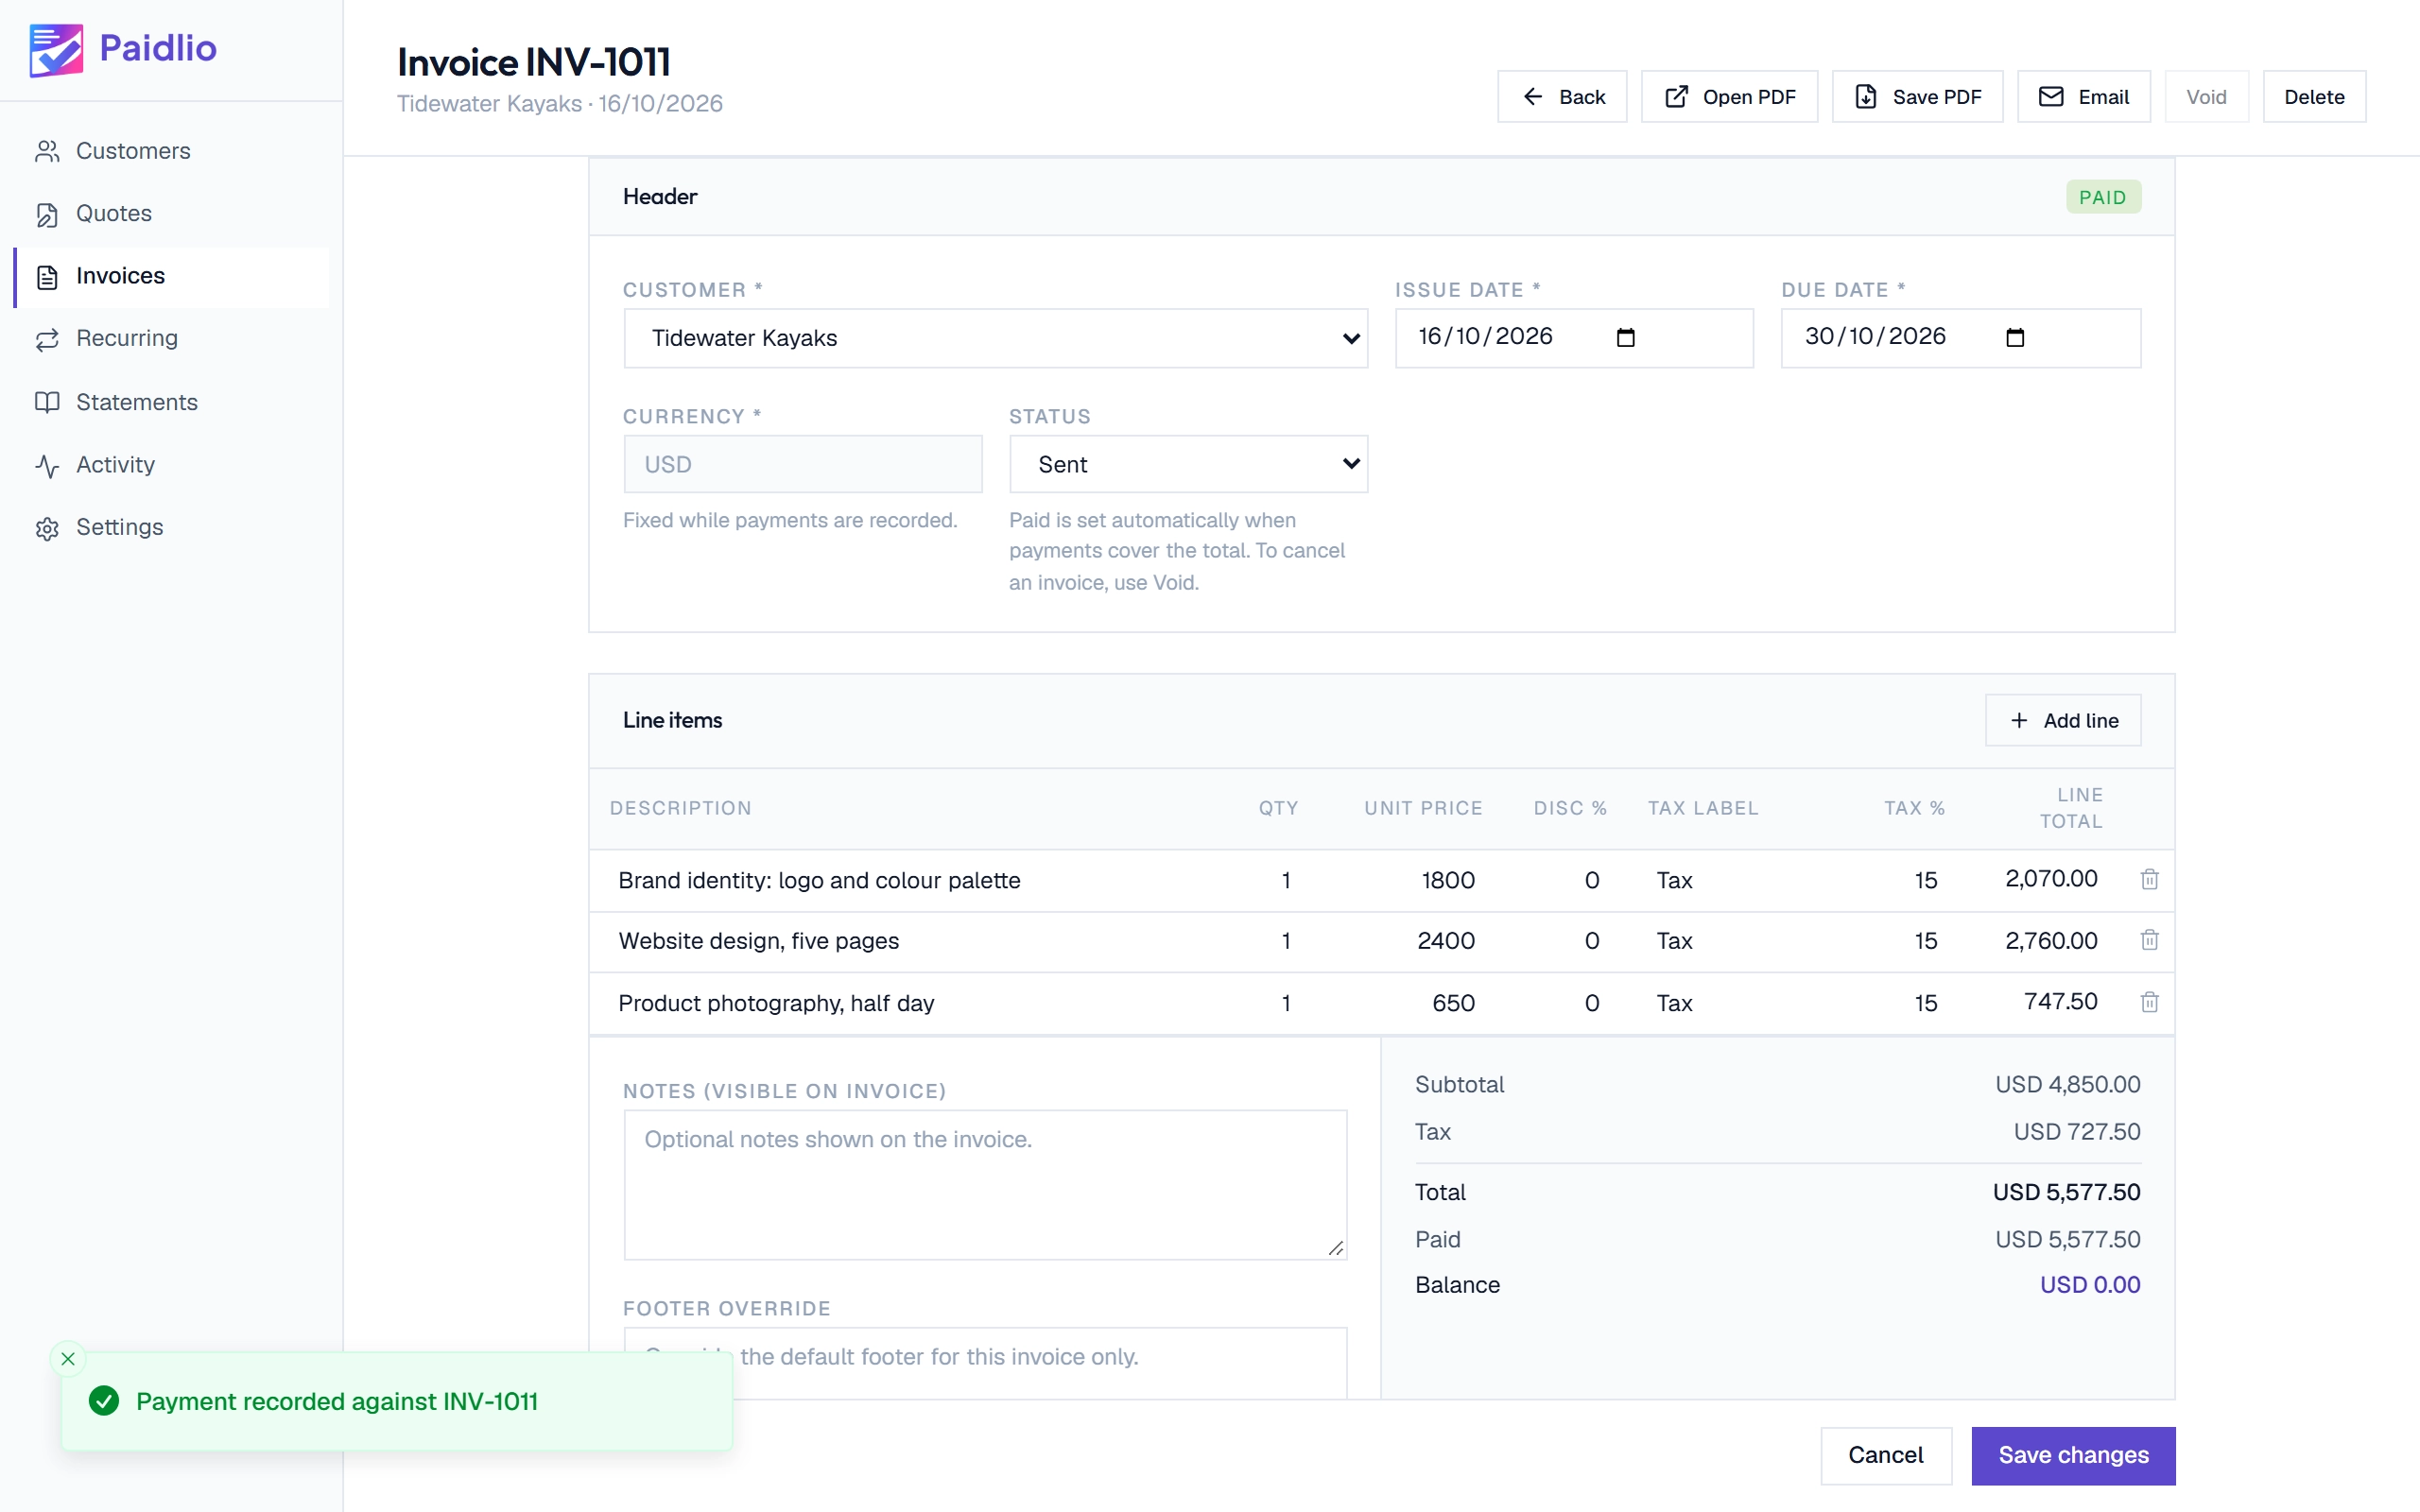
The invoice marks itself Paid
Once the payments cover the total, the status changes to Paid by itself and the balance reads zero.
Send a statementStep 1 of 3
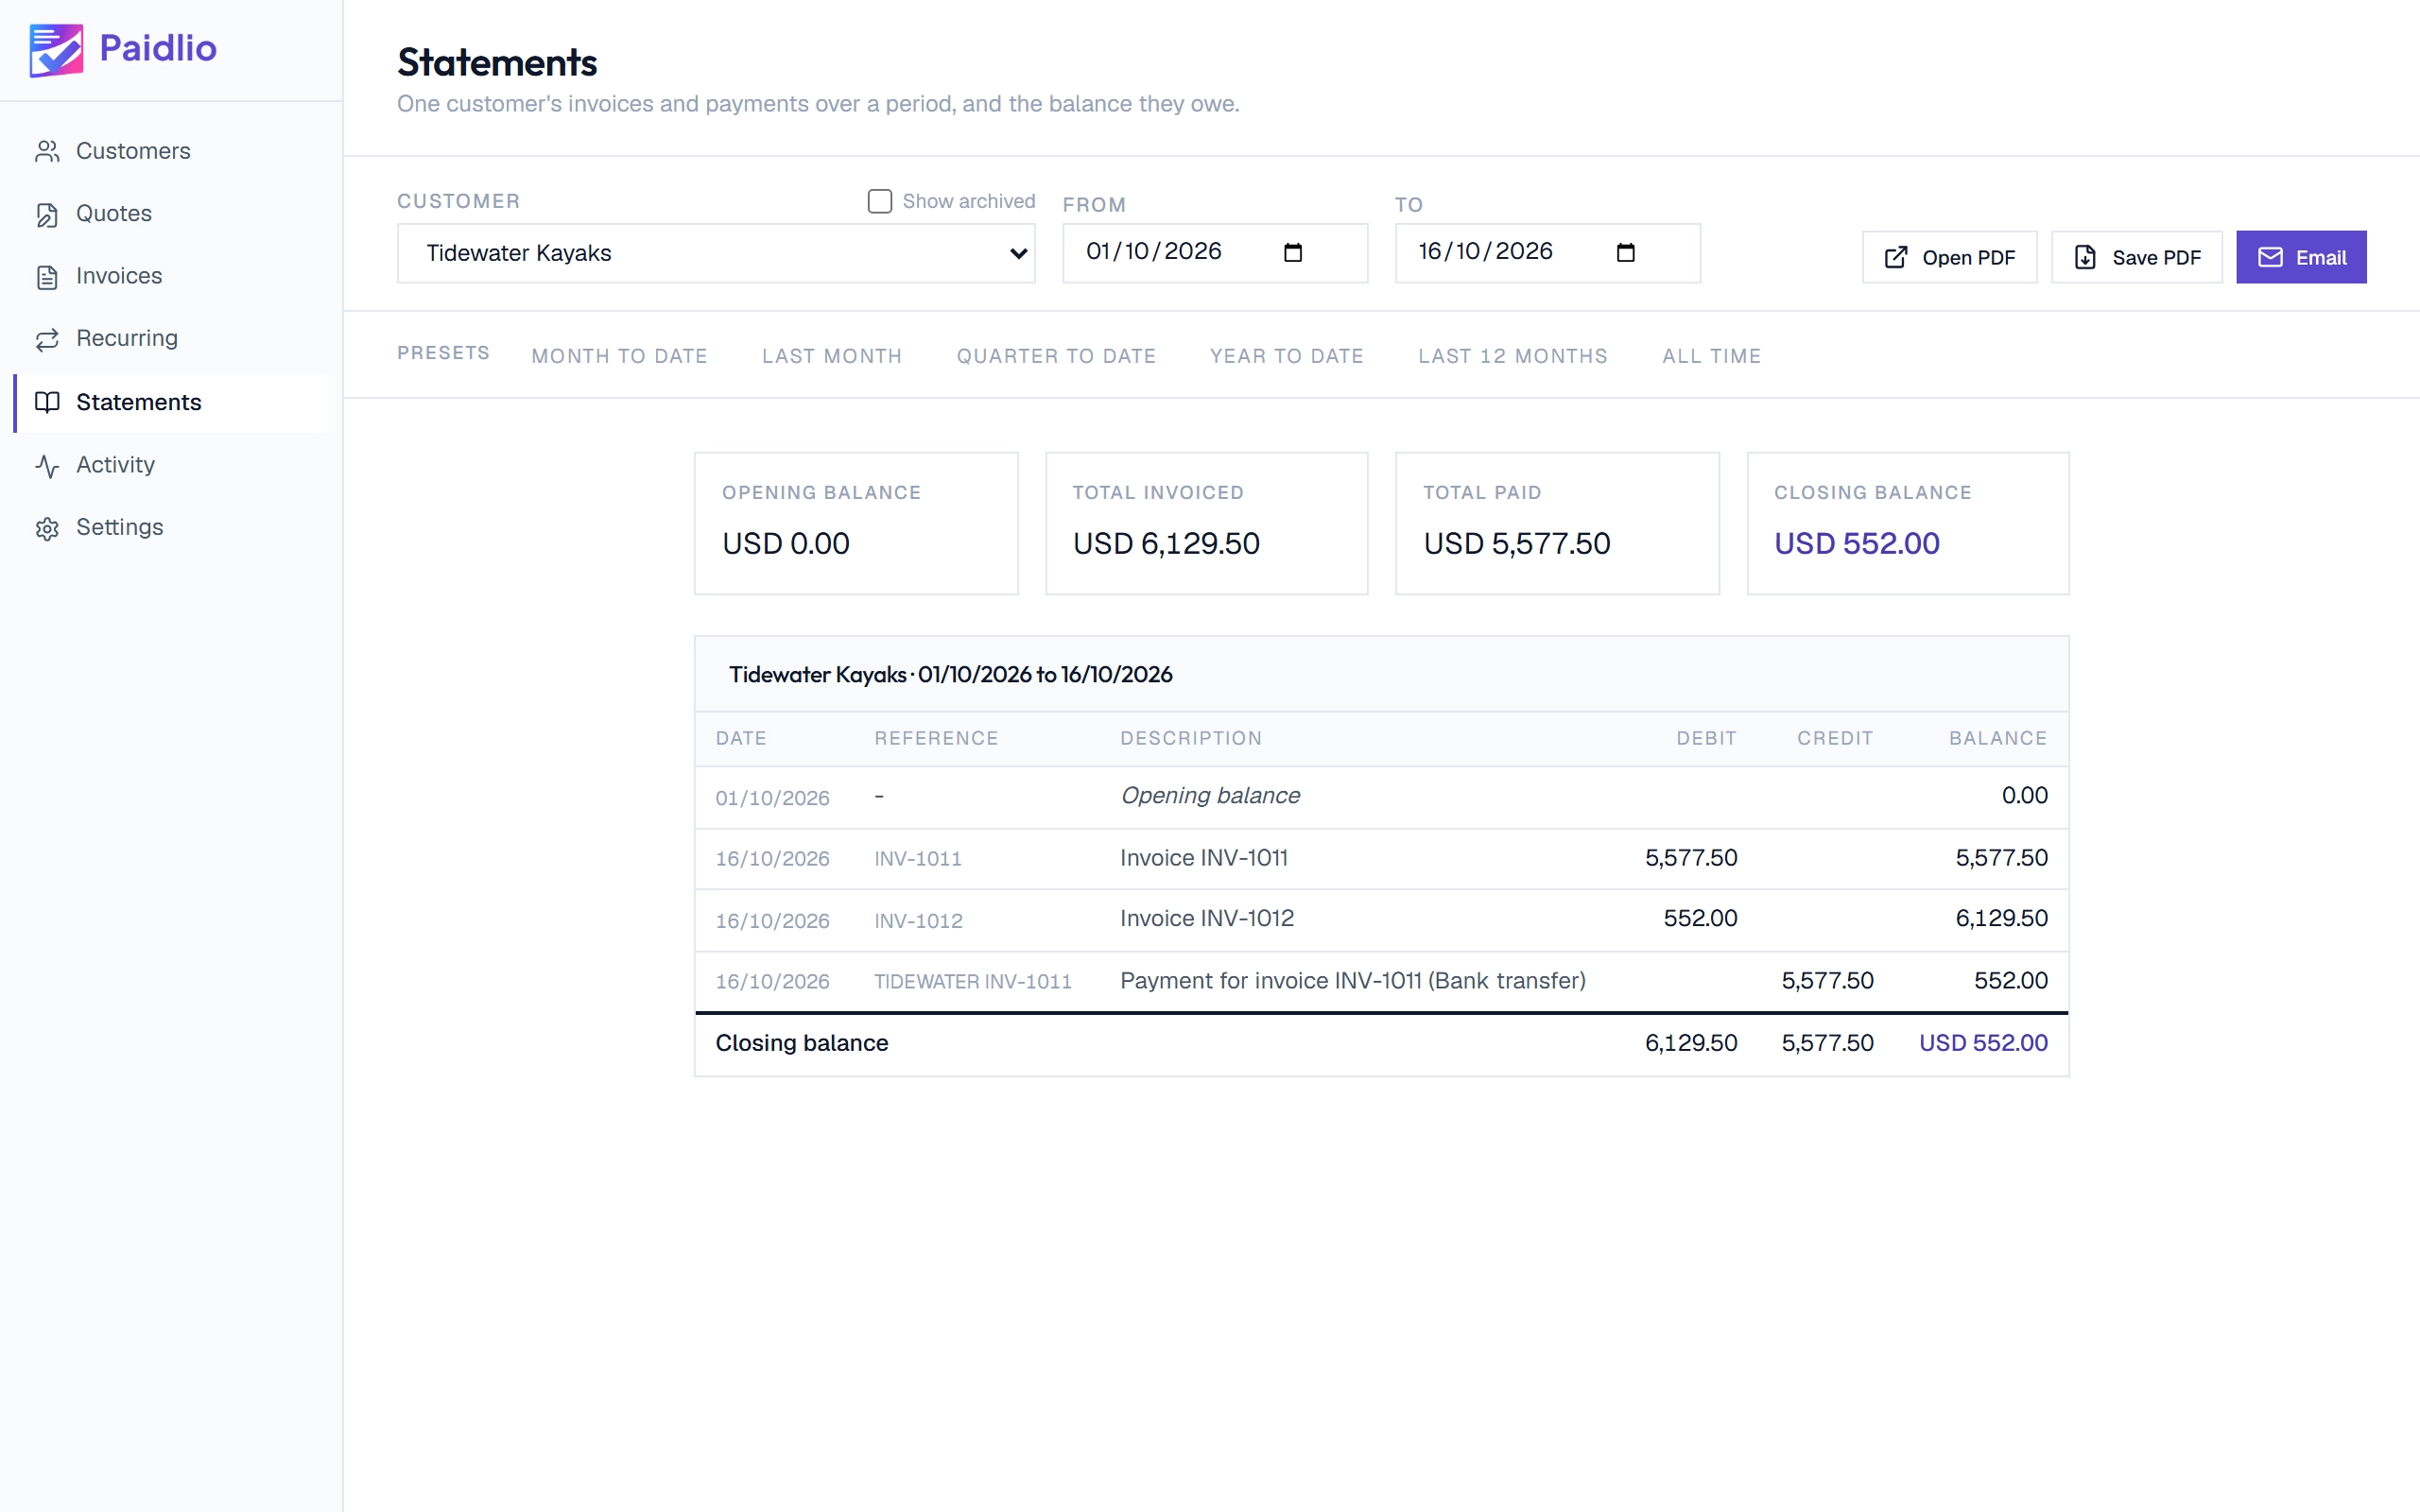
Pick a customer and a period
A statement shows the invoices and payments for one customer over a date range. Choose the customer, then set the dates or use a preset such as last month or year to date.
Send a statementStep 2 of 3
Read what they owe
The four figures at the top are the opening balance, what you invoiced, what they paid and the closing balance. Underneath, every invoice and payment in the period is listed with a running balance.
Send a statementStep 3 of 3
Save it or send it
Save PDF and Email work the same way they do on an invoice, and the statement goes out on your letterhead.
Quote before you invoiceStep 1 of 5
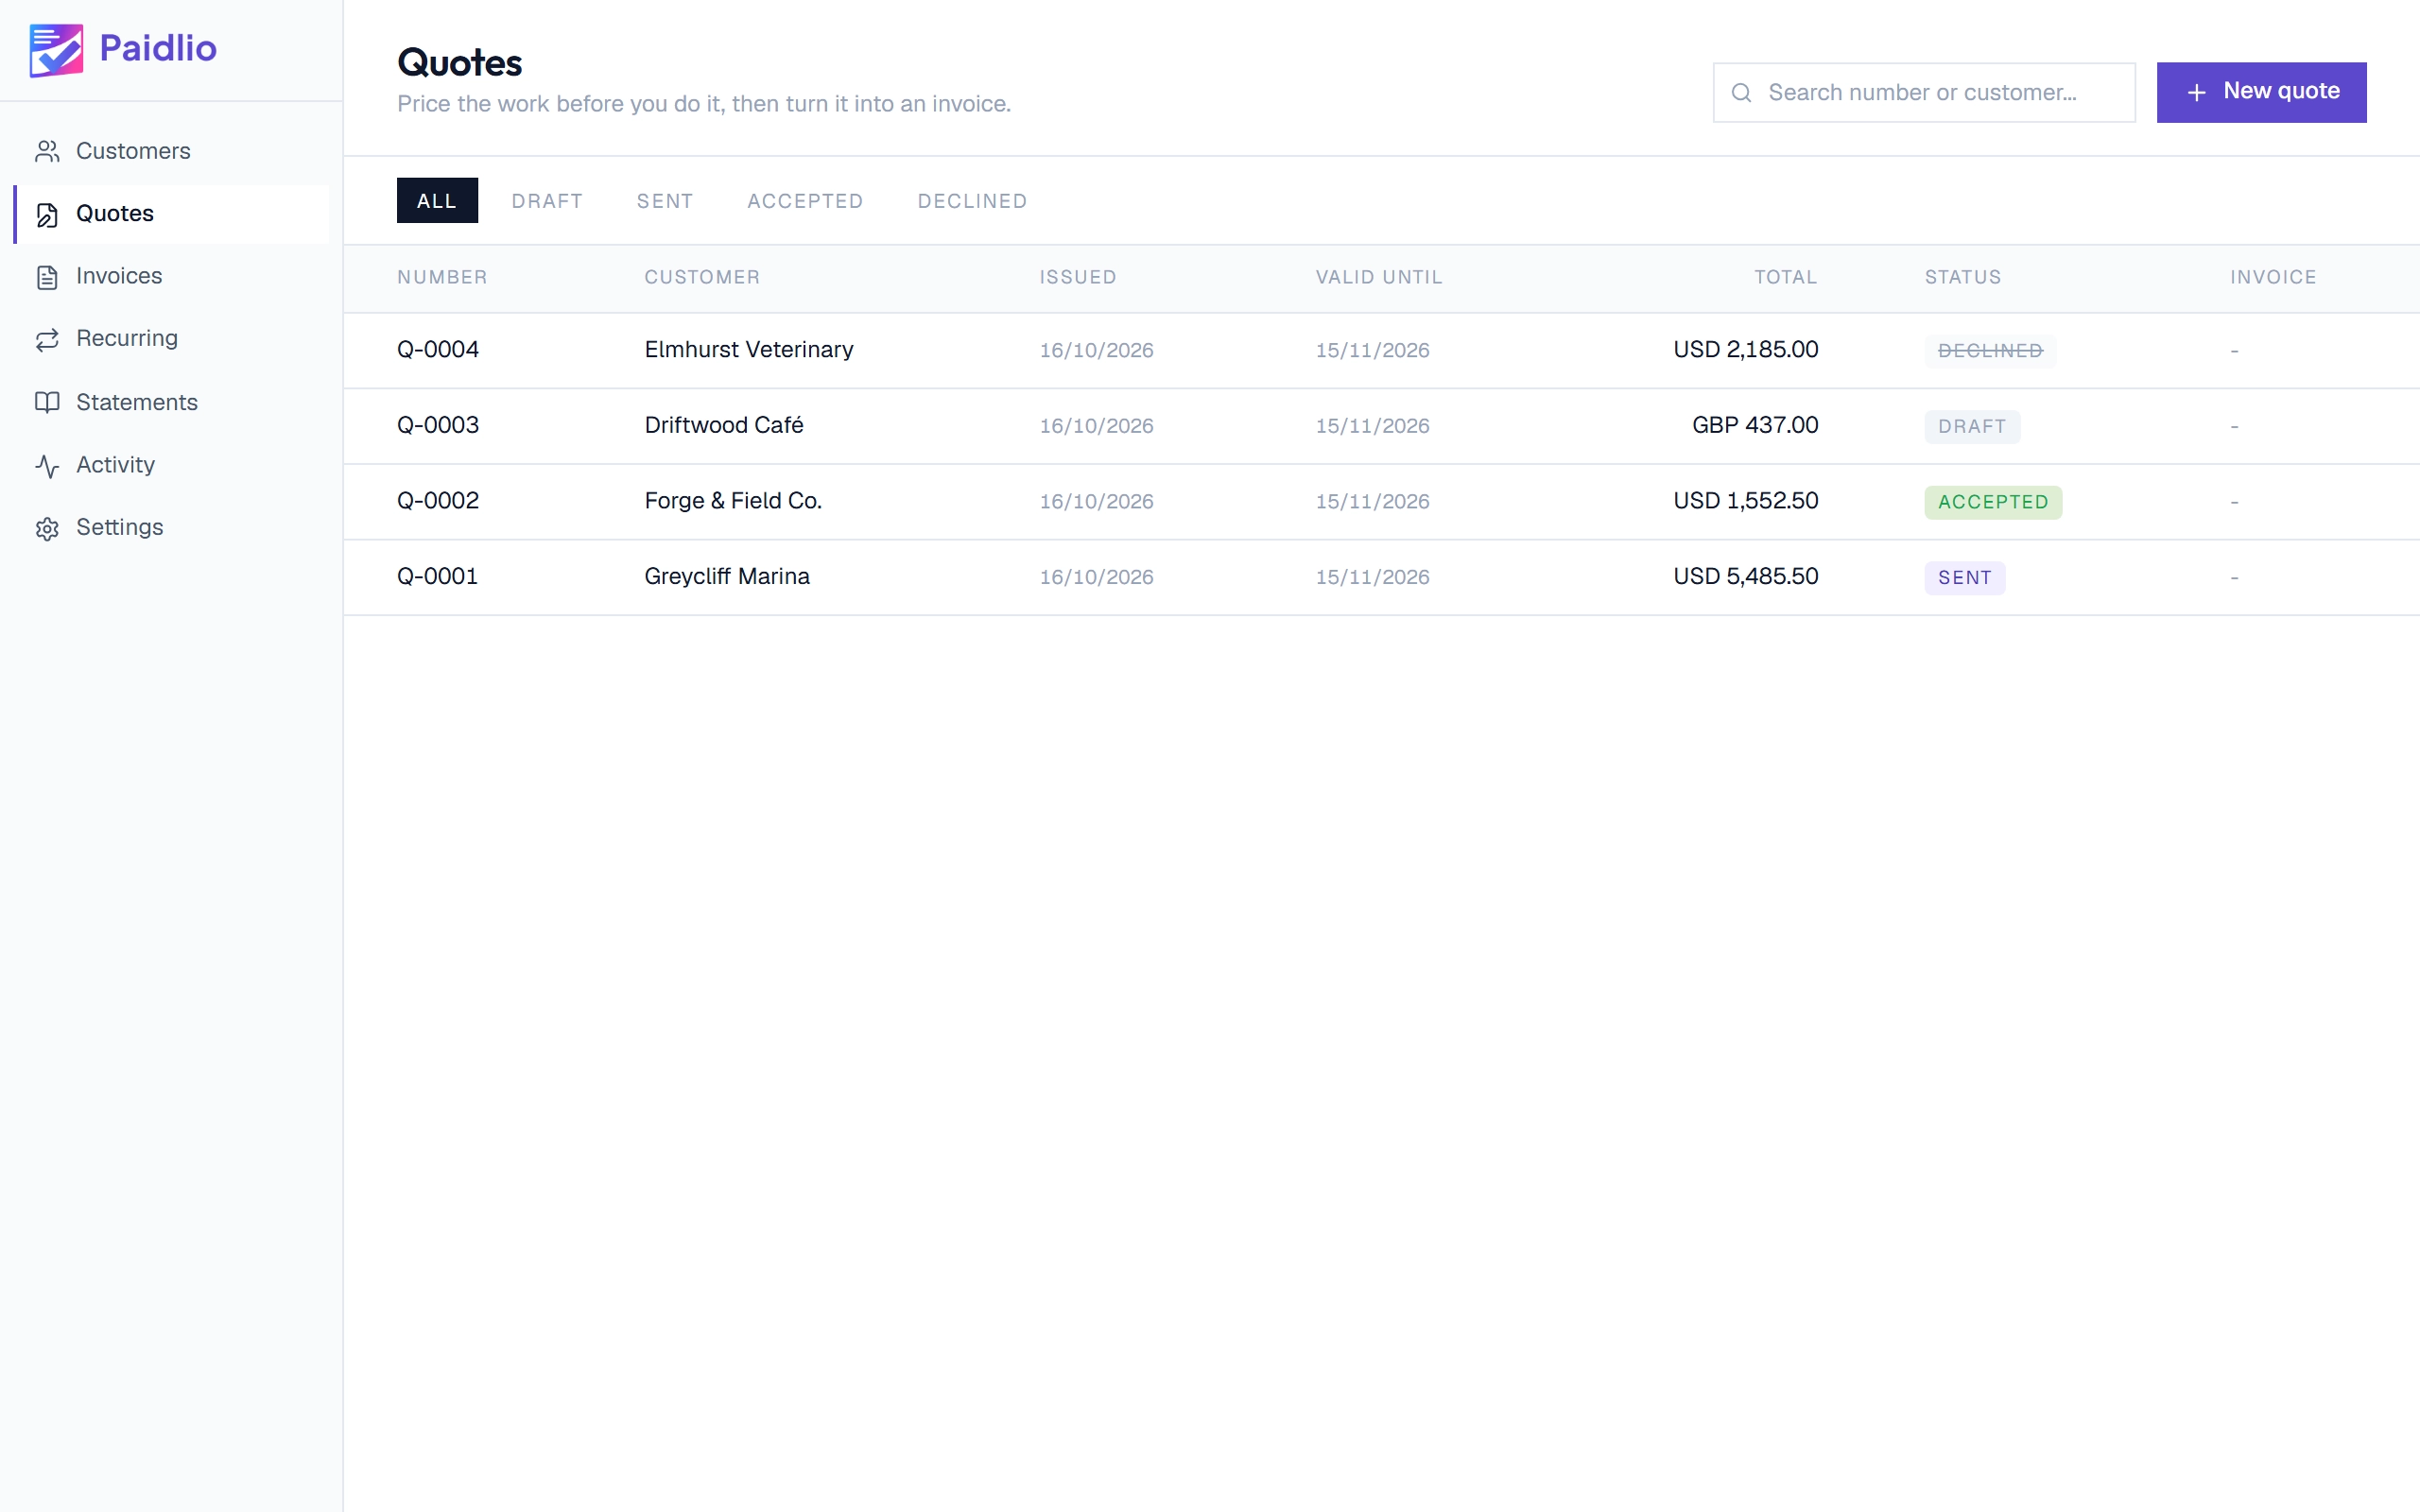
Open Quotes and click New quote
A quote prices the work before you do it. Quotes are numbered on their own, from Q-0001, so they never use up an invoice number, and the list shows whether each one is a draft, sent, accepted or declined. The prefix, the next number and how long a quote stays valid are under Settings, Quotes.
Quote before you invoiceStep 2 of 5
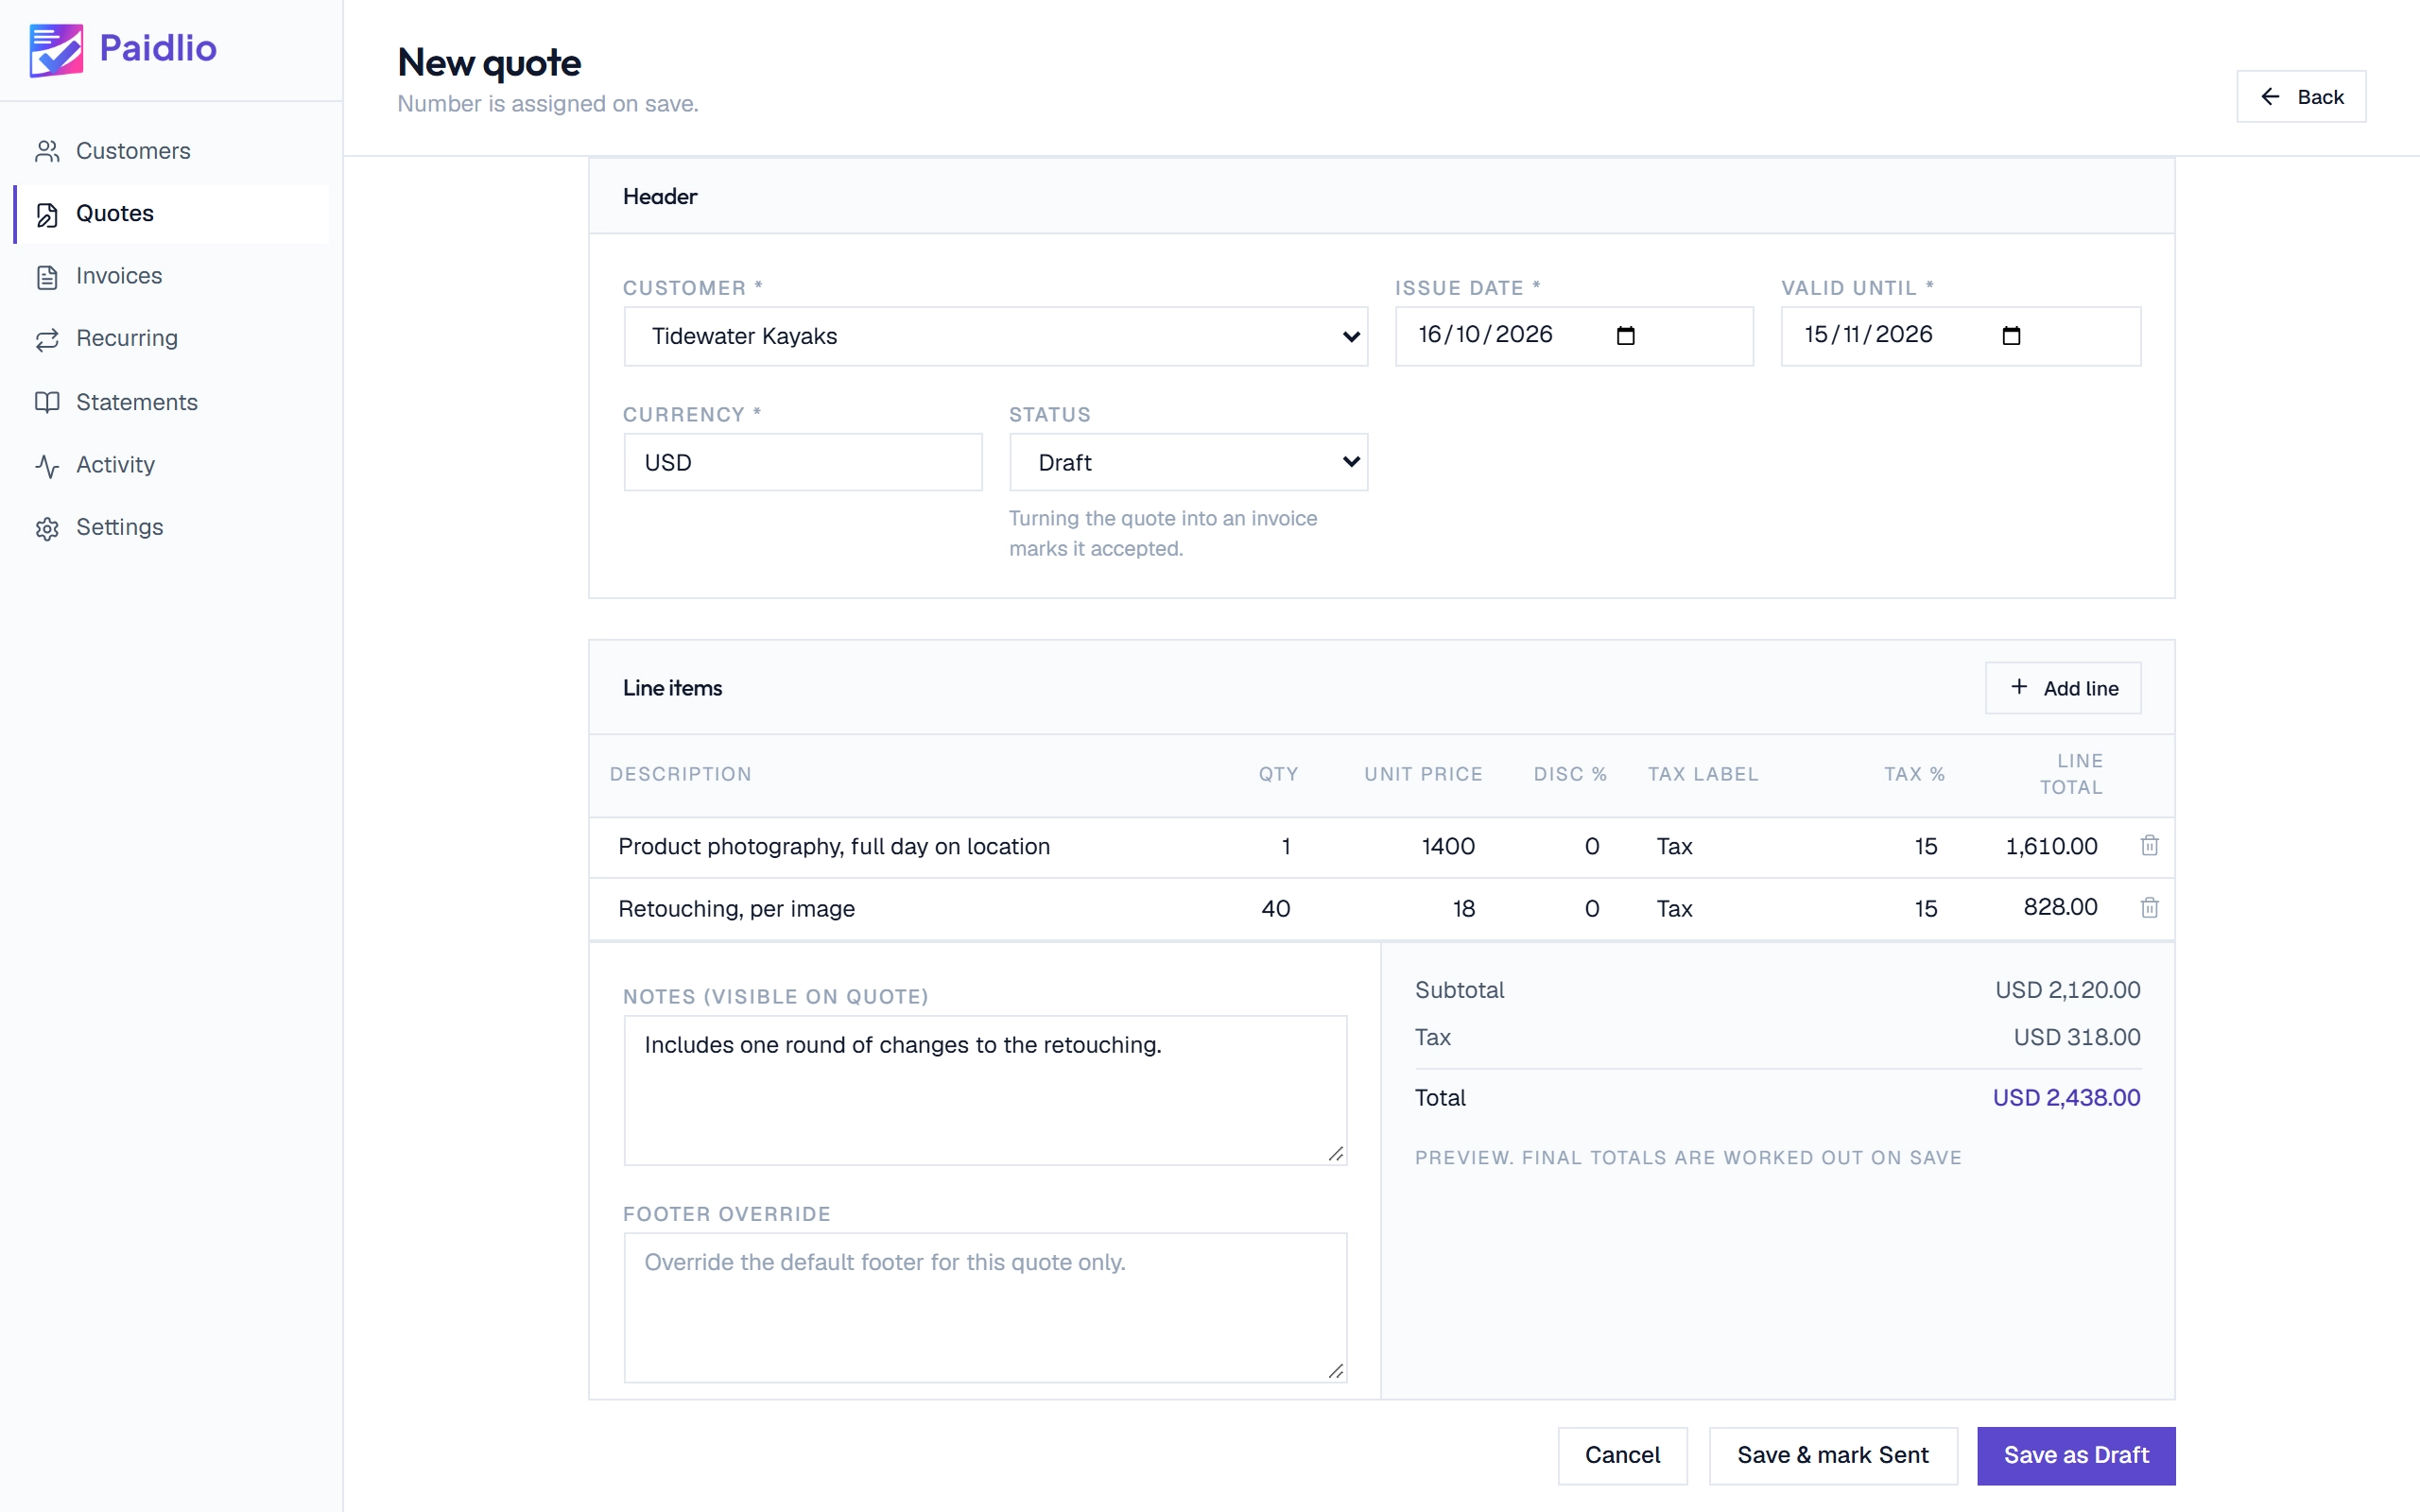
Price the job
Choose the customer and add the lines just as you would on an invoice, with the same tax and totals. Valid until is filled in 30 days out, which you can change for this quote or for every new one in Settings. Save it as a draft, or with Save and mark Sent when it goes to the customer.
Quote before you invoiceStep 3 of 5
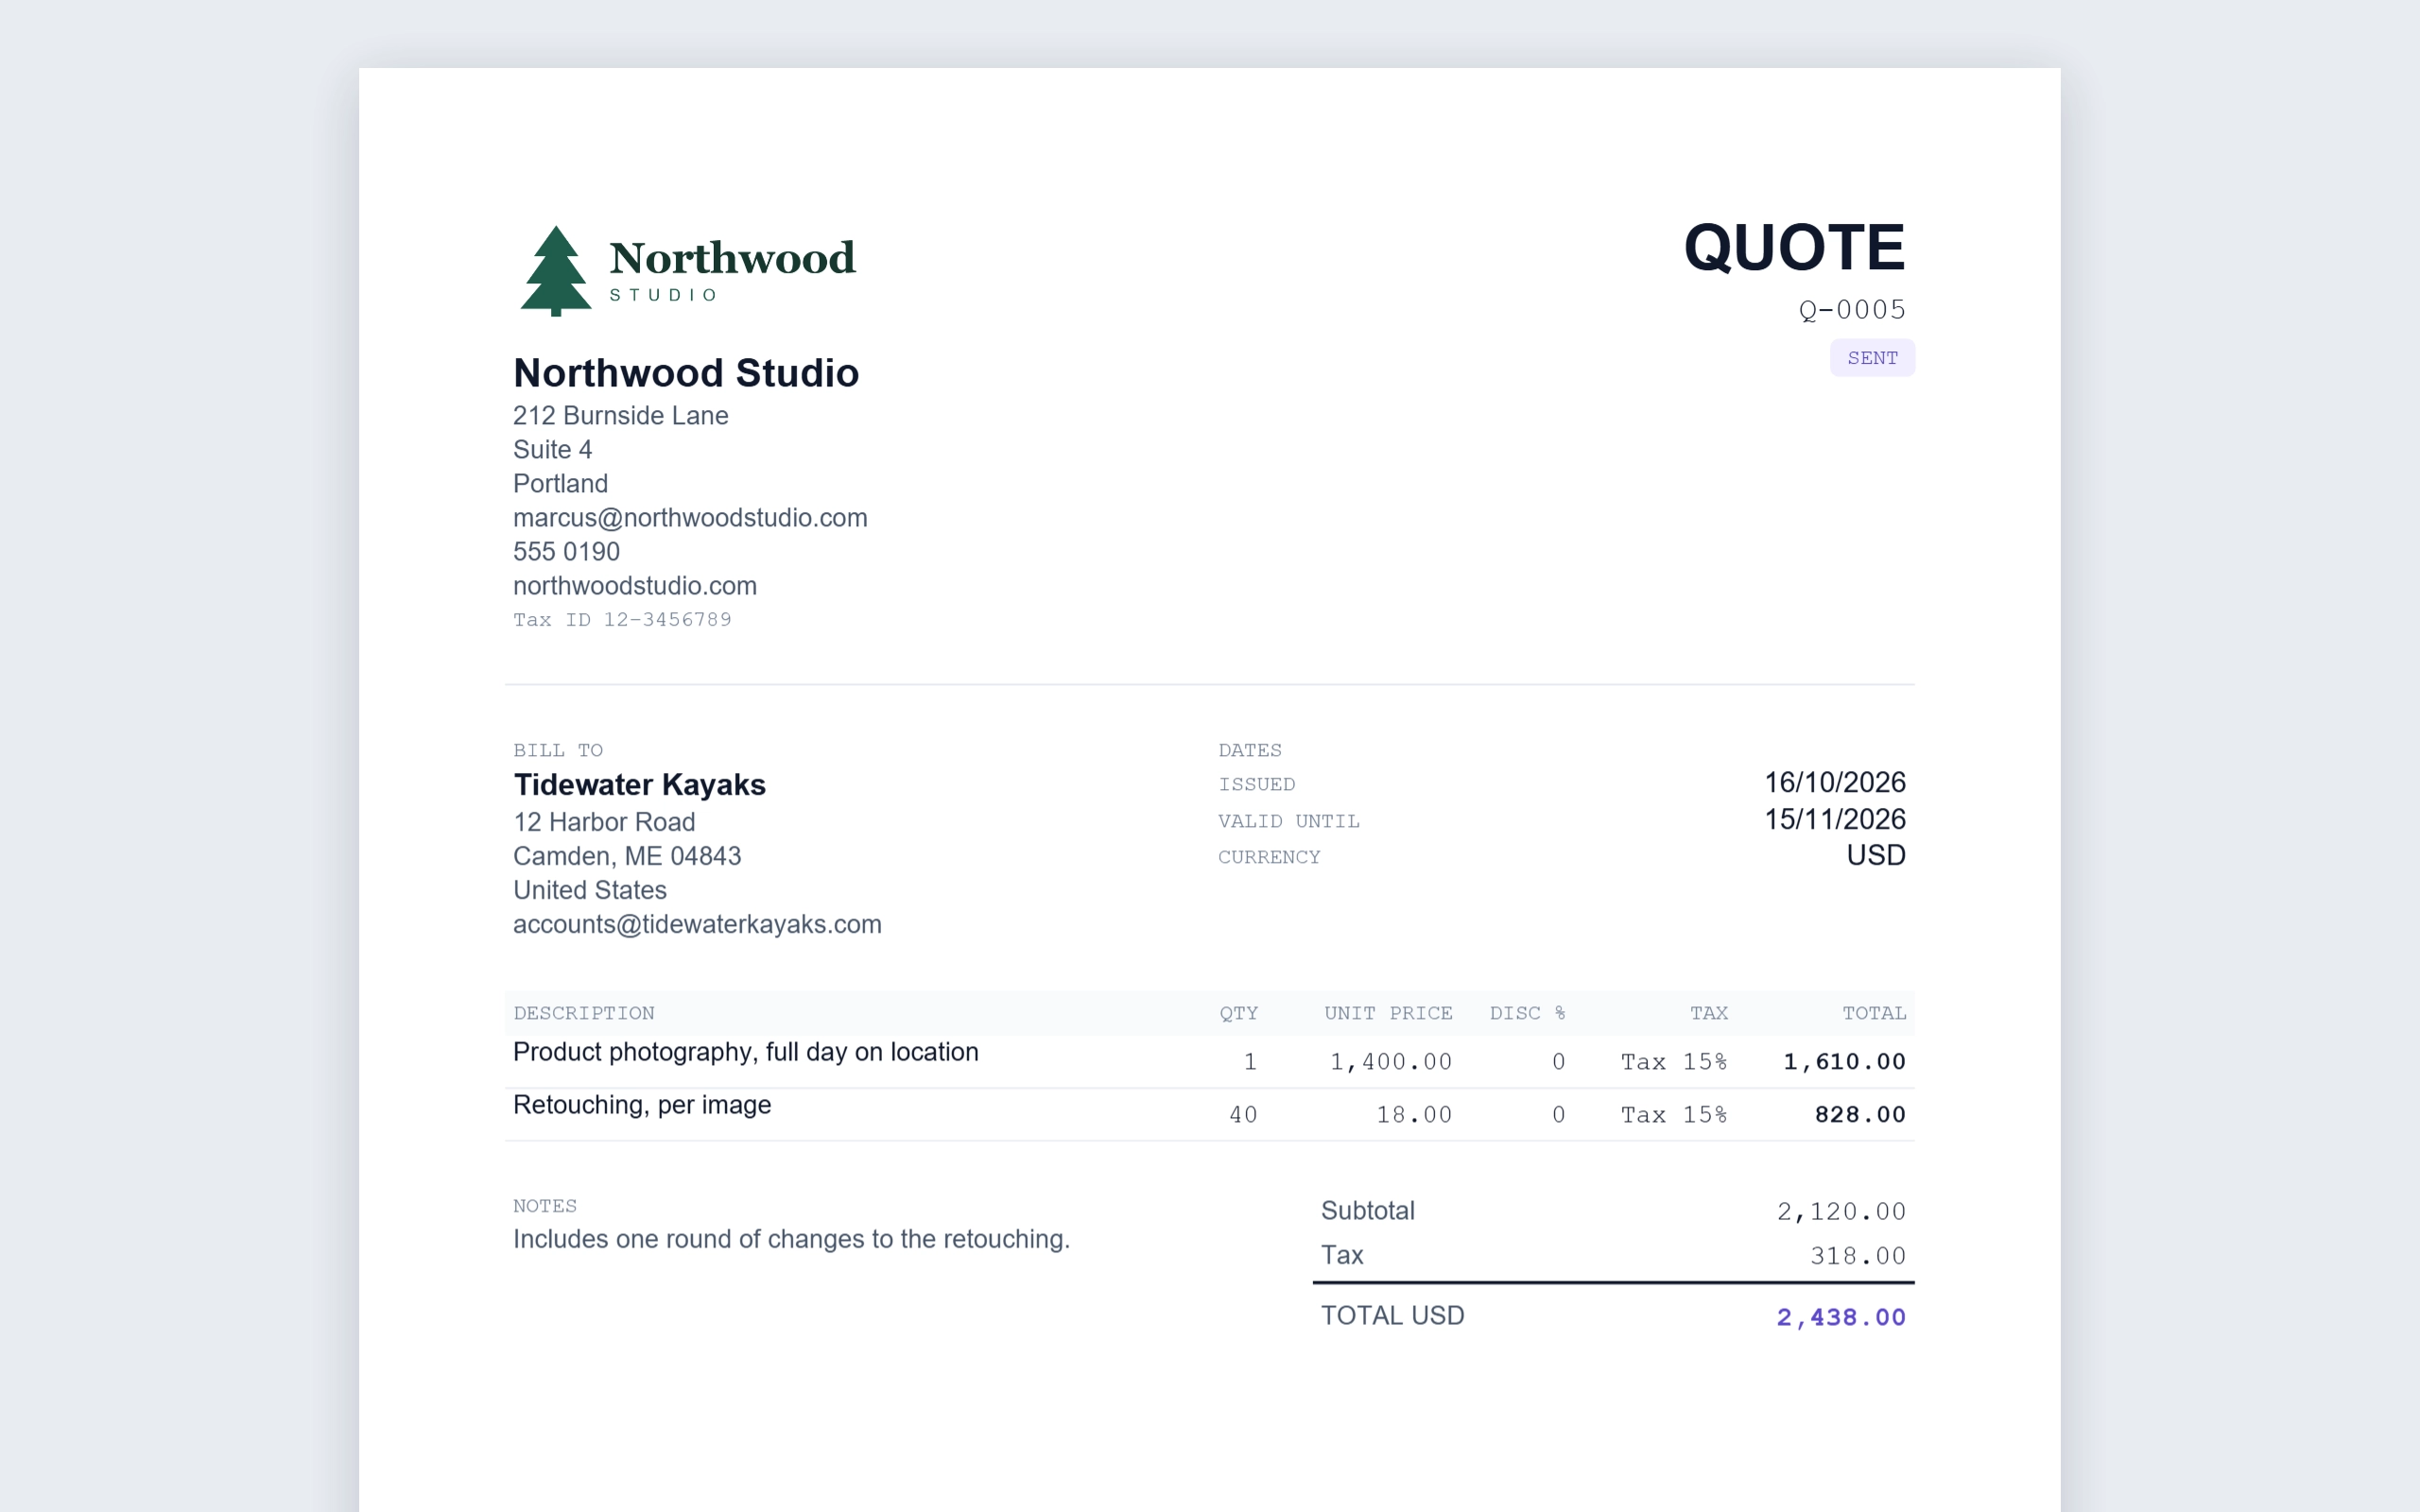
The quote your customer receives
It carries your letterhead and logo, is titled QUOTE and says how long the price holds. The Pay Now button and your bank details are left off, since there is nothing to pay yet. Save it or email it the same way you would an invoice.
Quote before you invoiceStep 4 of 5
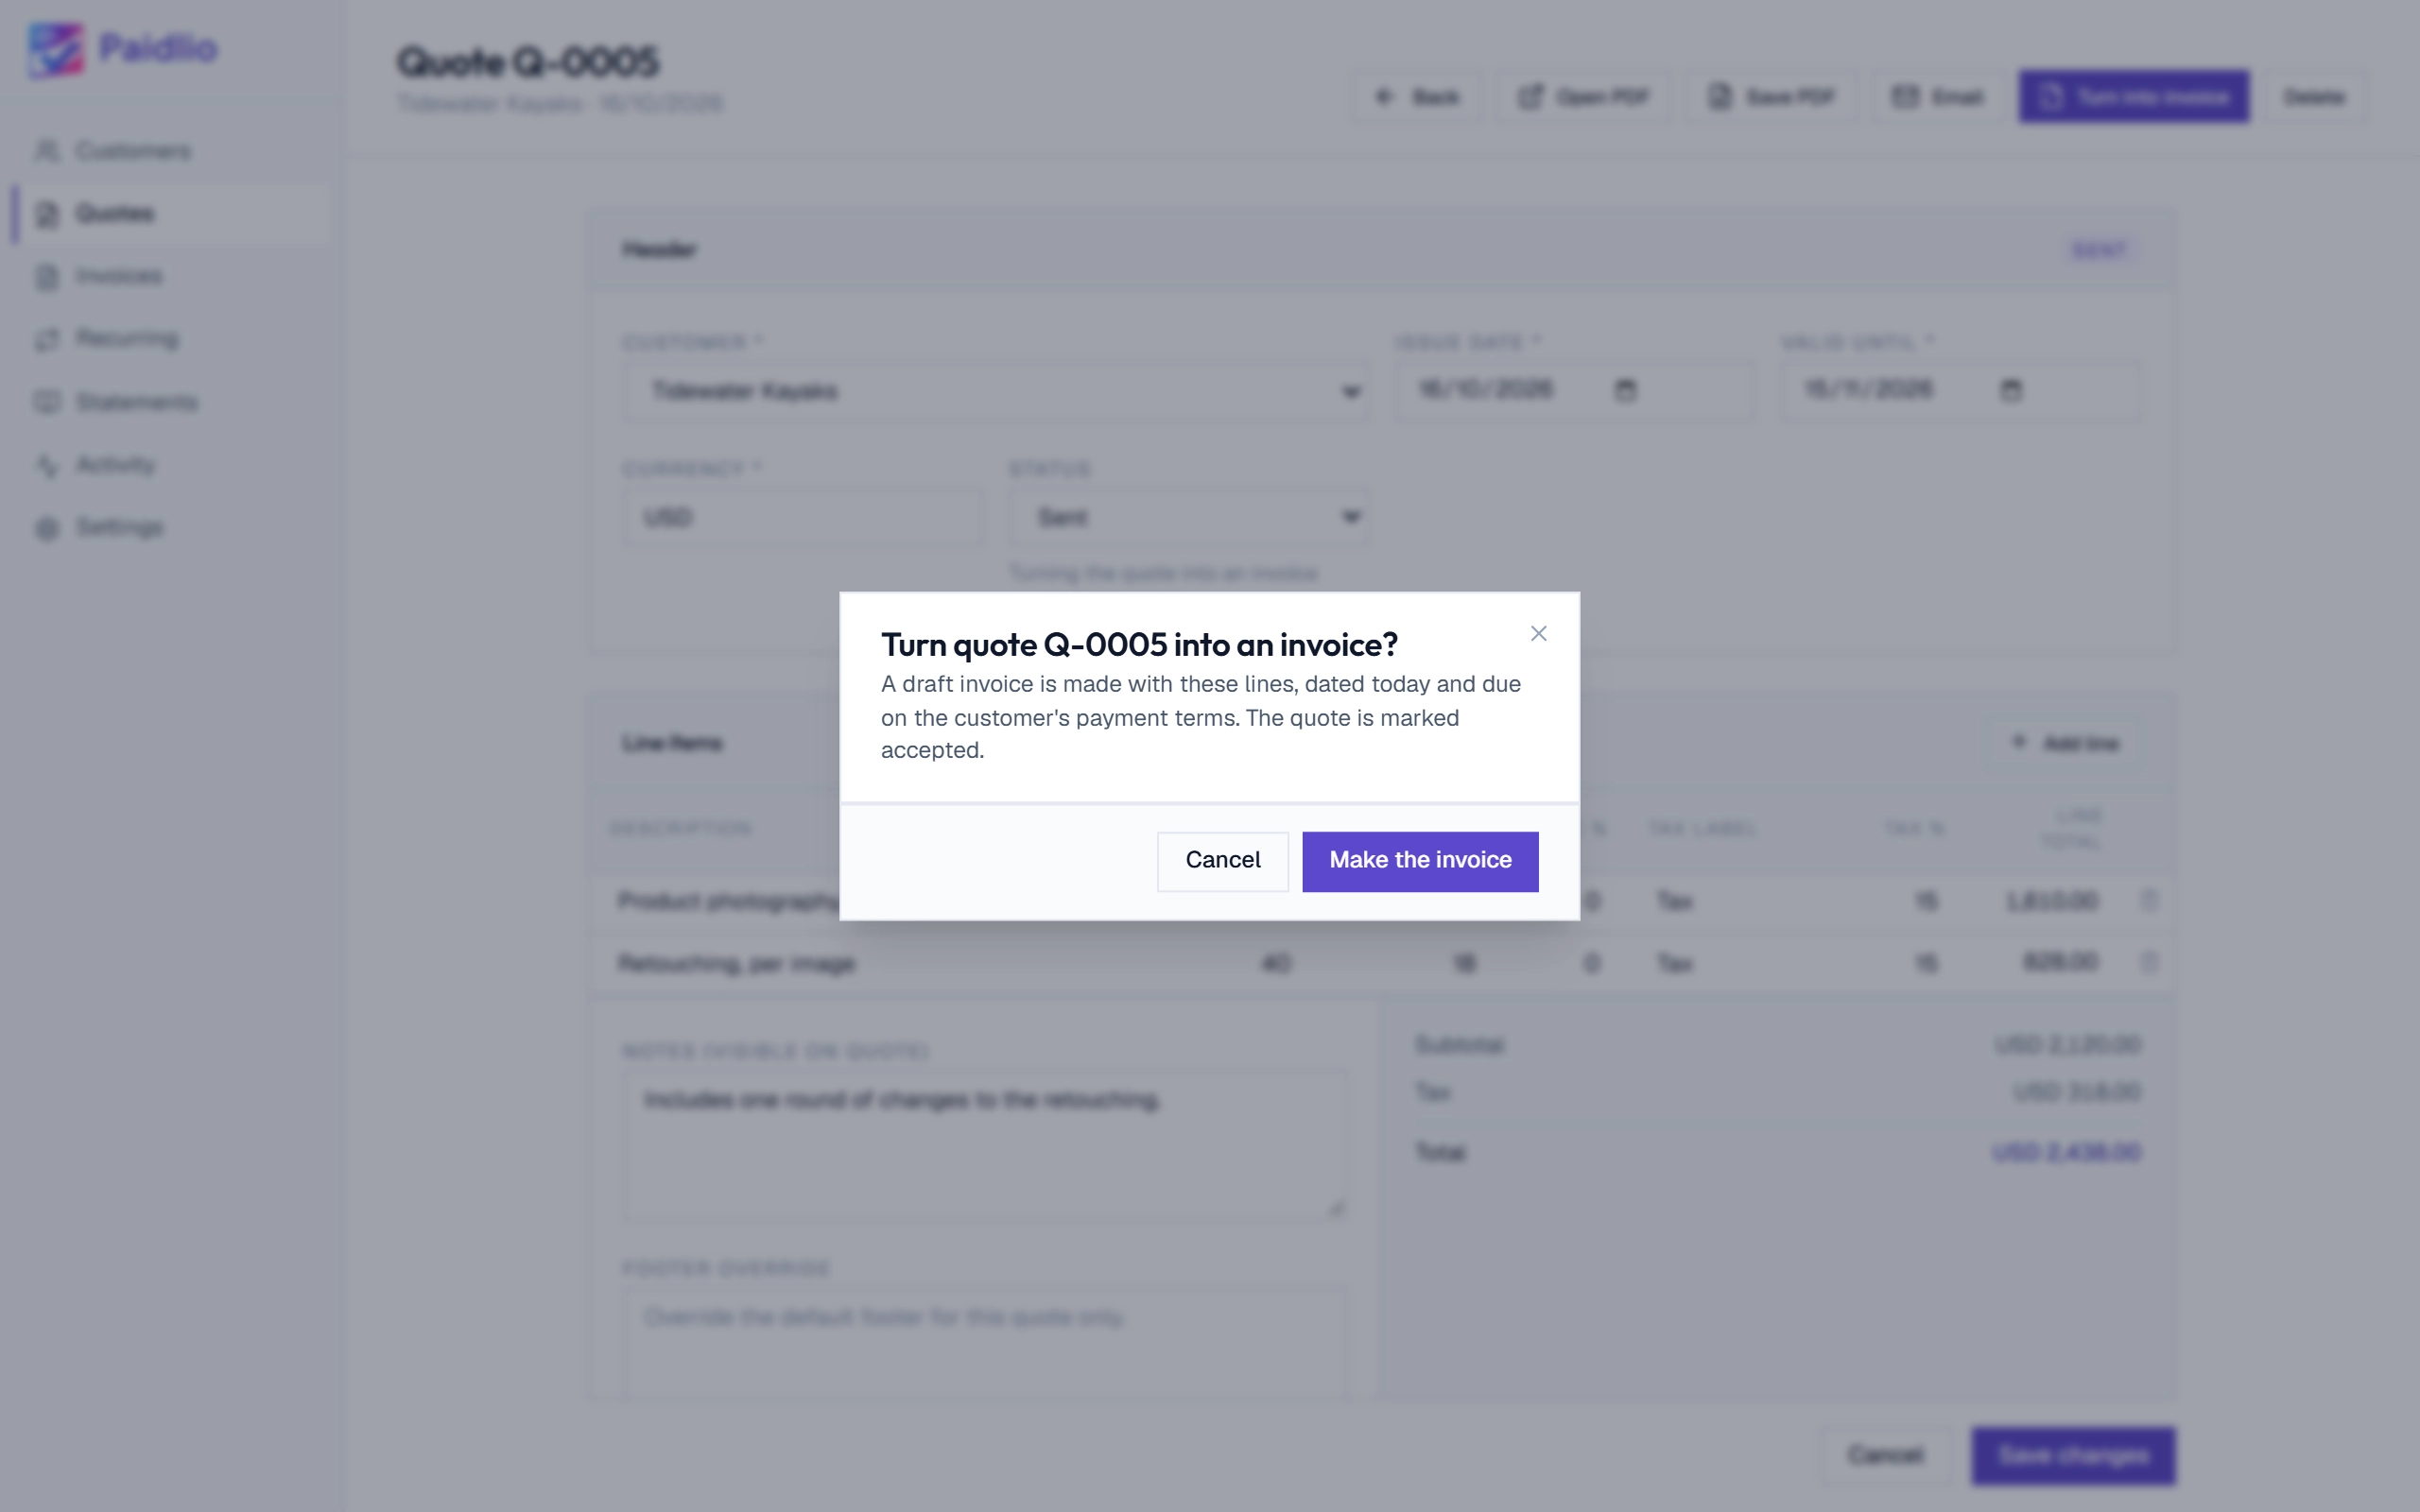
Turn it into an invoice
When the customer says yes, open the quote and click Turn into invoice. Paidlio makes the invoice from it, with the next invoice number, today's date and a due date from the customer's payment terms.
Quote before you invoiceStep 5 of 5
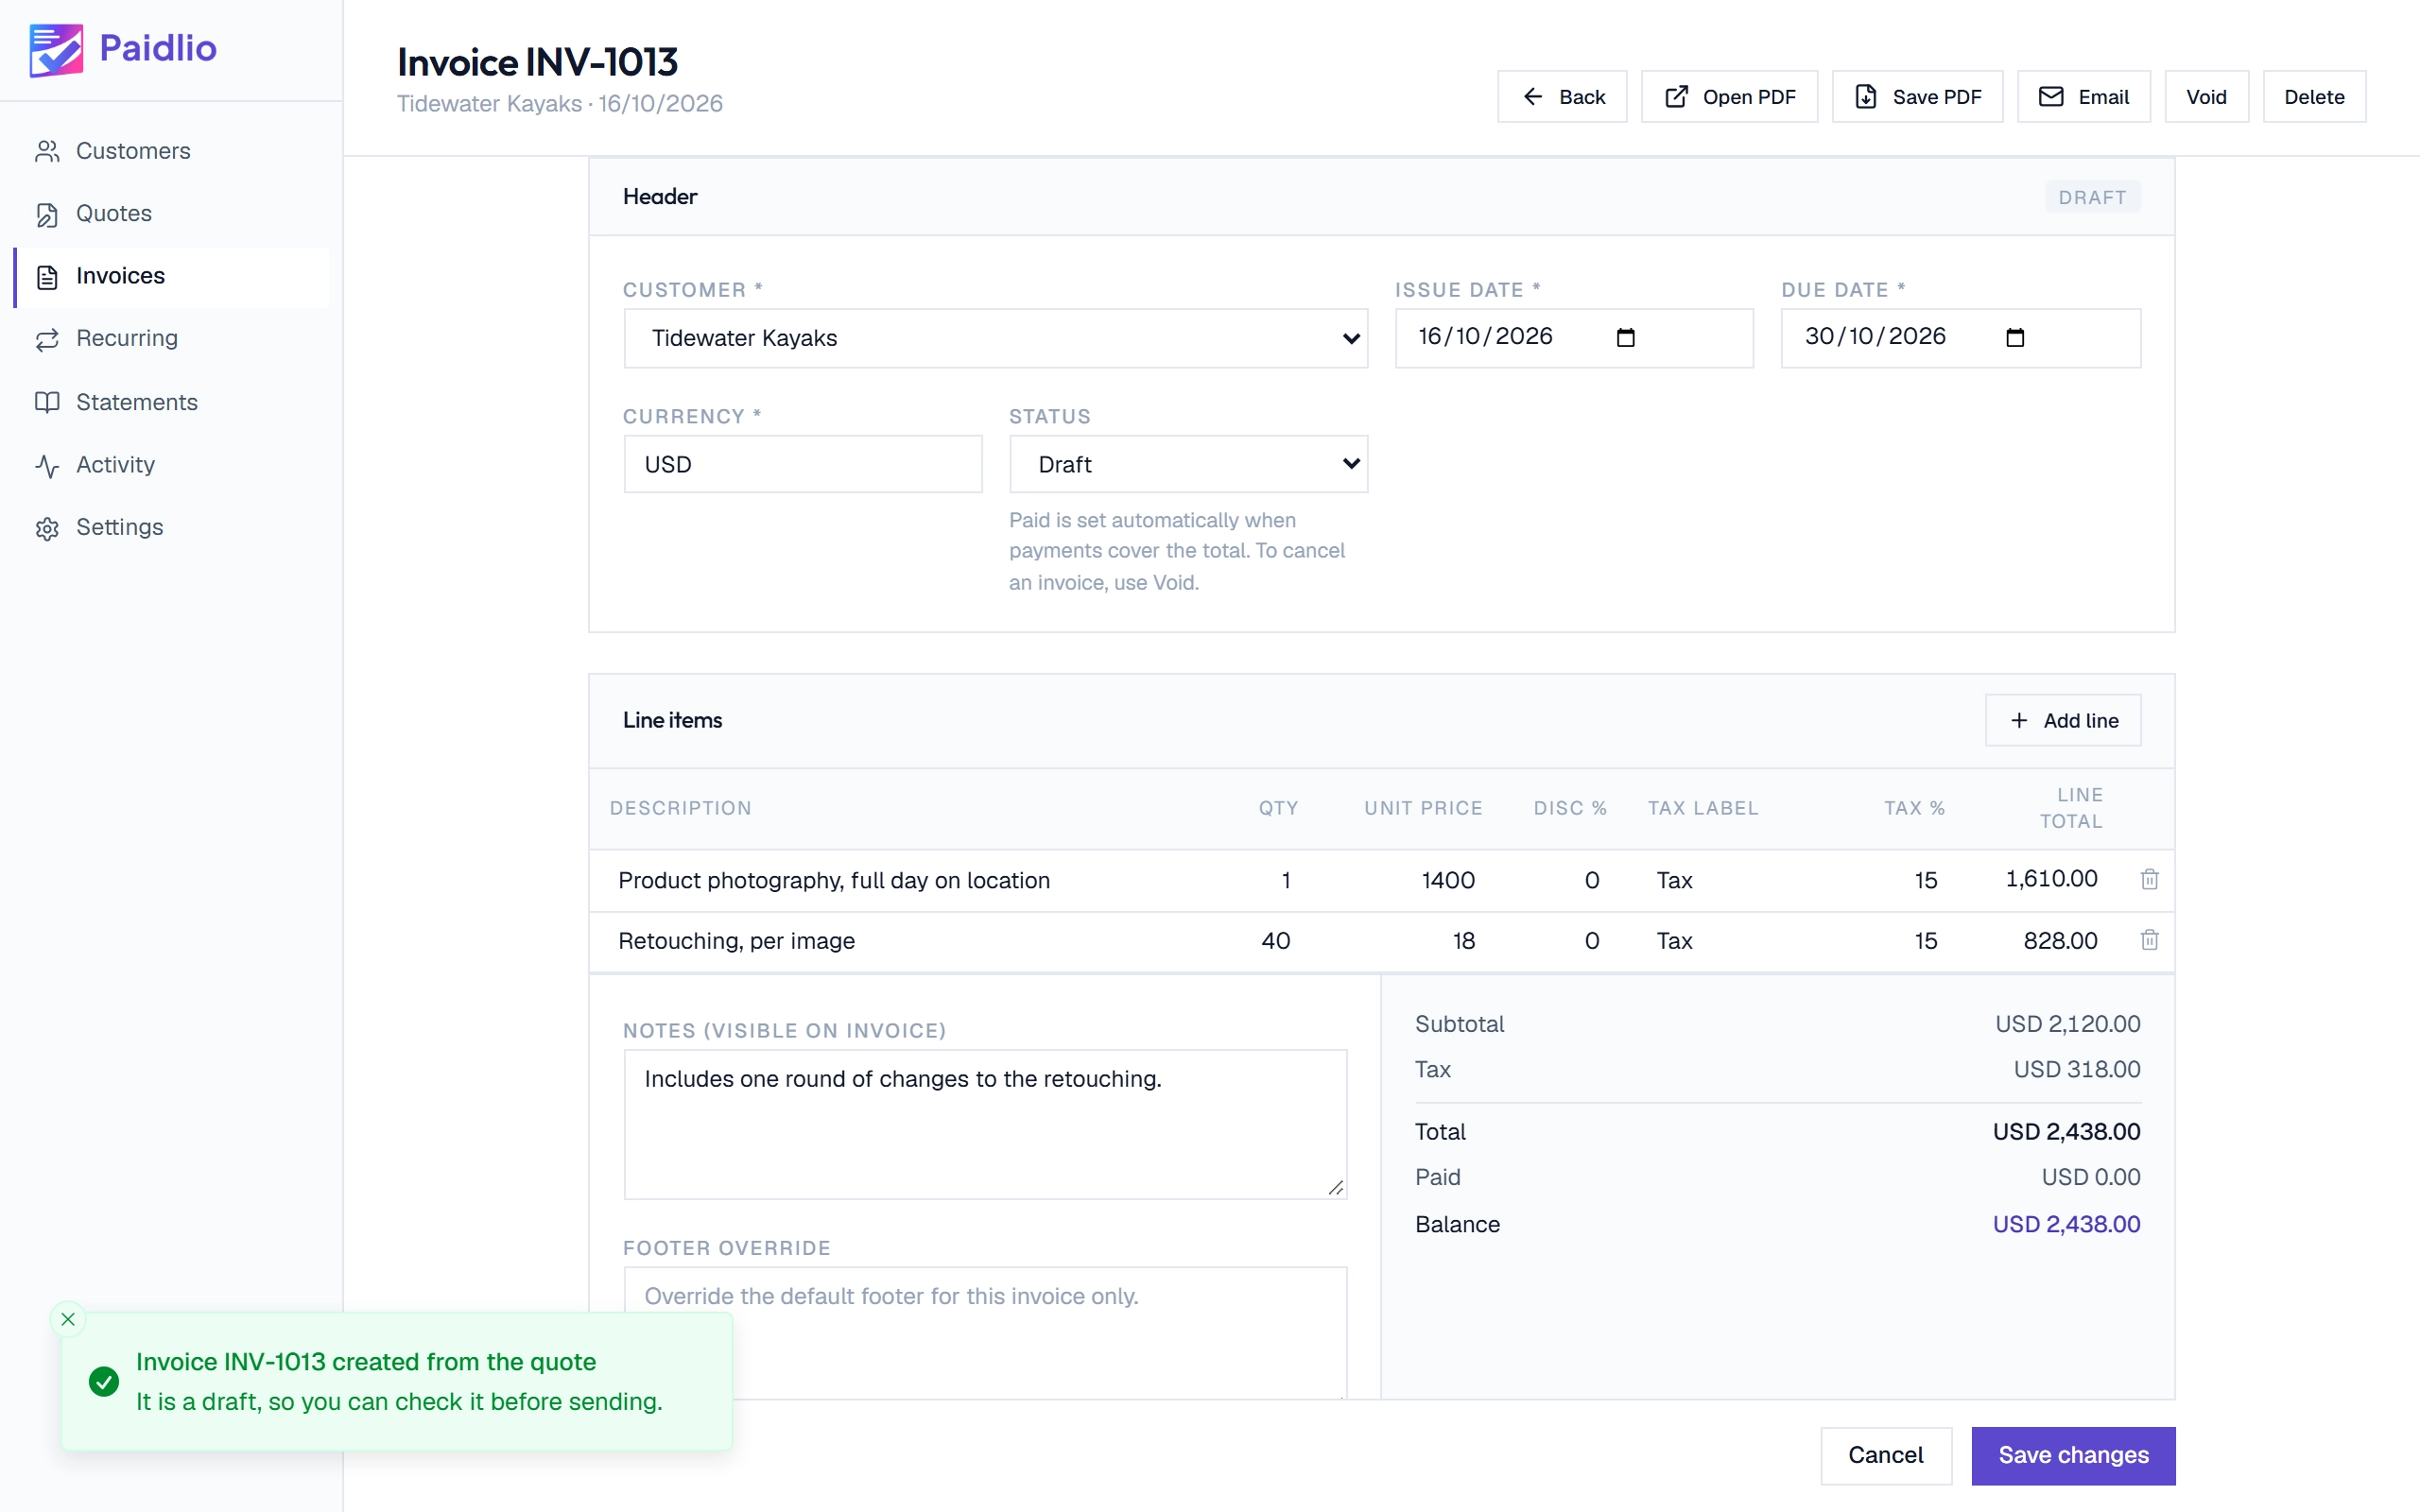
Check it, then send it
The invoice opens as a draft with the same lines, so you can look it over before it goes out. The quote is marked accepted, shows the invoice it became, and can no longer be changed.
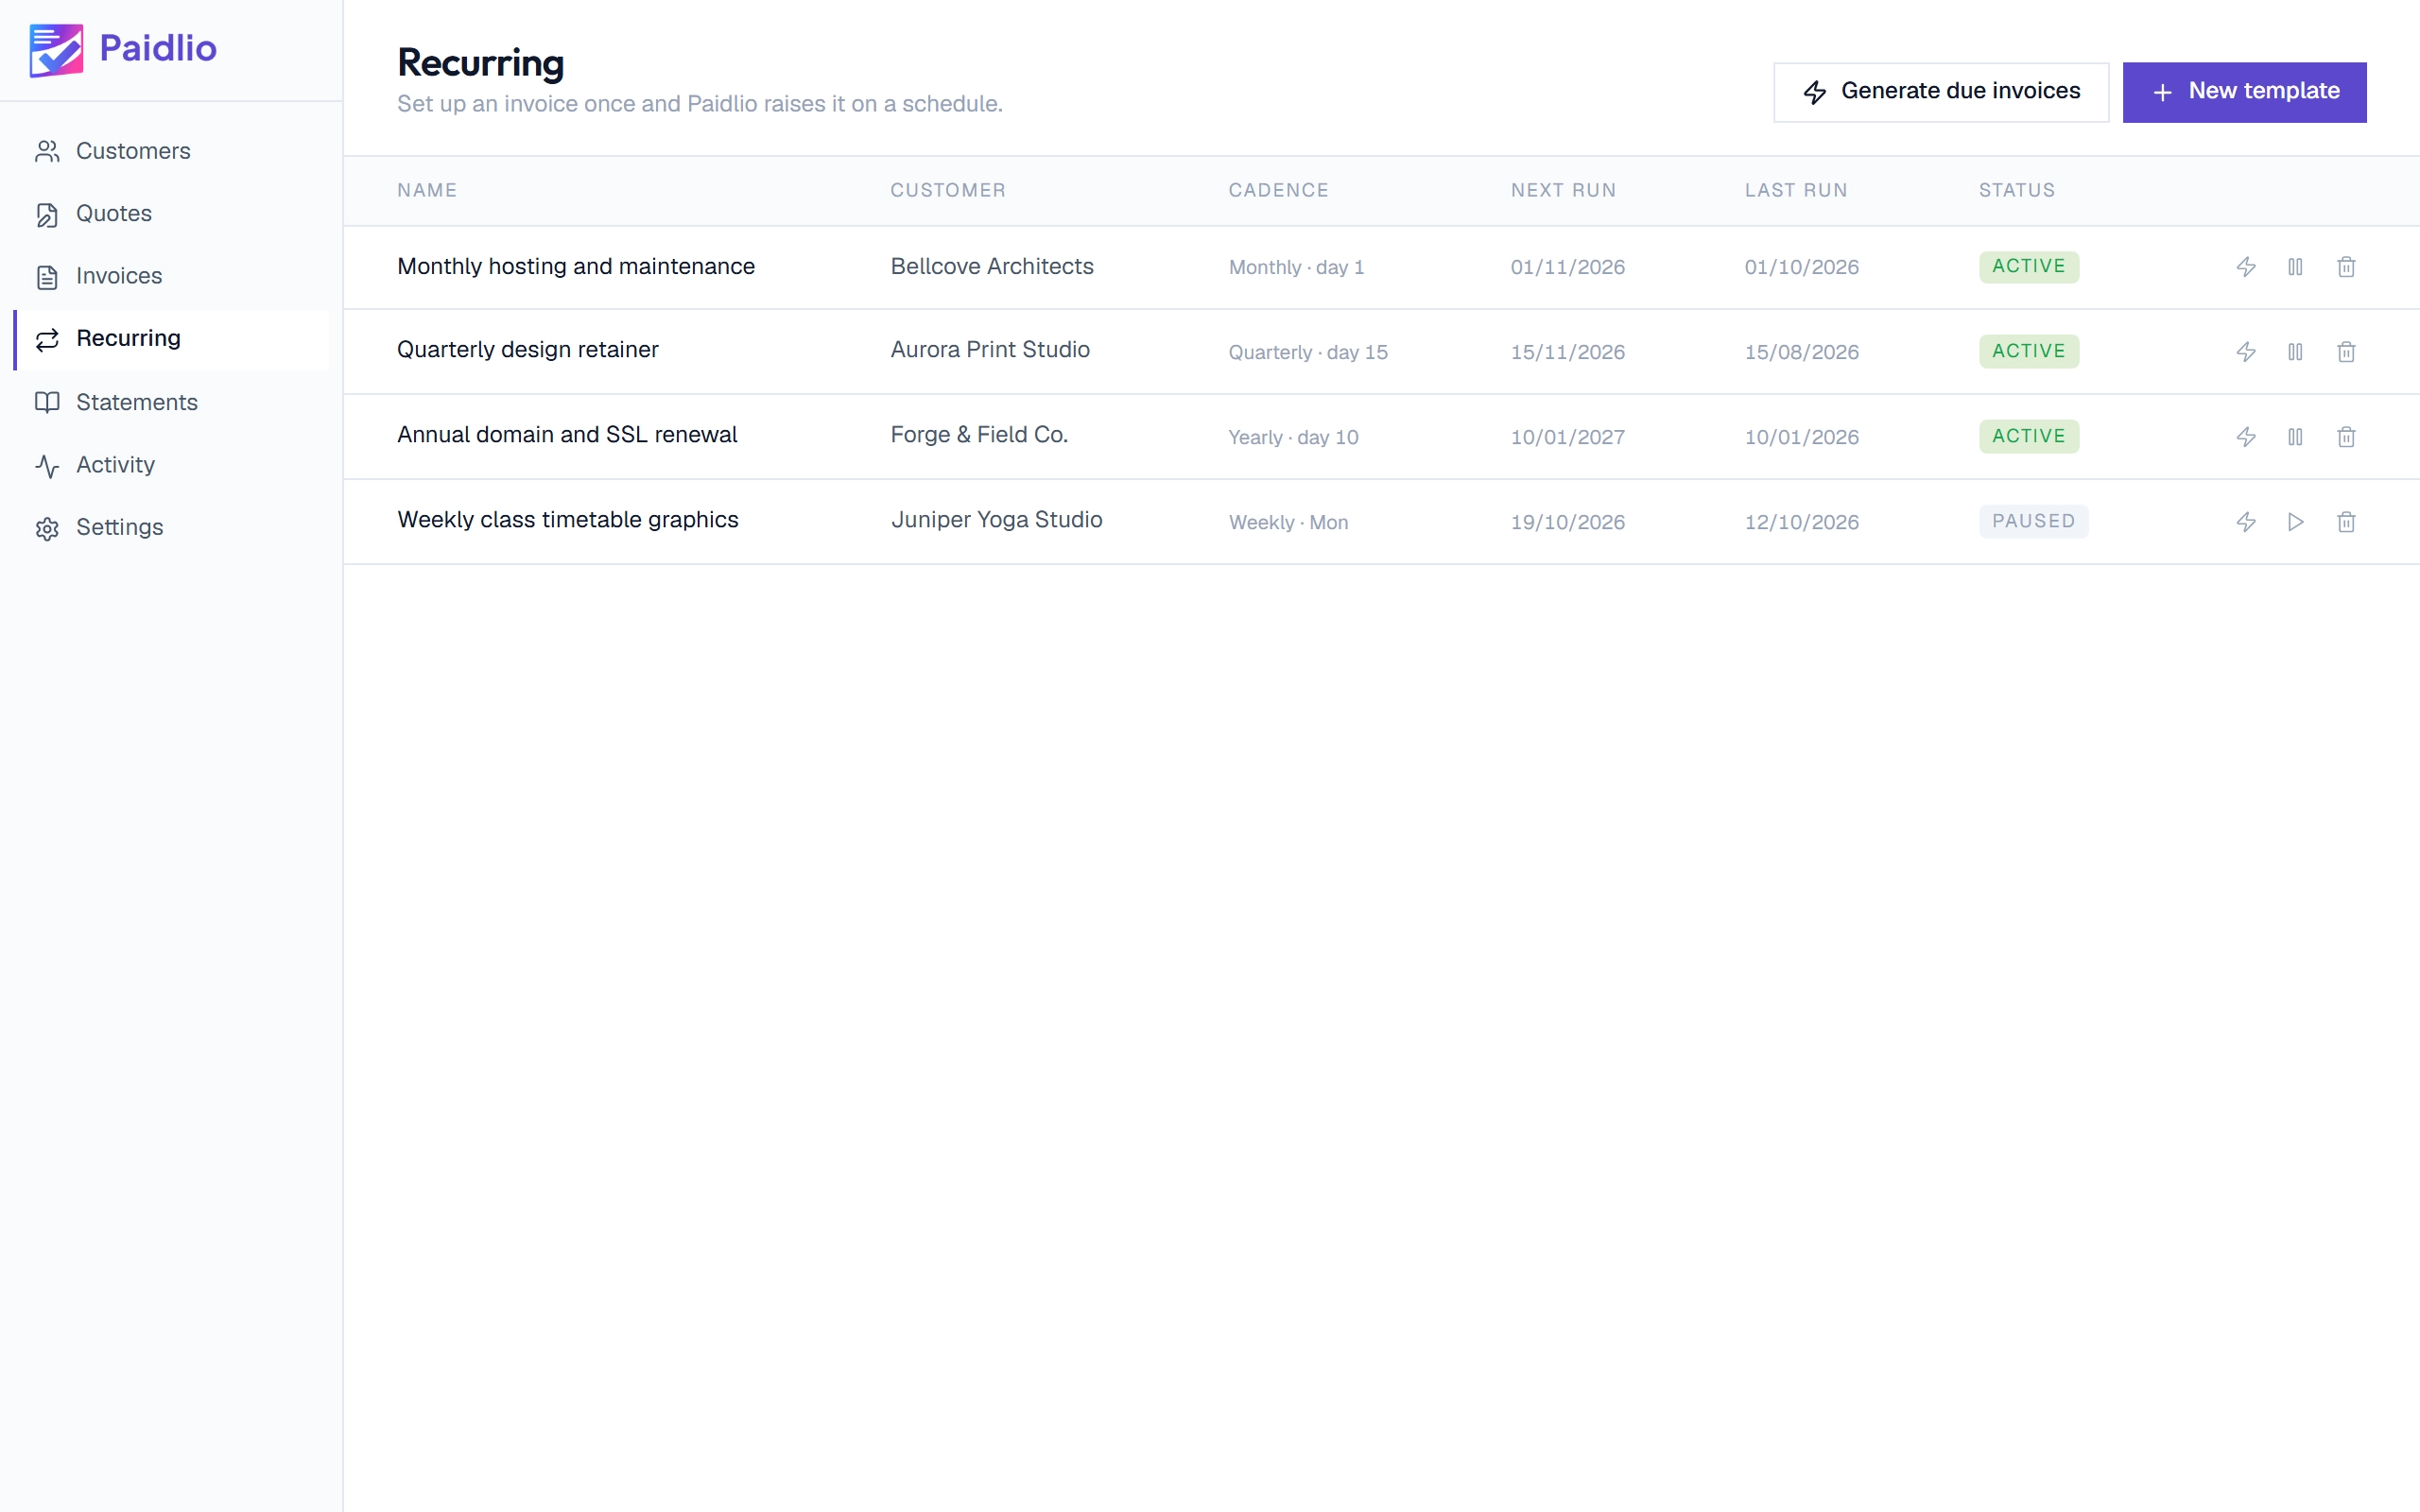
Set up recurring invoicesStep 1 of 3
Open Recurring and click New template
A template is an invoice Paidlio raises for you on a schedule. The list shows each one with its next run date and whether it is active or paused.
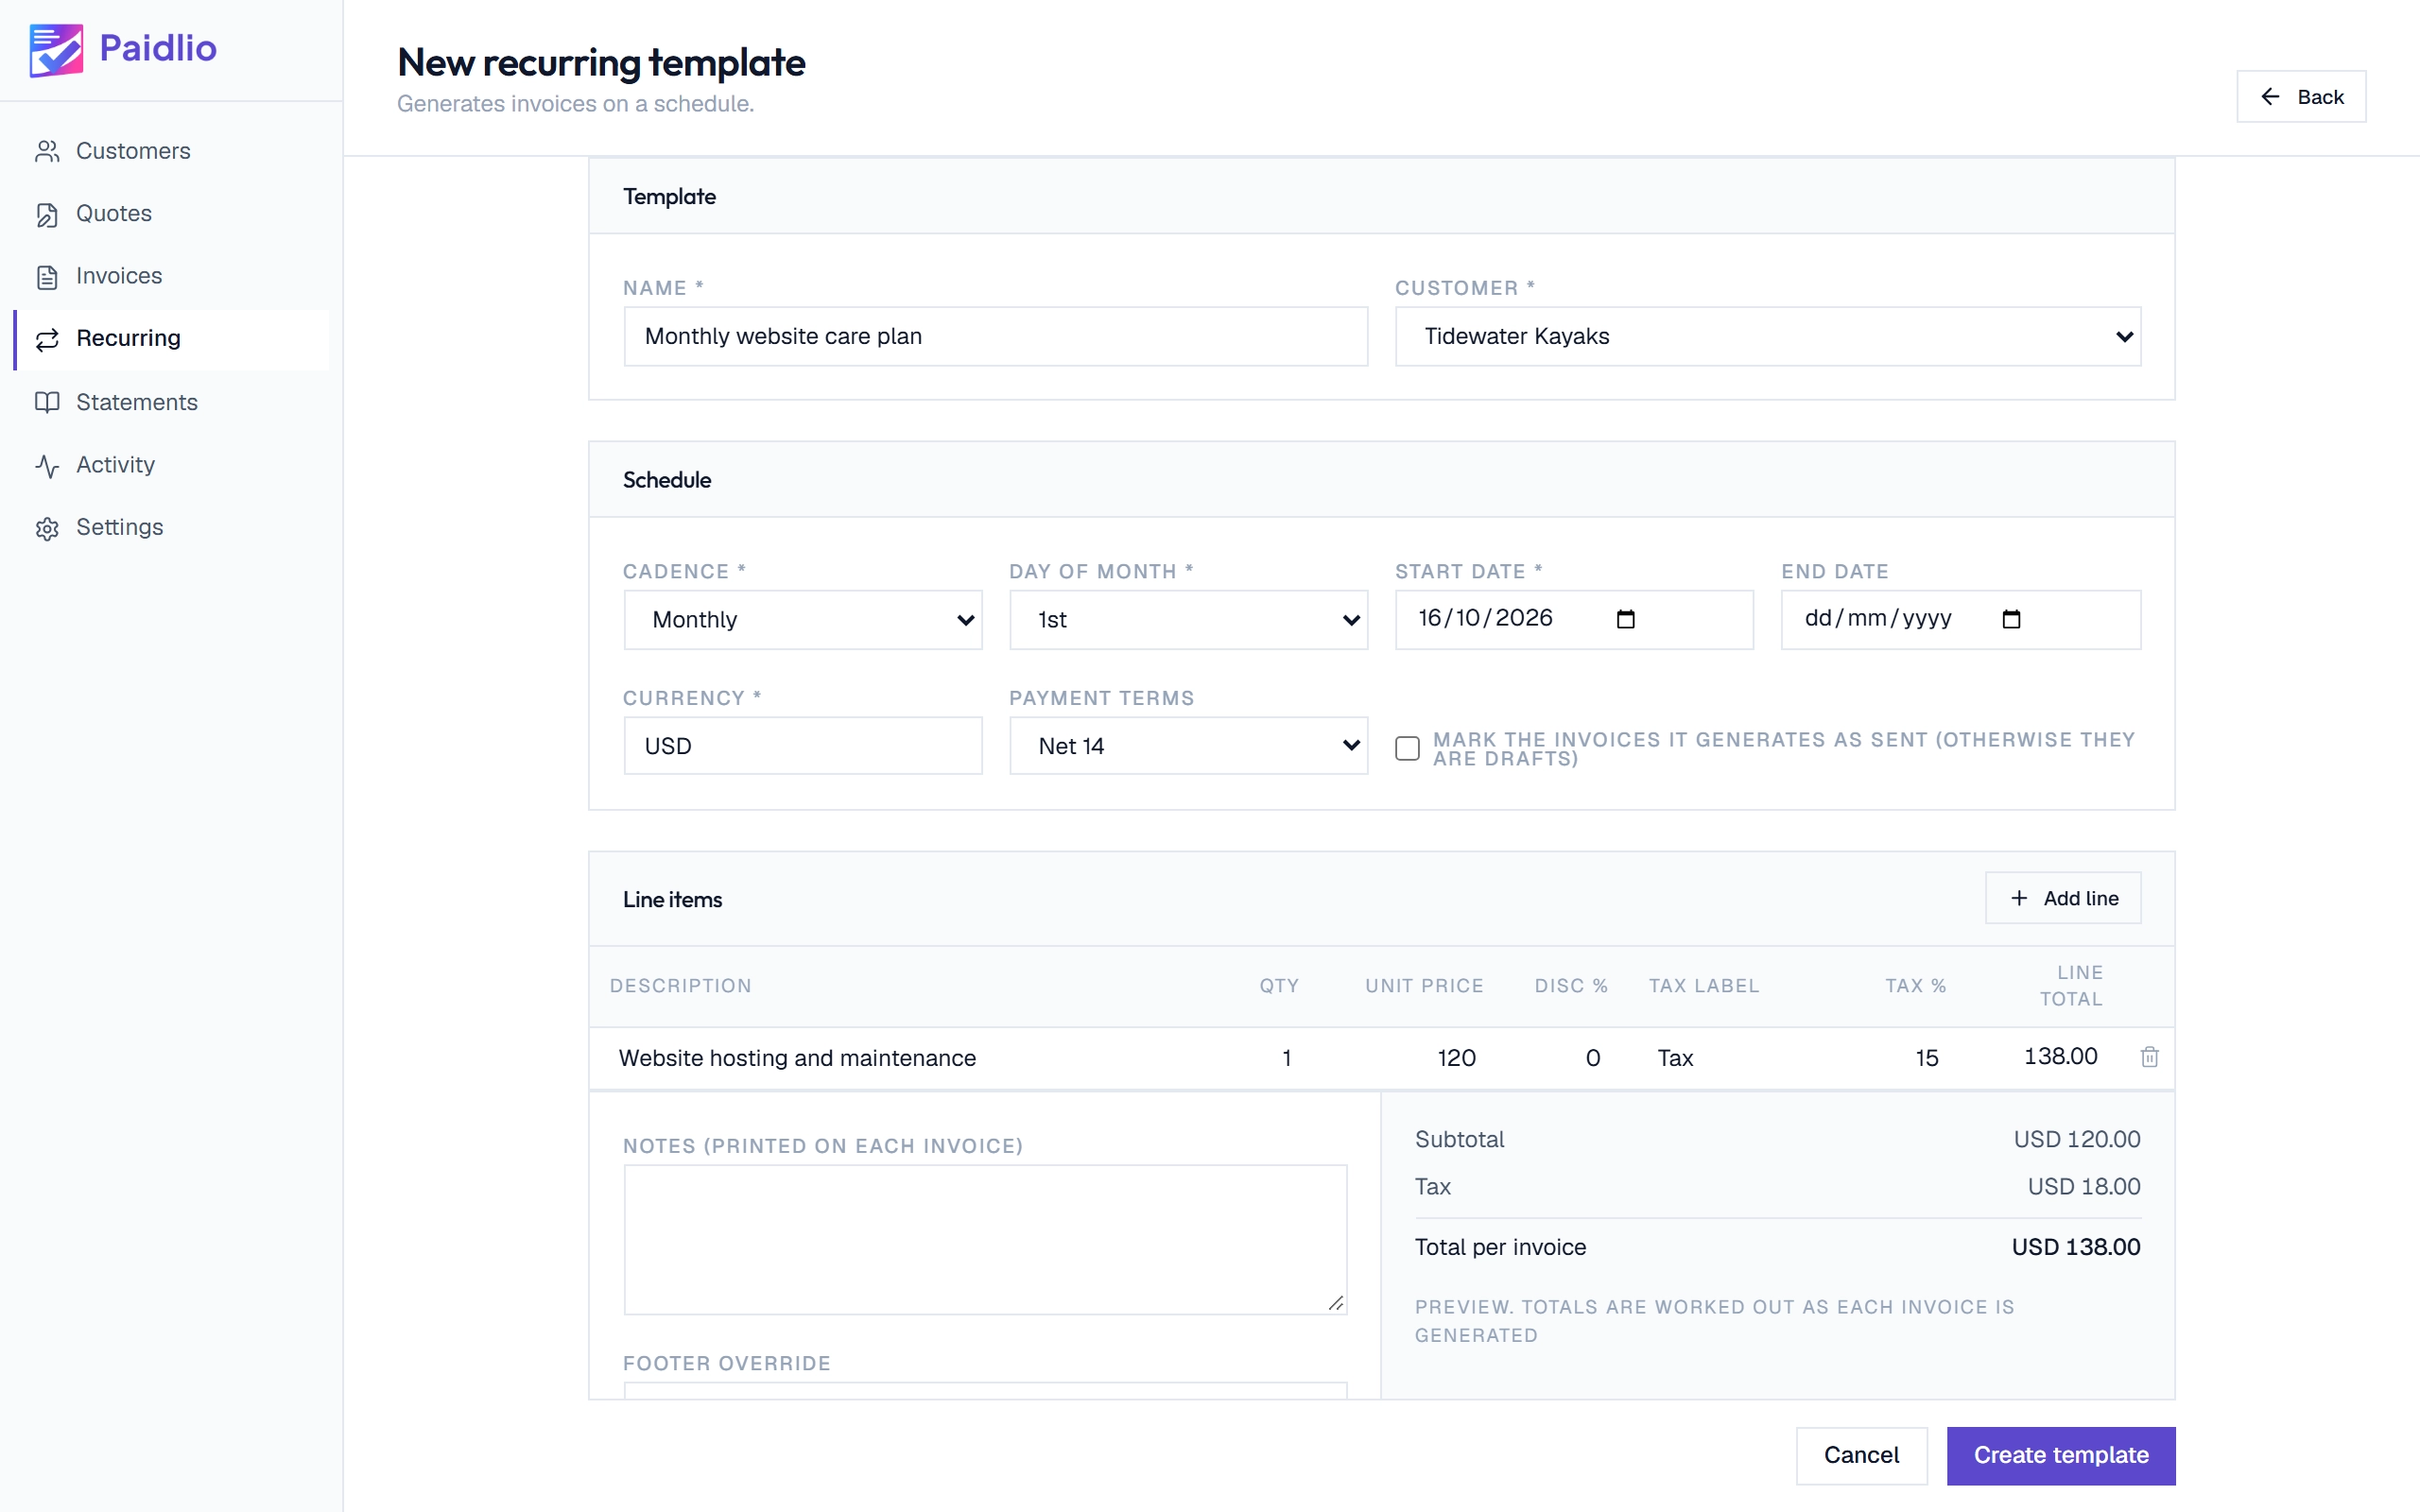
Set up recurring invoicesStep 2 of 3
Choose who and how often
Name the template, pick the customer, and choose weekly, monthly, quarterly or yearly. Tick the box if the invoices it raises should be marked Sent. Leave it clear and they arrive as drafts for you to check first.
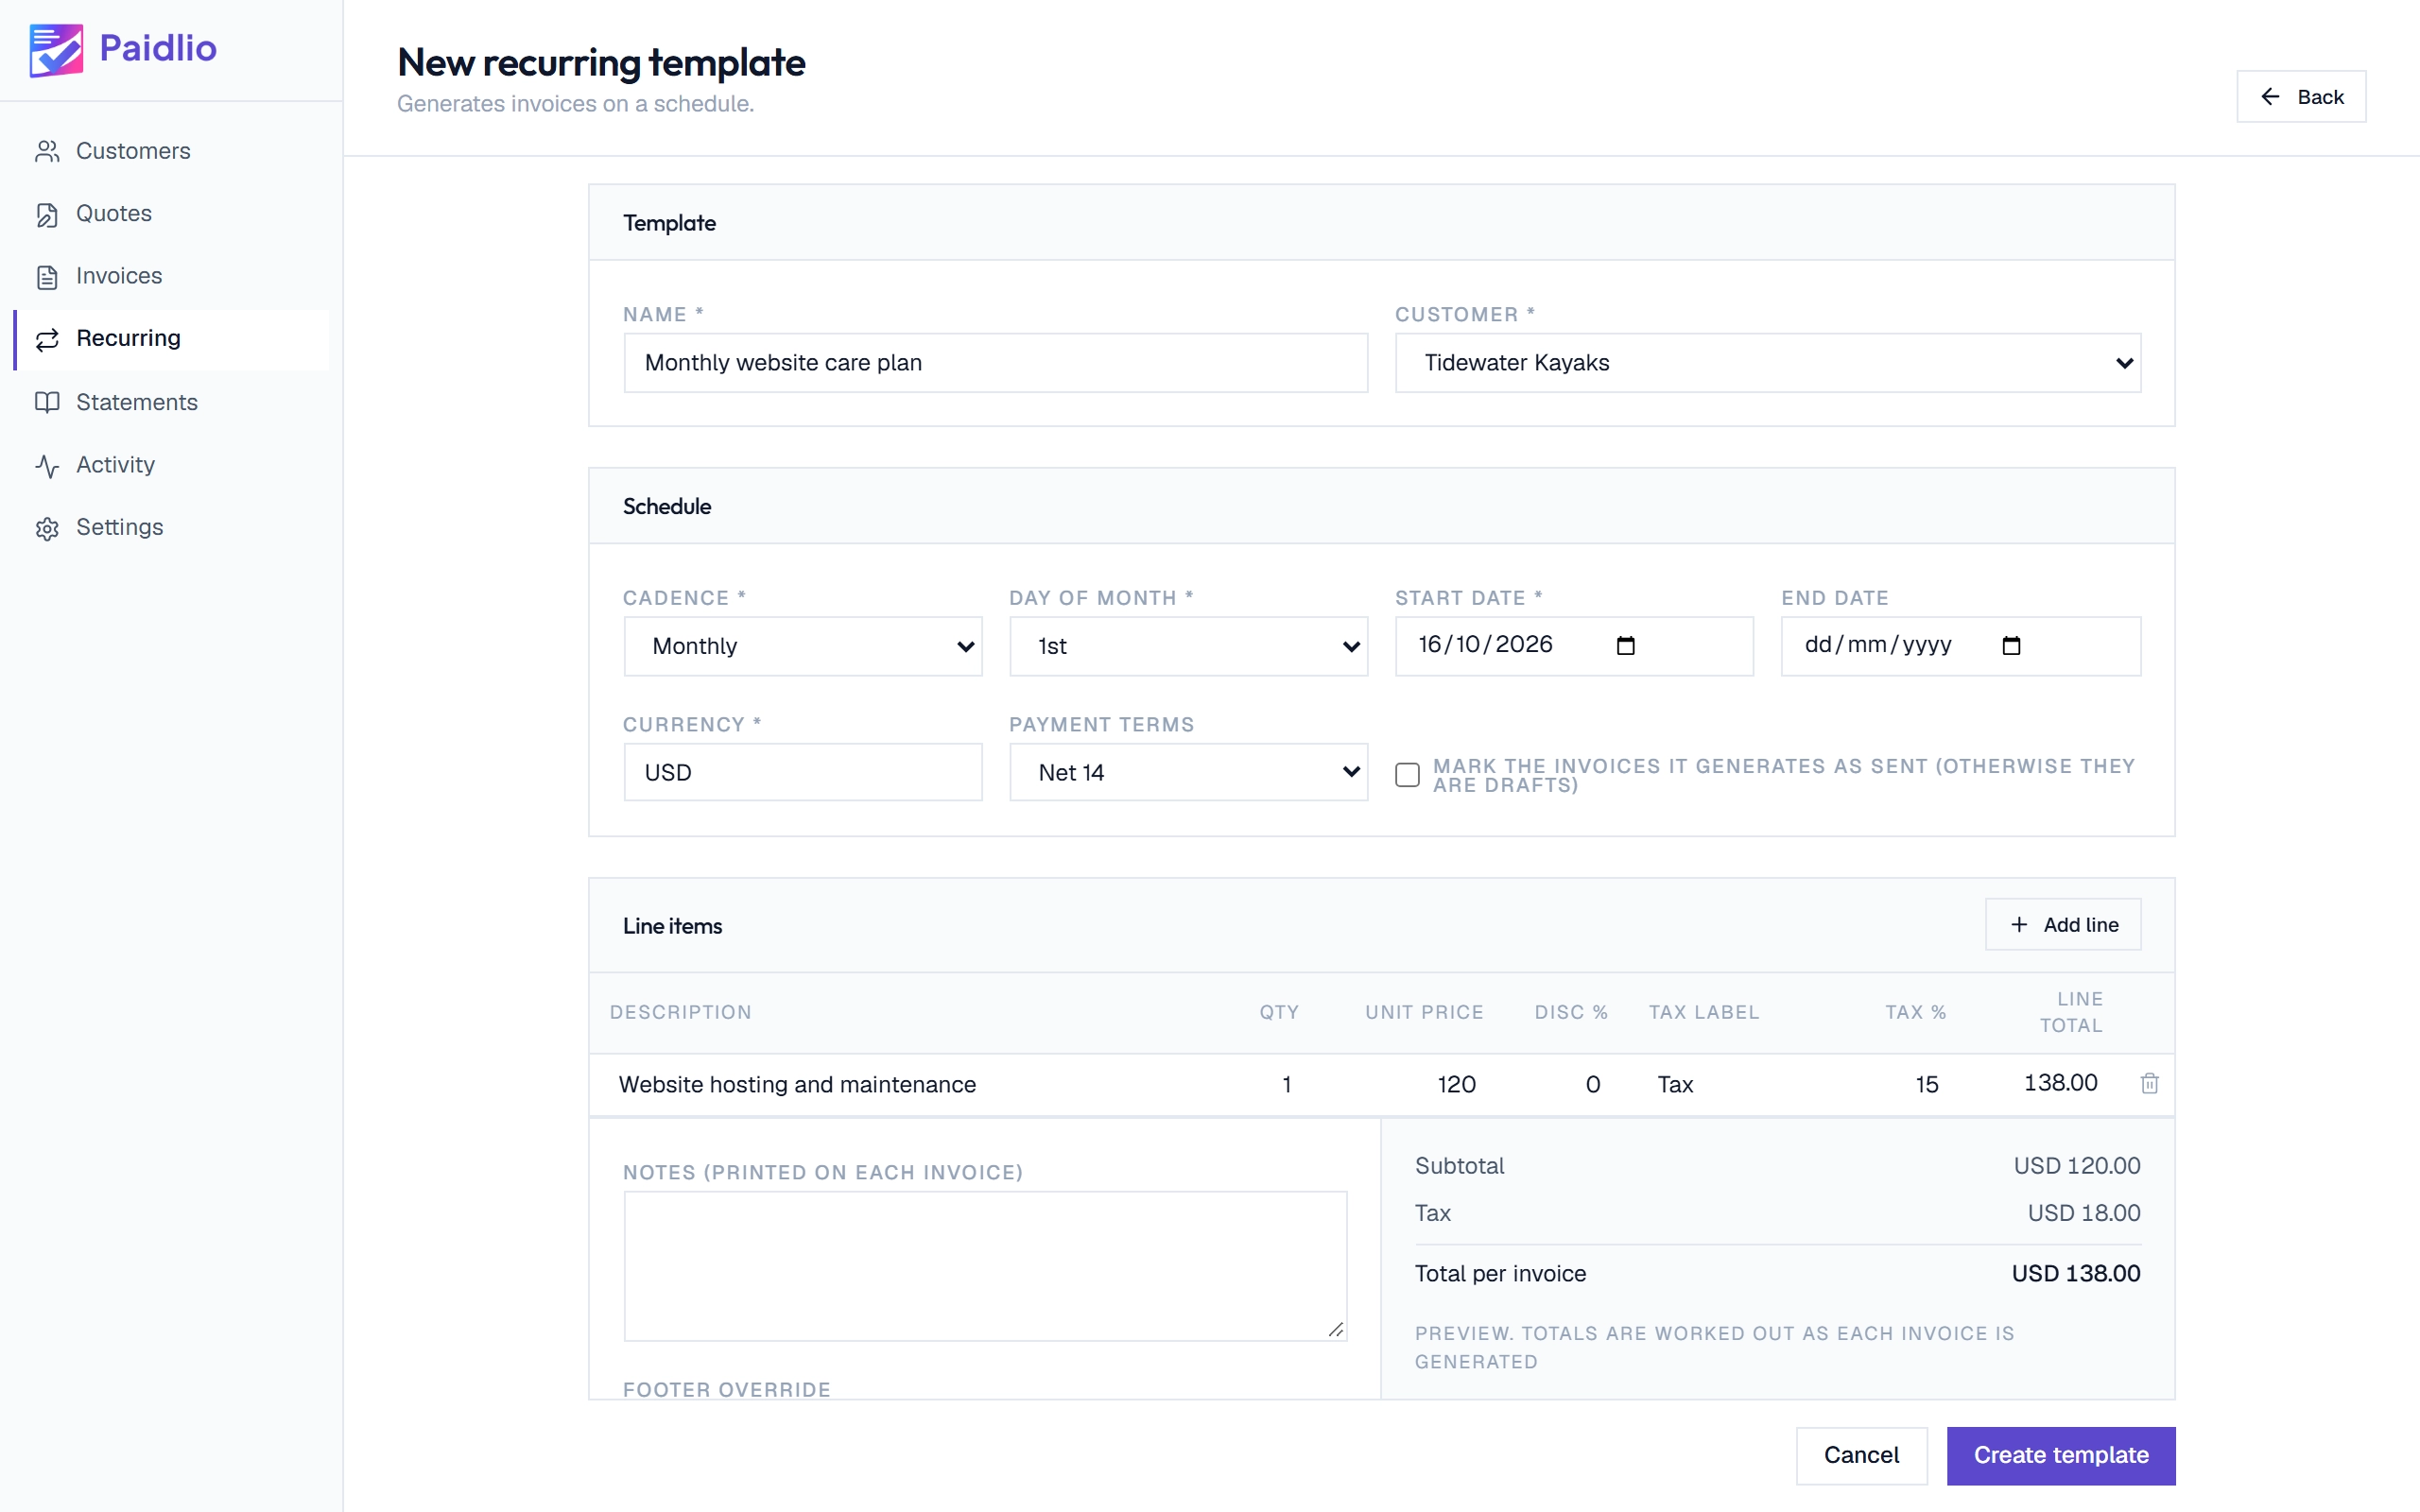
Set up recurring invoicesStep 3 of 3
Add the lines and create it
Line items work exactly as they do on an invoice. From then on Paidlio raises the invoice on the day it is due. If the app was not running that day, it catches up the next time you open it.
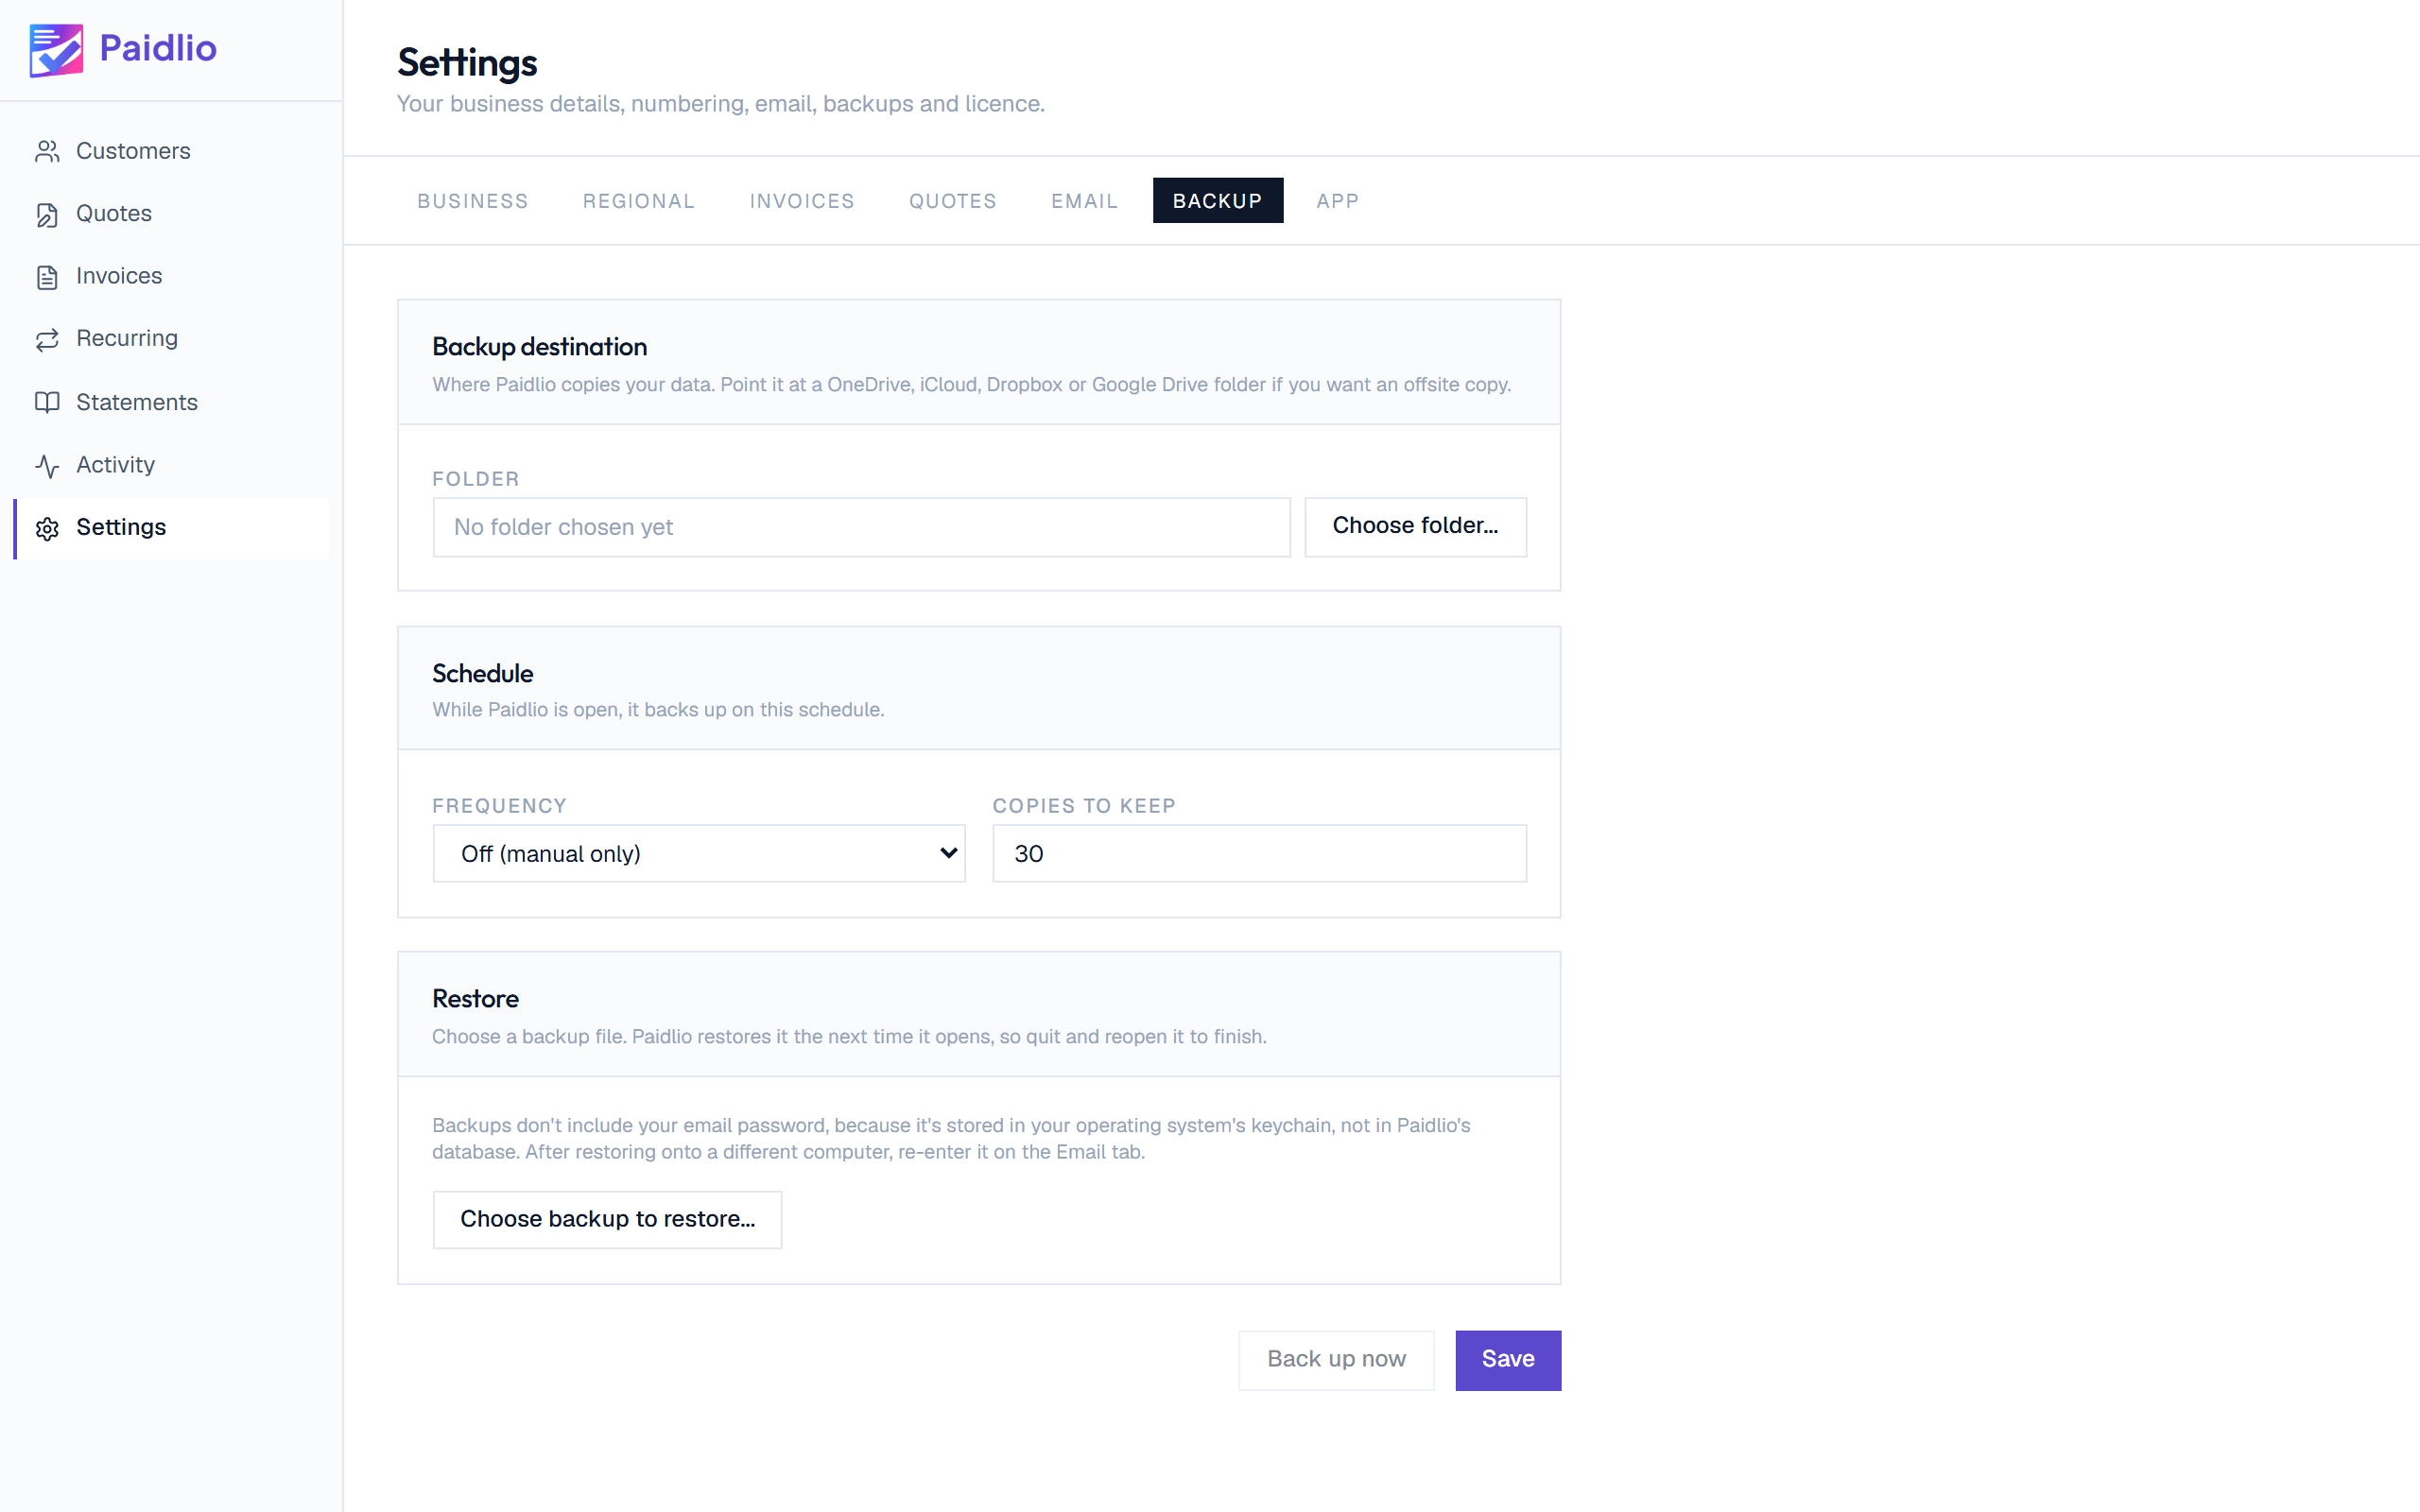
Back up your workStep 1 of 2
Choose a backup folder
Your data lives on your own computer, so give Paidlio a folder to copy it to. Pick one inside OneDrive, iCloud, Dropbox or Google Drive and your cloud sync keeps a copy somewhere else as well.
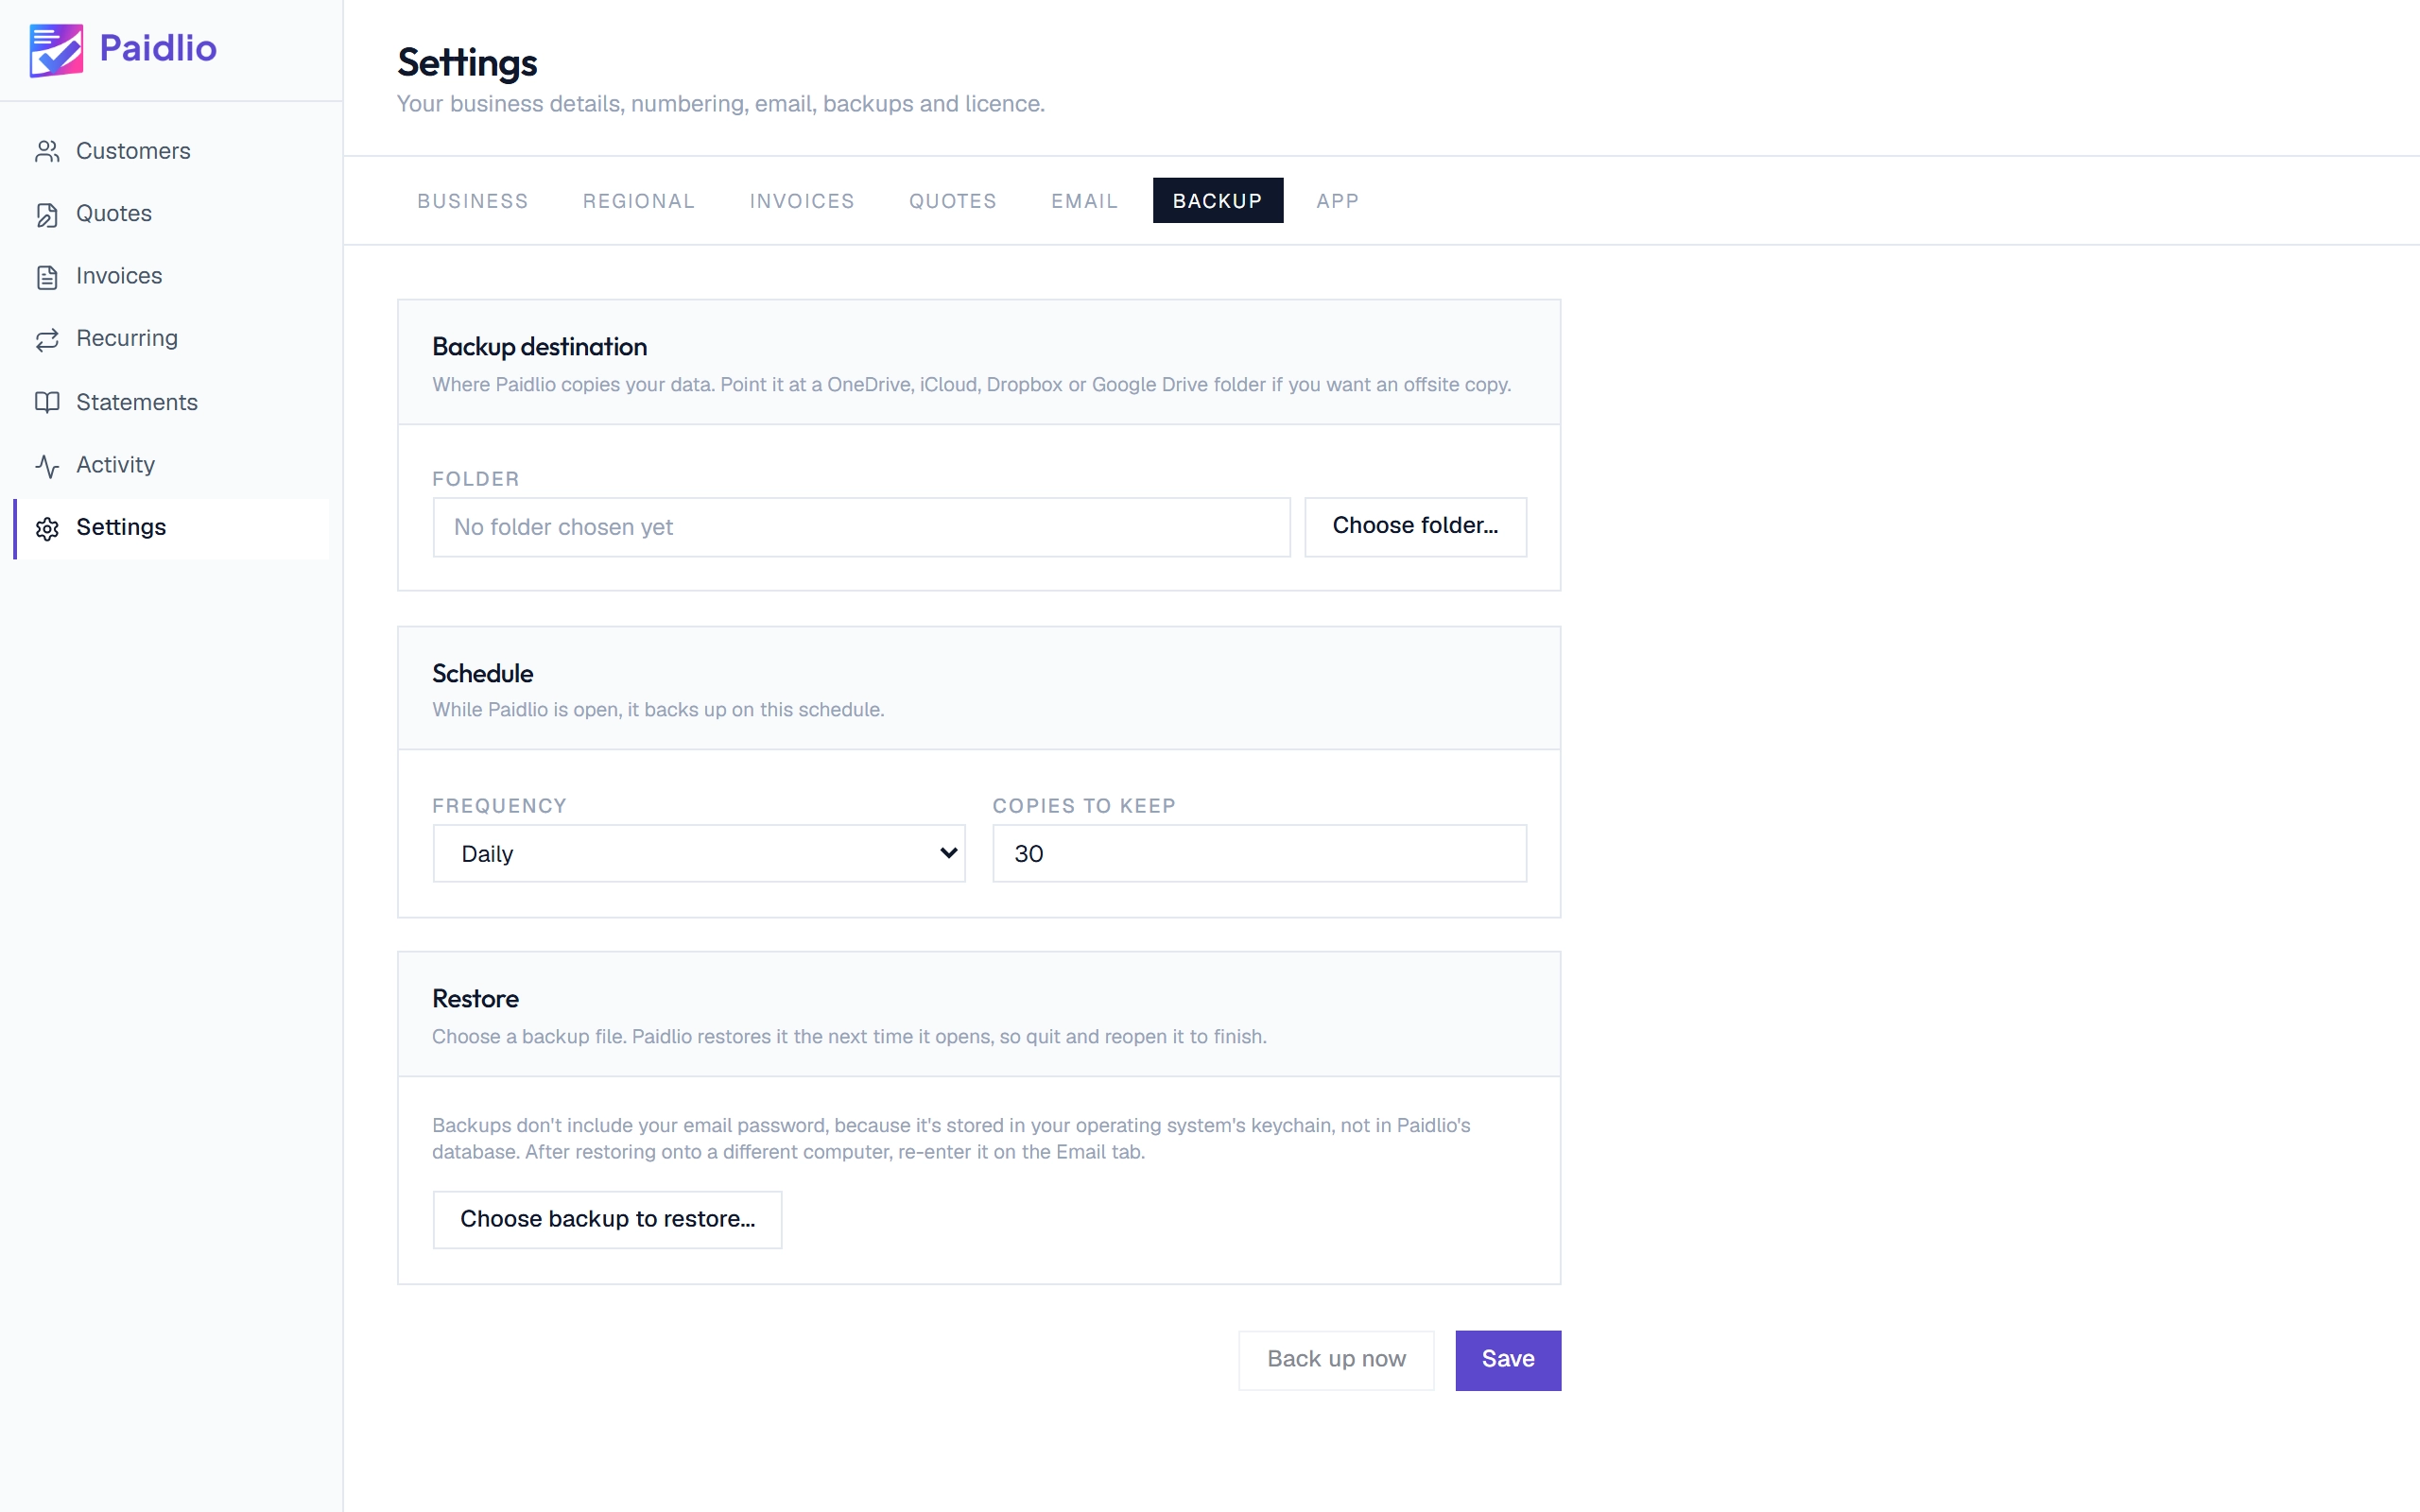
Back up your workStep 2 of 2
Set a schedule
Choose daily or weekly and how many copies to keep. Back up now makes one straight away, and Restore brings a backup back the next time Paidlio starts.
Activate your licenceStep 1 of 3
The trial runs for 14 days
A bar along the top counts down the trial, and everything works during those 14 days. When you have bought a licence, click Activate on the bar.
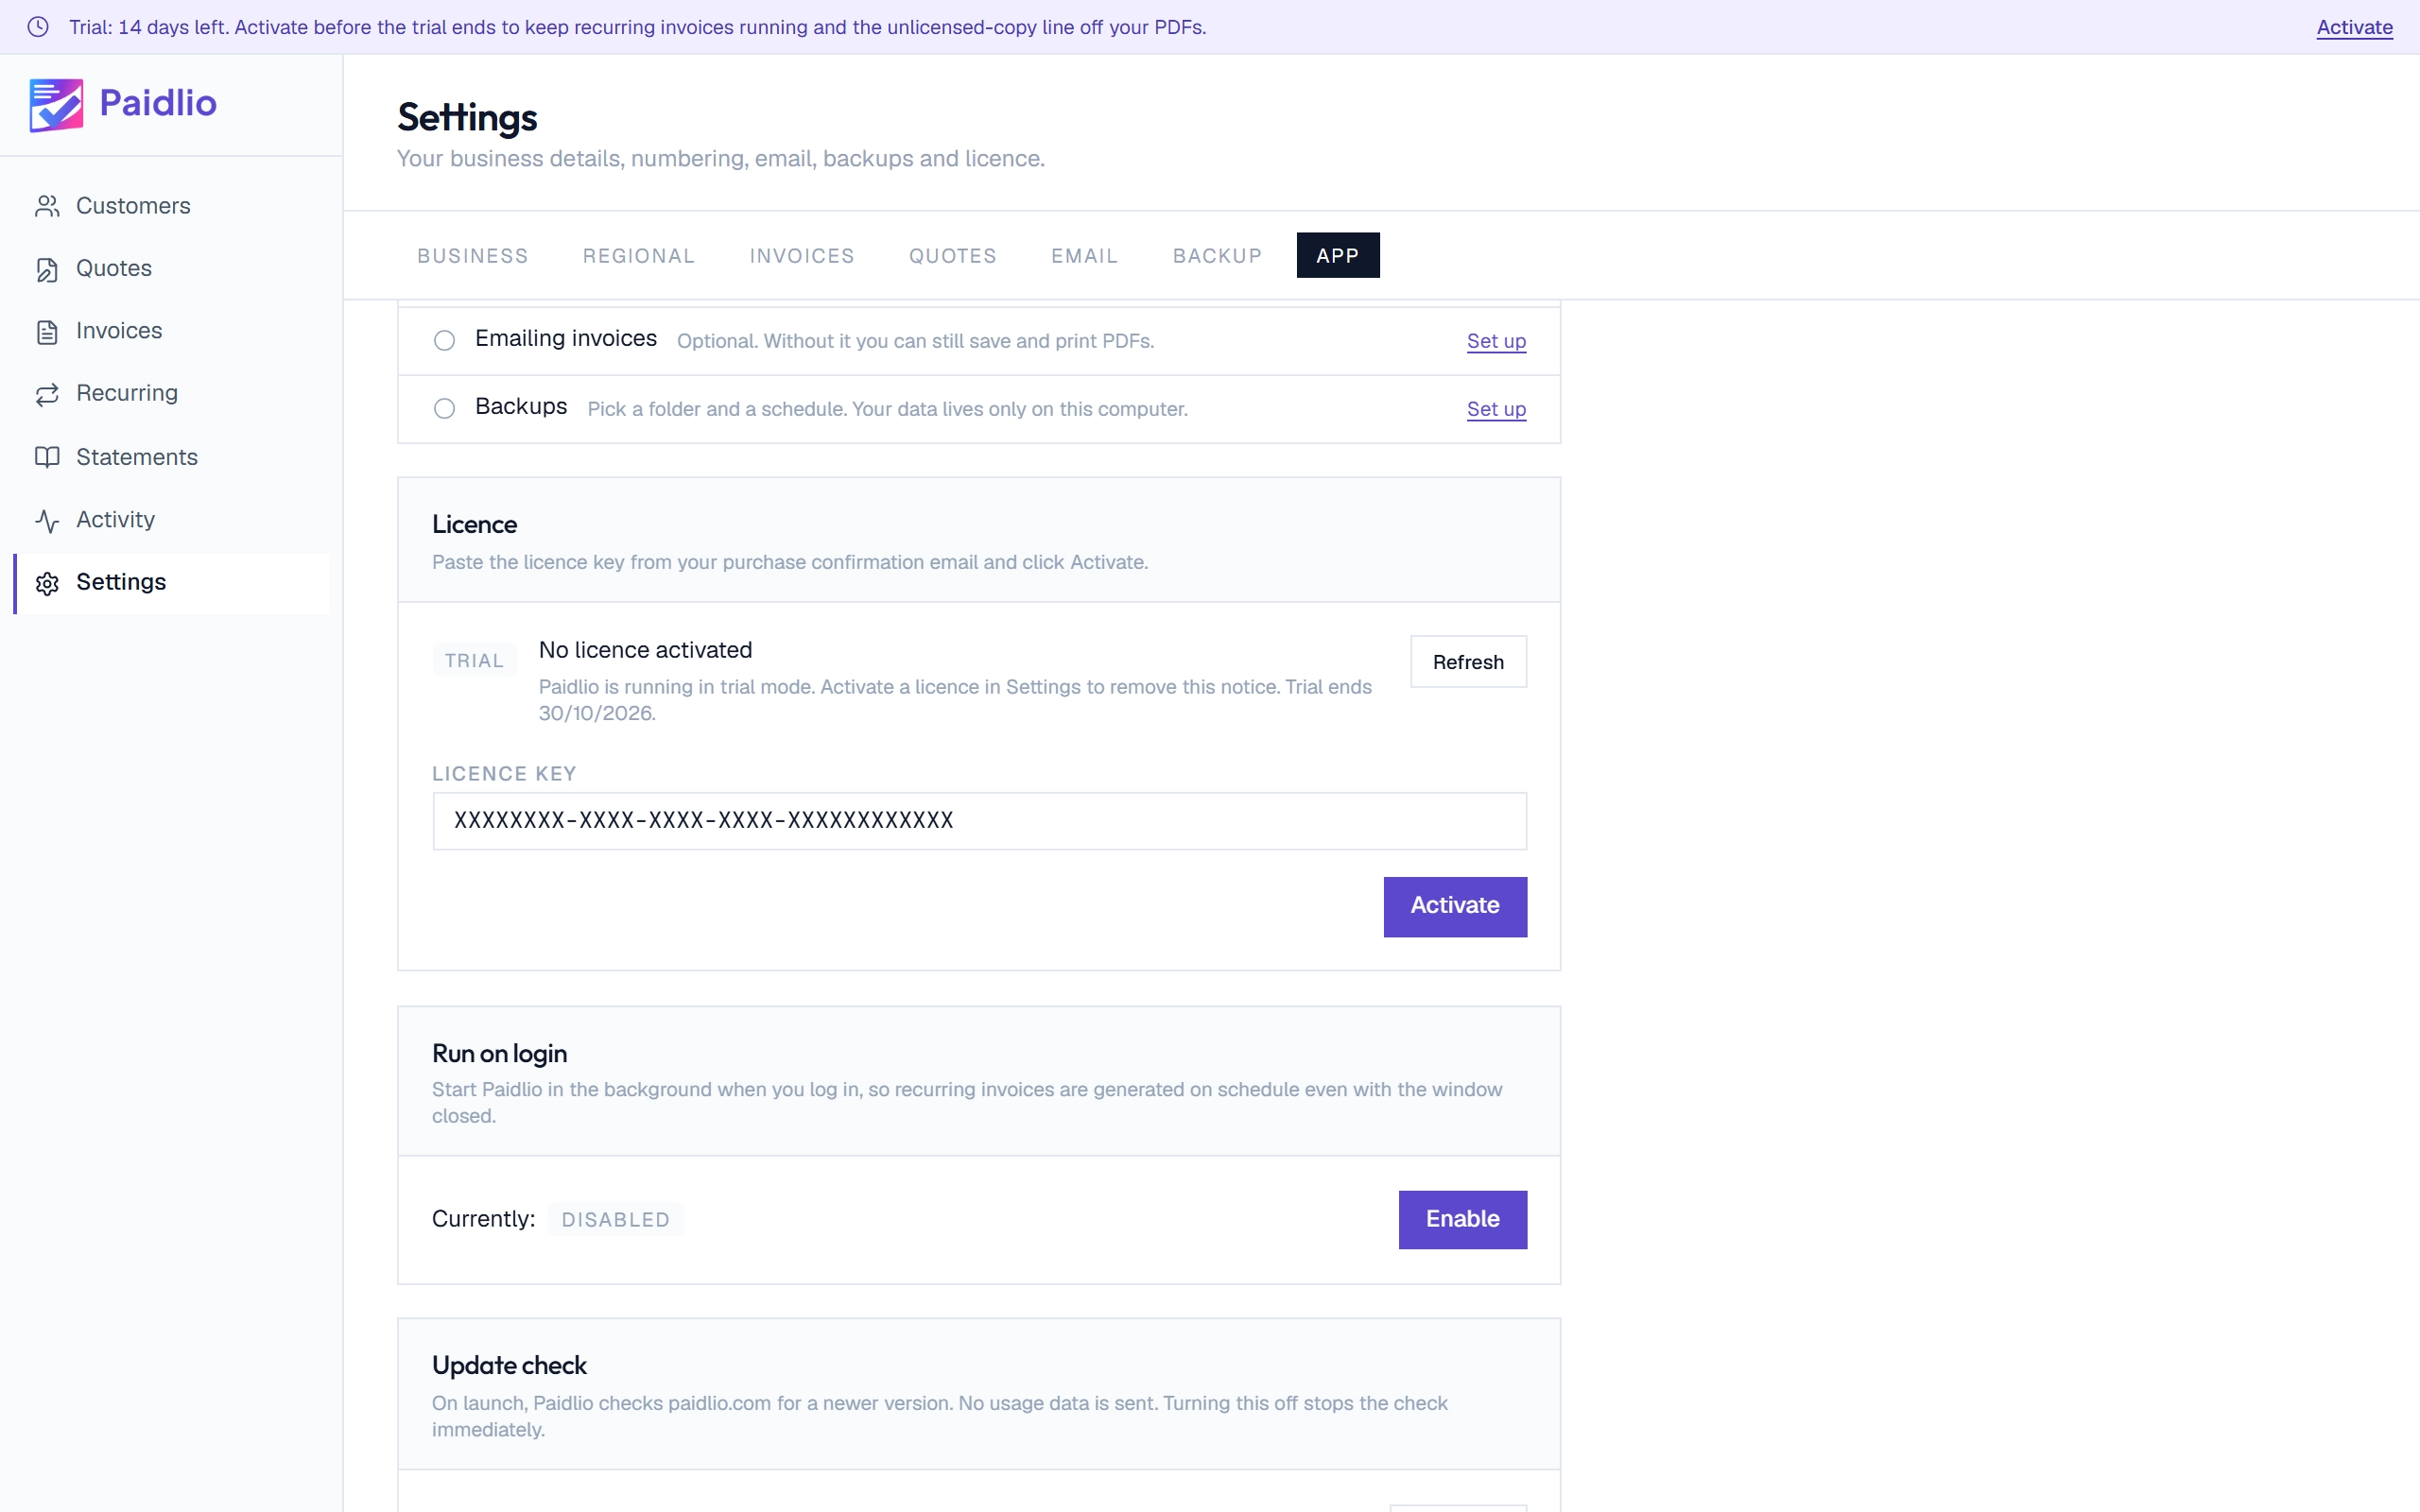
Activate your licenceStep 2 of 3
Paste your key and click Activate
Under Settings, App, paste the licence key from your purchase confirmation email and click Activate. It is one of the few moments Paidlio goes online.
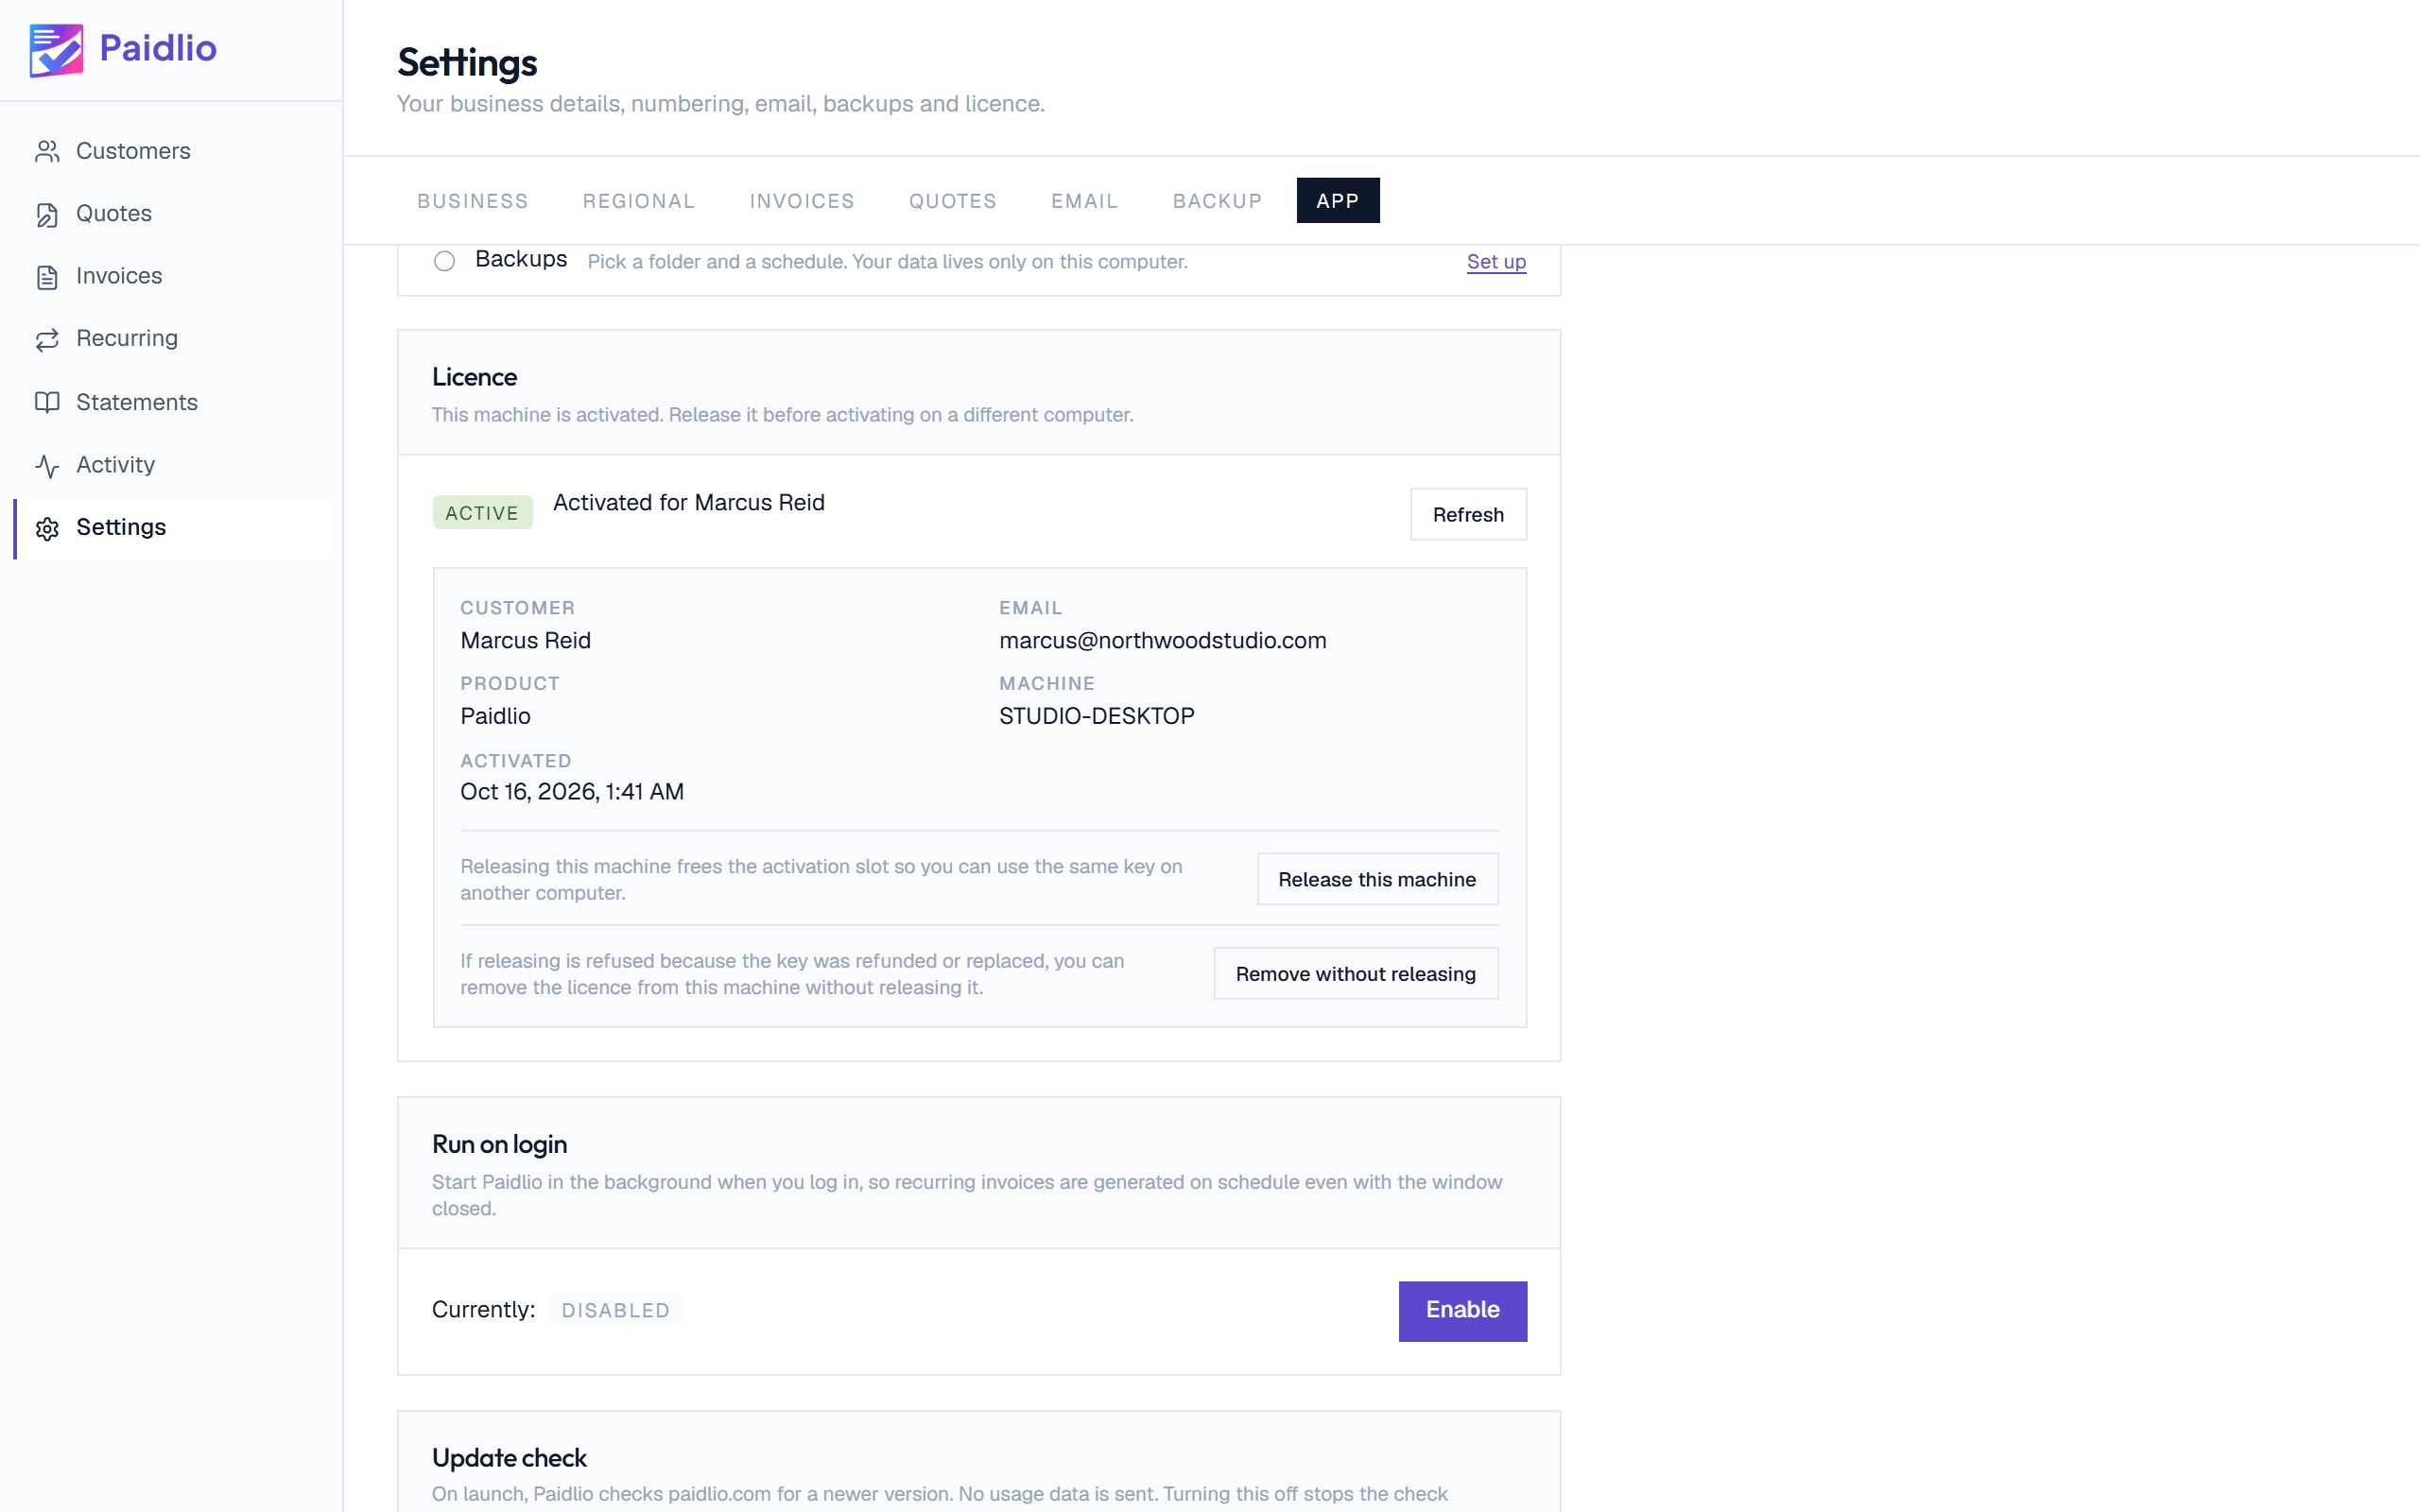
Activate your licenceStep 3 of 3
Moving to another computer
Once it is activated the bar goes away and Settings shows who the licence belongs to. Your licence covers the computers you work on yourself. If you replace one, click Release this machine first, then activate on the new one.
Keep Paidlio up to dateStep 1 of 1
Installing a new version
Installed from the Microsoft Store, Windows updates Paidlio for you. Downloaded from this site, a bar appears at the top when a new version is out. On macOS and Linux, click Download and install the new version over the old one. On Windows, from version 1.3.8, click Install update and Paidlio installs it and opens again. Your customers, invoices and settings stay where they are.
Good to know
- Can I try all of this before I buy?
- Yes. The trial runs for 14 days with everything in this guide switched on, and it does not ask for a card. Put real invoices through it and see whether it fits how you work.
- Which of these steps need an internet connection?
- Activating your licence and the check for a new version do, and so does downloading a new version when you click Install update. Emailing an invoice goes through your own mail provider. Everything else, from adding customers to saving PDFs and statements, works offline.
- Where do I get help if I get stuck?
- Send us a message through the contact form on the homepage and a person replies. Email support is included with your licence.
Try it on your own invoices
The trial runs for 14 days with everything you have just seen switched on, and it does not ask for a card. It is the same download as the full app, and your licence key unlocks it when you buy.